
MQTT的学习之Mosquitto安装和使用
Mosquitto是一个实现了MQTT3.1协议的代理服务器,由MQTT协议创始人之一的Andy Stanford-Clark开发,它为我们提供了非常棒的轻量级数据交换的解决方案。本文的主旨在于记录Mosquitto服务的安装和使用,以备日后查阅。
获取&安装
在Linux系统上安装Mosquitto,本人建议大家使用源码安装模式,最新的源码可从 http://mosquitto.org/files/source/ 地址中获取。解压之后,我们可以在源码目录里面找到主要的配置文件config.mk,其中包含了所有Mosquitto的安装选项,详细的参数说明如下:


# 是否支持tcpd/libwrap功能.
#WITH_WRAP:=yes

# 是否开启SSL/TLS支持
#WITH_TLS:=yes

# 是否开启TLS/PSK支持
#WITH_TLS_PSK:=yes

# Comment out to disable client client threading support.
#WITH_THREADING:=yes

# 是否使用严格的协议版本(老版本兼容会有点问题)
#WITH_STRICT_PROTOCOL:=yes

# 是否开启桥接模式
#WITH_BRIDGE:=yes

# 是否开启持久化功能
#WITH_PERSISTENCE:=yes

# 是否监控运行状态
#WITH_MEMORY_TRACKING:=yes
这里需要注意的是,默认情况下Mosquitto的安装需要OpenSSL的支持;如果不需要SSL,则需要关闭config.mk里面的某些与SSL功能有关的选项(WITH_TLS、WITH_TLS_PSK)。接着,就是运行make install进行安装,完成之后会在系统命令行里发现mosquitto、mosquitto_passwd、mosquitto_pub和mosquitto_sub四个工具(截图如下),分别用于启动代理、管理密码、发布消息和订阅消息。

安装其他依赖包:
yum install gcc gcc-c++ libstdc++-devel

yum install openssl-devel -y

yum install c-ares-devel -y

yum install uuid-devel -y

yum install libuuid-devel -y
安装mosquitto:
1、切换到/home/tool/sourceDir/mosquitto-1.4.14目录下
2、make && make install
3、安装完以后切换到 /etc 目录下查看:
4、切换到 /etc/mosquitto目录下,执行
cp mosquitto.conf.example mosquitto.conf
5、mosquitto参数详细说明:
# =================================================================
# General configuration
# =================================================================

# 客户端心跳的间隔时间
#retry_interval 20

# 系统状态的刷新时间
#sys_interval 10

# 系统资源的回收时间,0表示尽快处理
#store_clean_interval 10

# 服务进程的PID
#pid_file /var/run/mosquitto.pid

# 服务进程的系统用户
#user mosquitto

# 客户端心跳消息的最大并发数
#max_inflight_messages 10

# 客户端心跳消息缓存队列
#max_queued_messages 100

# 用于设置客户端长连接的过期时间,默认永不过期
#persistent_client_expiration

# =================================================================
# Default listener
# =================================================================

# 服务绑定的IP地址
#bind_address

# 服务绑定的端口号
#port 1883

# 允许的最大连接数,-1表示没有限制
#max_connections -1

# cafile:CA证书文件
# capath:CA证书目录
# certfile:PEM证书文件
# keyfile:PEM密钥文件
#cafile
#capath
#certfile
#keyfile

# 必须提供证书以保证数据安全性
#require_certificate false

# 若require_certificate值为true,use_identity_as_username也必须为true
#use_identity_as_username false

# 启用PSK(Pre-shared-key)支持
#psk_hint

# SSL/TSL加密算法,可以使用“openssl ciphers”命令获取
# as the output of that command.
#ciphers

# =================================================================
# Persistence
# =================================================================

# 消息自动保存的间隔时间
#autosave_interval 1800

# 消息自动保存功能的开关
#autosave_on_changes false

# 持久化功能的开关
persistence true

# 持久化DB文件
#persistence_file mosquitto.db

# 持久化DB文件目录
#persistence_location /var/lib/mosquitto/

# =================================================================
# Logging
# =================================================================

# 4种日志模式:stdout、stderr、syslog、topic
# none 则表示不记日志,此配置可以提升些许性能
log_dest none

# 选择日志的级别(可设置多项)
#log_type error
#log_type warning
#log_type notice
#log_type information

# 是否记录客户端连接信息
#connection_messages true

# 是否记录日志时间
#log_timestamp true

# =================================================================
# Security
# =================================================================

# 客户端ID的前缀限制,可用于保证安全性
#clientid_prefixes

# 允许匿名用户
#allow_anonymous true

# 用户/密码文件,默认格式:username:password
#password_file

# PSK格式密码文件,默认格式:identity:key
#psk_file

# pattern write sensor/%u/data
# ACL权限配置,常用语法如下:
# 用户限制:user <username>
# 话题限制:topic [read|write] <topic>
# 正则限制:pattern write sensor/%u/data
#acl_file

# =================================================================
# Bridges
# =================================================================

# 允许服务之间使用“桥接”模式(可用于分布式部署)
#connection <name>
#address <host>[:<port>]
#topic <topic> [[[out | in | both] qos-level] local-prefix remote-prefix]

# 设置桥接的客户端ID
#clientid

# 桥接断开时,是否清除远程服务器中的消息
#cleansession false

# 是否发布桥接的状态信息
#notifications true

# 设置桥接模式下,消息将会发布到的话题地址
# $SYS/broker/connection/<clientid>/state
#notification_topic

# 设置桥接的keepalive数值
#keepalive_interval 60

# 桥接模式,目前有三种:automatic、lazy、once
#start_type automatic

# 桥接模式automatic的超时时间
#restart_timeout 30

# 桥接模式lazy的超时时间
#idle_timeout 60

# 桥接客户端的用户名
#username

# 桥接客户端的密码
#password

# bridge_cafile:桥接客户端的CA证书文件
# bridge_capath:桥接客户端的CA证书目录
# bridge_certfile:桥接客户端的PEM证书文件
# bridge_keyfile:桥接客户端的PEM密钥文件
#bridge_cafile
#bridge_capath
#bridge_certfile
#bridge_keyfile
5、启动mosquitto服务:
mosquitto -c /etc/mosquitto/mosquitto.conf
或
mosquitto -c /etc/mosquitto/mosquitto.conf -v -d
6、查看端口:

7、至此,mosquitto安装,启动完毕!
补充问题:
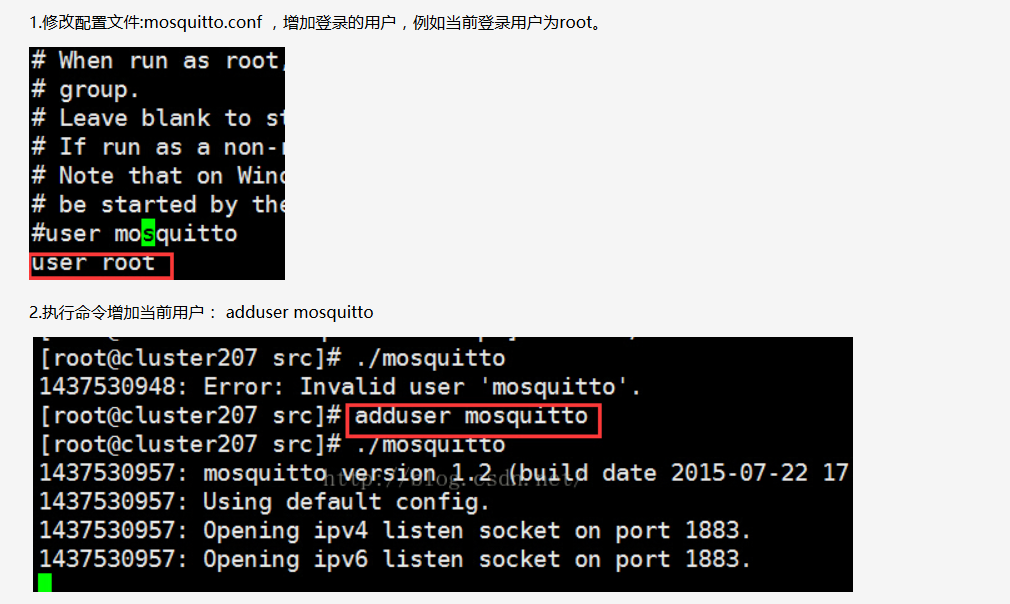
1、在启动过程中报错:
Error: Invalid user 'mosquitto'.
解决方法:
2、重启Mosquitto
笔者在网上找了很多资料都没有提起怎样重启服务器,并且在官网上也没有相应命令提示。
所以我们使用Liunx终止进程命令,强行退出。
[root@localhost ~]# ps -A | grep mosquitto
21674 ?        00:02:38 mosquitto
[root@localhost ~]# kill -9 21674
编译过程中问题:
1. ssh.h找不到。我之前安装了openssl,为什么还会报这个错误呢,因为我安装好了以后并没有配置环境变量 下面的命令是安装开发环境,执行此命令,上面的openssl就可以不安装了
yum install openssl-devel
2.ares.h找不到
yum install c-ares-devel
3.#include <uuid/uuid.h> 找不到文件解决方法:
yum install e2fsprogs-devel
yum install uuid-devel
yum install libuuid-devel
调测问题:
1、报错./mosquitto_sub: error while loading shared libraries: libmosquitto.so.1: cannot open shared object file: No such file or directory
解决:执行以下命令:
sudo ln -s /usr/local/lib/libmosquitto.so.1 /usr/lib/libmosquitto.so.1
ldconfig

调测步骤:
1、先开启一个客户端,模拟broker

2、再开启一个客户端,模拟订阅

3、最后开启一个客户端,模拟发布

4、订阅界面可以实时收到发布消息
原文链接: https://www.cnblogs.com/iot-arking/p/13230597.html
欢迎关注
微信关注下方公众号,第一时间获取干货硬货;公众号内回复【pdf】免费获取数百本计算机经典书籍;
也有高质量的技术群,里面有嵌入式、搜广推等BAT大佬

原创文章受到原创版权保护。转载请注明出处:https://www.ccppcoding.com/archives/362040
非原创文章文中已经注明原地址,如有侵权,联系删除
关注公众号【高性能架构探索】,第一时间获取最新文章
转载文章受原作者版权保护。转载请注明原作者出处!