
我们仍然如前例一样,构建一个类来处理得到直方图。
我们来看看基本的类定义
#ifndef HISTOGRAM_H_#define HISTOGRAM_H_#include <opencv2/core/core.hpp>#include <opencv2/highgui/highgui.hpp>#include <opencv2/imgproc/imgproc.hpp>#include <iostream>#include <vector>class Histogram {private: int histSize[1]; float hrangee[2]; const float* ranges[1]; int channels[1];protected: cv::Mat getHistogram(const cv::Mat&);public: Histogram(); cv::Mat getHistogramImage(const cv::Mat&, int channel = 0);};#endif /* HISTOGRAM_H_ */
类的实现
#include "Histogram.h"Histogram::Histogram() { histSize[0] = 256; hrangee[0] = 0.0; hrangee[1] = 255.0; ranges[0] = hrangee; channels[0] = 0;}cv::Mat Histogram::getHistogram(const cv::Mat& image){ cv::MatND hist; cv::calcHist(&image, 1, channels, cv::Mat(), hist, 1, histSize, ranges); return hist;}cv::Mat Histogram::getHistogramImage(const cv::Mat& image, int channel){ std::vector<cv::Mat> planes; cv::split(image,planes); cv::Scalar color; if(planes.size() == 1){ channel = 0; color = cv::Scalar(0,0,0); }else{ color = cv::Scalar(channel==0?255:0, channel==1?255:0, channel==2?255:0); } cv::MatND hist = getHistogram(planes[channel]); double maxVal = 0; double minVal = 0; cv::minMaxLoc(hist, &minVal, &maxVal, 0, 0); cv::Mat histImg(histSize[0], histSize[0], CV_8UC3, cv::Scalar(255,255,255)); int hpt = static_cast<int>(0.9*histSize[0]); for(int h=0; h<histSize[0]-1; h++){ float binVal = hist.at<float>(h); float binVal2 = hist.at<float>(h+1); int intensity = static_cast<int>(binVal*hpt/maxVal); int intensity2 = static_cast<int>(binVal2*hpt/maxVal); cv::line(histImg, cv::Point(h,histSize[0]-intensity), cv::Point(h,histSize[0]-intensity2), color); } return histImg;}
这里面要用的几个函数在这里列出:
C++:voidminMaxLoc(const SparseMat& src, double minVal, double maxVal, int minIdx=0, int maxIdx=0)
其作用是寻找一个矩阵中最大和最小值,并得到它们的位置
C++:voidsplit(const Mat& mtx, vector
把一个多通道矩阵分成几个单通道矩阵,在这里主要用于计算各通道的直方图
C++:voidcalcHist(const Mat arrays, int narrays, const int channels, InputArray mask, OutputArray hist, int dims, const int histSize, const float ranges, bool uniform=true, bool accumulate*=false)
计算直方图,各参数含义可在参考文档中查到
Parameters:
- arrays – Source arrays. They all should have the same depth,CV_8UorCV_32F, and the same size. Each of them can have an arbitrary number of channels.
- narrays – Number of source arrays.
- channels – List of thedimschannels used to compute the histogram. The first array channels are numerated from 0 toarrays[0].channels()-1, the second array channels are counted fromarrays[0].channels()toarrays[0].channels()+arrays[1].channels()-1, and so on.
- mask – Optional mask. If the matrix is not empty, it must be an 8-bit array of the same size asarrays[i]. The non-zero mask elements mark the array elements counted in the histogram.
- hist – Output histogram, which is a dense or sparsedims-dimensional array.
- dims – Histogram dimensionality that must be positive and not greater thanCV_MAX_DIMS(equal to 32 in the current OpenCV version).
- histSize – Array of histogram sizes in each dimension.
- ranges – Array of thedimsarrays of the histogram bin boundaries in each dimension. When the histogram is uniform (uniform=true), then for each dimensioniit is enough to specify the lower (inclusive) boundary

 of the 0-th histogram bin and the upper (exclusive) boundary for the last histogram binhistSize[i]-1. That is, in case of a uniform histogram each ofranges[i]is an array of 2 elements. When the histogram is not uniform (uniform=false), then each ofranges[i]containshistSize[i]+1elements:
 ![L_0, U_0=L_1, U_1=L_2, ..., U_{texttt{histSize[i]}-2}=L_{texttt{histSize[i]}-1}, U_{texttt{histSize[i]}-1}](http://opencv.itseez.com/_images/math/2b32e933a4da6b24d4c0e39c8857367ef58224e4.png) . The array elements, that are not between and , are not counted in the histogram.
. The array elements, that are not between and , are not counted in the histogram. - uniform – Flag indicatinfg whether the histogram is uniform or not (see above).
- accumulate – Accumulation flag. If it is set, the histogram is not cleared in the beginning when it is allocated. This feature enables you to compute a single histogram from several sets of arrays, or to update the histogram in time.
我们来看看主程序
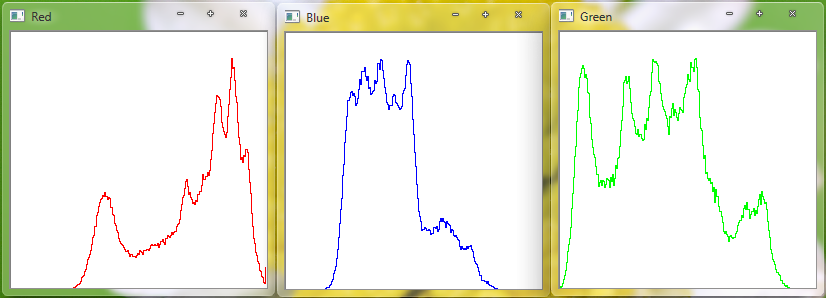
#include "Histogram.h"int main(){ cv::Mat image = cv::imread("E:/Image/Lena.jpg"); Histogram h; cv::namedWindow("Red"); cv::namedWindow("Blue"); cv::namedWindow("Green"); cv::namedWindow("Original"); cv::imshow("Original",image); cv::imshow("Red",h.getHistogramImage(image,2)); cv::imshow("Green",h.getHistogramImage(image,1)); cv::imshow("Blue",h.getHistogramImage(image)); cv::waitKey(0); return 0;}
运行效果如下:
原文链接: https://www.cnblogs.com/xianglan/archive/2011/08/03/2126092.html
欢迎关注
微信关注下方公众号,第一时间获取干货硬货;公众号内回复【pdf】免费获取数百本计算机经典书籍
原创文章受到原创版权保护。转载请注明出处:https://www.ccppcoding.com/archives/29879
非原创文章文中已经注明原地址,如有侵权,联系删除
关注公众号【高性能架构探索】,第一时间获取最新文章
转载文章受原作者版权保护。转载请注明原作者出处!