
1. 委托构造函数
委托构造函数允许在同一个类中,一个构造函数可以调用另一个构造函数,从而可以在初始化的时候简化变量的初始化。
例如:定义一个test类
// ConsoleApplication1.cpp : 定义控制台应用程序的入口点。
#include "stdafx.h"
#include <iostream>
#include <type_traits>
#include <string>

using namespace std;

class test
{
public:
    test();
    test(int a);
    test(int a, double b);
    test(int a, double b, string c);
    ~test();

private:
    int a;
    double b;
    string c;
};

test::test(){}     // 无参构造函数
test::test(int a)
{
    this->a = a;
}

test::test(int a, double b) : test(a)   // 委托构造函数
{
    // 在构造函数中调用构造函数
    this->b = b;
}

test::test(int a, double b, string c) : test(a, b)   // 委托构造函数
{
    // 在构造函数中调用构造函数
    this->c = c;
}

test::~test(){}

int main()
{
    test t(1, 2.0, "hello");
    return 0;
}
需要注意,这种链式调用构造函数不能形成一个环。否则会在运行期抛出异常。且调用了委托构造函数,就不能使用类成员初始化了。
test::test(int a, double b, string c) : test(a, b), c("hello") {} //error
继承构造函数:
继承构造函数可以让派生类直接使用基类的构造函数,而无需再自定构造函数,尤其是在积累有大量的构造函数的时候,可以简化代码的编写。如果有一个派生类,且希望这个派生类采取和基类一样的构造函数,那么直接派生于基类是不能够获取基类的构造函数的,因为派生类会隐藏基类的构造函数,所以通过基类构造函数去构造派生类对象是不合法的,派生类的构造函数隐藏了基类的构造函数,所以需要在派生类中定义这些构造函数。
// ConsoleApplication1.cpp : 定义控制台应用程序的入口点。
#include "stdafx.h"
#include <iostream>
#include <type_traits>
#include <string>

using namespace std;

struct test_base    // 定义基类
{
    int x;
    double y;
    string z;

    test_base() {}
    test_base(int px) :x(px) {}
    test_base(int px, double py) : x(px), y(py) {}
    test_base(int px, double py, string pz) :x(px), y(py), z(pz) {}
};

// 继承
struct test : test_base
{
    // 定义构造函数
    test() : test_base() {}
    test(int px) :test_base(px) {}
    test(int px, int py) :test_base(px, py) {}
    test(int px, double py, string pz) :test_base(px, py, pz) {}
};

int main()
{
    test t(1, 2.3, "hello");
    return 0;
}
对于上面的写法,C++11提供了更加简洁的形式,可以用过using来表示使用基类的构造函数:
// ConsoleApplication1.cpp : 定义控制台应用程序的入口点。
#include "stdafx.h"
#include <iostream>
#include <type_traits>
#include <string>

using namespace std;

struct test_base    // 定义基类
{
    int x;
    double y;
    string z;

    test_base() {}
    test_base(int px) :x(px) {}
    test_base(int px, double py) : x(px), y(py) {}
    test_base(int px, double py, string pz) :x(px), y(py), z(pz) {}
};

// 继承
struct test : test_base
{
    // 定义构造函数
    using test_base::test_base;    // using 声明使用基类的构造函数
};

int main()
{
    test t(1, 2.3, "hello");
    return 0;
}
原始字面量
原始字面量可以直接表示字符串的实际含义,因为有些字符串带有一些特殊字符,比如转义字符串,往往需要专门处理,现在可以通过原始字符串字面量R得到其原始的意义。
int main()
{
    string str = "D:\A\B\test.txt";
    cout << str << endl;

    string str1 = R"(D:\A\B\test.txt)";   // 原始的字面量
    cout << str1 << endl;

    return 0;
}
输出结果: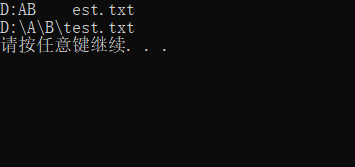

final和override标识符
final标识符用来限制某个类不能被继承,或者某个虚函数不能被重写,且finall只能修饰虚函数,并且要放到类或者函数的后面:
struct A
{
    virtual void foo() final;   // 不能重写
    void bar();   // 不能使用final
};

struct B final :A
{
    void foo();    // error, foo不能重写
};

struct C:B        // error B不能作为基类被继承
{

};
override标识符确保在派生类中声明的重写函数与基类中的虚函数具有相同的签名,同时,也明确表明会重写基类中的虚函数。override的主要作用是防止因为疏忽把本来想重写的积累中的虚函数声明成重载,这样,即可以确保重写虚函数的正确定,又提高了可读性。
struct A
{
    virtual void func() {}
};

struct B:A
{
    void func() override
    {

    }
};
内存对齐
内存对齐,或者说字节对齐,是一个数据类型所能存放的内存地址的属性。这个属性是一个无符号整数,并且这个整数必须是2的N次方,当我们说一个数据类型的内存对齐为8时,就是说这个数据类型所定义出来的所有变量的内存地址都是8的倍数。
当一个基本数据类型的对齐属性和这个数据类型的大小相等的时候,这种对齐方式称为自然对齐,例如,int类型的大小为4,默认情况下它的对齐属性也是4.
那么为什么要内存对齐?(详细描述一下)
因为并不是每一个硬件平台都能够随便访问任意位置的内存,不少平台的cpu,若读取的数据是未对齐的,将拒绝访问或这抛出硬件异常。CPU处理内存的方式是,以32为CPU为例,它一个时钟周期可以读取4个连续的内存单元,也就是4字节,使用字节对齐将会提高系统的性能,即CPU读取内存的效率。,举个例子,将一个int类型的数据放到奇数内存位置上,想把这四个字节读取出来,32位的CPU需要两次。但是如果按照4字节对齐的话一次就可以读取出来。
因为内存对齐的缘故,数据在内存中的存放就不是紧挨着的,而是会出现一些空隙,这对基本数据类型来说还好,而对于一个内部有多个基本类型的结构体或者类而言,sizeof的结果往往和想象的不一样。
struct MyStruct
{
    char a;       // 1 byte
    int b;        // 4 byte
    short c;      // 2 byte
    long long d;  // 8 byte
    char e;       // 1 byte
};
这个结构体的大小按理说应该是16,但是在32位MSVC下是32,这是因为为了保证结构体中每个成员都应该在它对齐了的内存位置上,而在某一位置插入了Padding(填充)
所以在char,int之间,short和long long之间分别插入了一些padding。不同的平台可能会采用不同的对齐值,会导致结构体的大小不同,但是结构体的整体大小一定能被对齐值整除。
那么结构体类型本身的内存对齐值是多少,怎么确定:
实际上,为了保证结构体内每个数据成员都能够放在它自然对齐的位置上,对结构体本身来说最理想的内存对齐数值应该是结构体中内存对齐数值最大的成员的内存对齐数。也就是说,上面的结构体最大的内存对齐数是8
C++11新增的便利算法:
只介绍一些常用的:其他的可以参考:https://en.cppreference.com/w/cpp/algorithm
1. all_of, any_of, none_of
template< class InputIt, class UnaryPredicate >
bool all_of(InputIt first, InputIt last, UnaryPredicate p);

template< class InputIt, class UnaryPredicate >
bool any_of(InputIt first, InputIt last, UnaryPredicate p);

template< class InputIt, class UnaryPredicate >
bool none_of(InputIt first, InputIt last, UnaryPredicate p);
其中:
all_of用于判断区间[first, last)范围内的所有元素是否满足判别式, 所有满足,返回true,否则返回false
any_of用于判断区间[first, last)范围内是否至少有一个元素是否满足判别式,若有满足,返回true,否则返回false
none_of用于判断区间[first, last)范围内的所有元素都不满足判别式, 所有都不满足,返回true,否则返回false
// ConsoleApplication1.cpp : 定义控制台应用程序的入口点。
#include "stdafx.h"
#include <iostream>
#include <vector>
#include <algorithm>

using namespace std;


int main()
{
    vector<int> v = {1,2,3,4,5,6,7,8,9};
    bool all_even = std::all_of(v.begin(), v.end(), [](int i) {return i % 2 != 0; });
    if (all_even)
    {
        cout << "all is even" << endl;
    }
    else
    {
        cout << "not all is even" << endl;
    }

    bool has_even = std::any_of(v.begin(), v.end(), [](int i) {return i % 2 != 0; });
    if (has_even)
    {
        cout << "has even" << endl;
    }
    else
    {
        cout << "not has even" << endl;
    }

    bool non_even = std::none_of(v.begin(), v.end(), [](int i) {return i % 2 != 0; });
    if (non_even)
    {
        cout << "has no even" << endl;
    }
    else
    {
        cout << "has even" << endl;
    }

    return 0;

}
2. 查找算法find_if和find_if_not
// ConsoleApplication1.cpp : 定义控制台应用程序的入口点。
#include "stdafx.h"
#include <iostream>
#include <vector>
#include <algorithm>

using namespace std;

int main()
{
    vector<int> v = {1,2,3,4,5,6,7,8,9};
    auto first_even = std::find_if(v.begin(), v.end(), [](int i) {return i % 2 != 0; });
    if (first_even != v.end())
    {
        cout << "The first even is " << *first_even << endl;
    }
    else
    {
        cout << "Has no even" << endl;
    }

    return 0;

}
3. copy_if算法
// ConsoleApplication1.cpp : 定义控制台应用程序的入口点。
#include "stdafx.h"
#include <iostream>
#include <vector>
#include <algorithm>

using namespace std;

int main()
{
    vector<int> v = {1,2,3,4,5,6,7,8,9};
    vector<int> v1(v.size());    // 确定大小

    auto it = std::copy_if(v.begin(), v.end(), v1.begin(), [](int i) {return i % 2 != 0; });  // it表示v1的末尾

    // 缩减vector的大小
    v1.resize(std::distance(v1.begin(), it));
    for (auto elem : v1)
    {
        cout << elem << endl;
    }

    return 0;
}
4. iota算法
用于生成有序序列,例如需要一个定唱的数组。数组中的元素在某一个值上面递增
// ConsoleApplication1.cpp : 定义控制台应用程序的入口点。
#include "stdafx.h"
#include <iostream>
#include <vector>
#include <numeric>
#include <algorithm>

using namespace std;

int main()
{
    vector<int> v(10);
    std::iota(v.begin(), v.end(), 2);  // 2,3,4,5,6....

    for (auto elem : v)
    {
        cout << elem << endl;
    }

    return 0;
}
5. minmax_elemen
同时获取最大值和最小值的算法,相当于融合了max_elemen和min_elemen,将最大值和最小值放到一个pair中返回
// ConsoleApplication1.cpp : 定义控制台应用程序的入口点。
#include "stdafx.h"
#include <iostream>
#include <vector>
#include <numeric>
#include <algorithm>

using namespace std;

int main()
{
    vector<int> v(10);
    std::iota(v.begin(), v.end(), 2);  // 2,3,4,5,6....

    auto res = std::minmax_element(v.begin(), v.end());

    cout << "minum: " << *res.first << " maxuim: " << *res.second << endl;
    return 0;
}
6. is_sorted和is_sorted_until
is_sorted是用来判断某个序列是否是排好序的,而is_sorted_until用来返回序列中已经排好序的部分序列:
// ConsoleApplication1.cpp : 定义控制台应用程序的入口点。
#include "stdafx.h"
#include <iostream>
#include <vector>
#include <numeric>
#include <algorithm>

using namespace std;

int main()
{
    vector<int> v = {3,4,5,6,7,1,2};
    auto pos = std::is_sorted_until(v.begin(), v.end());

    for (auto it = v.begin(); it != pos; it++)
    {
        cout << *it << endl;
    }

    bool is_sorted = std::is_sorted(v.begin(), v.end());
    if (is_sorted)
    {
        cout << "the array is sorted" << endl;
    }
    else
    {
        cout << "the array is not sorted" << endl;
    }
    return 0;
}
------------------------------------------------------end-------------------------------------------------
原文链接: https://www.cnblogs.com/ncepubye/p/12724009.html
欢迎关注
微信关注下方公众号,第一时间获取干货硬货;公众号内回复【pdf】免费获取数百本计算机经典书籍;
也有高质量的技术群,里面有嵌入式、搜广推等BAT大佬

原创文章受到原创版权保护。转载请注明出处:https://www.ccppcoding.com/archives/396503
非原创文章文中已经注明原地址,如有侵权,联系删除
关注公众号【高性能架构探索】,第一时间获取最新文章
转载文章受原作者版权保护。转载请注明原作者出处!