
集群架构:
tracker服务器(跟踪服务器):192.168.110.128
storage服务器(存储服务器):192.168110.129/130
基础环境配置:
1 yum install -y gcc gcc-c++ libstdc++-devel pcre-devel zlib-devel wget make
2 yum install -y groupinstall 'Development Tools'
所需安装包:
1、fastdfs基础依赖包:libfastcommon-master.zip
2、fastdfs包:fastdfs-master.zip
3、fastdfs的nginx插件:fastdfs-nginx-module-master.zip
4、nginx:nginx-1.8.1.tar.gz
FastDFS安装(所有):
1 unzip libfastcommon-master.zip -d /usr/local
2 cd /usr/local/libfastcommon-master
3 ./make.sh
4 ./make.sh install
5
6 unzip fastdfs-master.zip -d /usr/local
7 cd /usr/local/fastdfs-master
8 ./make.sh
9 ./make.sh install
tracker配置(192.168.110.128):
 1 mkdir /home/fastdfs
 2 cp /etc/fdfs/tracker.conf.sample /etc/fdfs/tracker.conf
 3 vim /etc/fdfs/tracker.conf
 4
 5 #配置内容
 6 base_path=/home/fastdfs
 7 port=22122
 8 http.server_port=8080
 9
10 #启动
11 fdfs_trackerd /etc/fdfs/tracker.conf start/restart/stop
查看进程、端口:


storage配置(192.168.110.129/130):
 1 mkdir /home/fastdfs
 2 cp /etc/fdfs/storage.conf.sample /etc/fdfs/storageconf
 3 vim /etc/fdfs/storage.conf
 4
 5 #配置
 6 base_path=/home/fastdfs
 7 goupe_name=group1 #group2、group3、group4以此类推
 8 store_path0=/home/fastdfs #store_path1、store_path2以此类推
 9 store_path_count=1 #数量跟store_path对应
10 tracker_server=192.168.110.128:22122 #可配置多个tracker_server,即集群
11 #启动
12 fdfs_storaged /etc/fdfs/storage.conf start/restart/stop
查看进程、端口:


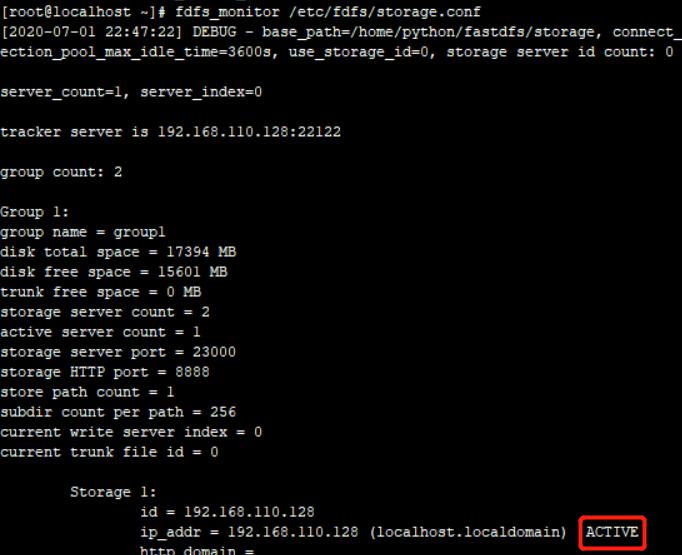
查看storage集群状态,ACTIVE表示激活正常状态:
storage上安装nginx:
1 unzip fastdfs-nginx-module-master.zip /usr/local
2 tar -xvf nginx-1.8.1.tar.gz -C /usr/local
3 ln -sv /usr/include/fastcommon /usr/local/include/fastcommon
4 ln -sv /usr/include/fastdfs /usr/local/include/fastdfs
5 ln -sv /usr/lib64/libfastcommon.so /usr/local/lib/libfastcommon.so
6
7 cd /usr/local/nginx-1.8.1
8 ./configure --prefix=/usr/local/nginx --add-module=/usr/fastdfs-nginx-module-master/src
安装:make & make install
查看:/usr/local/nginx/sbin/nginx -V
配置storage的fastdfs-nginx-module:
 1 cp fastdfs-nginx-module-master/src/mod_fastdfs.conf /etc/fdfs
 2 vim /etc/fdfs/mod_fastdfs.conf
 3
 4 #配置
 5 base_path=/home/fastdfs
 6 tracker_server=192.168.110.128 #可配置多个
 7 storage_server_port=23000
 8 group_name=group1
 9 url_have_group_name=true #此处需注意
10 store_path_count=1 #此处需与store_path对应
11 store_path0=/home/fastdfs
12 group_count=2
13
14 [group1]
15 group_name=group1
16 storage_server_port=23000
17 store_path_count=1
18 store_path0=/home/fastdfs
19
20 [group2]
21 group_name=group2
22 storage_server_port=23000
23 store_path_count=1
24 store_path0=/home/fastdfs
ln -s /root/fastdfs/data /root/fastdfs/data/M00
ll /root/fastdfs/data/M00
配置storage的nginx:
server配置:
location ~/group[1-2]/M00 {
    root /home/fastdfs/data;
    ngx_fastdfs_module;
}

#复制两个文件:
cp /usr/local/fastdfs-master/conf/http.conf /usr/local/fastdfs-master/conf/mime.types /etc/fdfs
运行...
tracker安装nginx:
#安装:
tar -xvf nginx-1.8.1.tar.gz -C /usr/local
cd /usr/local/nginx-1.8.1
./configure --prefix=/usr/local/nginx
make & make install

#配置:
worker_processes  4;                  #根据CPU核心数而定
events {
    worker_connections  65535;        #最大链接数
    use epoll;                        #新版本的Linux可使用epoll加快处理性能
}
http {
    #设置group1的服务器
    upstream fdfs_group1 {
        server 192.168.110.129:8080 weight=1 max_fails=2 fail_timeout=30s;
    }
    #设置group2的服务器
    upstream fdfs_group2 {
        server 192.168.110.130:8080 weight=1 max_fails=2 fail_timeout=30s;
    }

   server {
       #设置服务器端口
        listen       8080;
       #设置group1的负载均衡参数
        location /group1/M00 {
            proxy_pass http://fdfs_group1;
        }
        #设置group2的负载均衡参数
        location /group2/M00 {
            proxy_pass http://fdfs_group2;
        }
      }

    }
client配置:
cp /etc/fdfs/client.conf.sample /etc/fdfs/client.conf
vim /etc/fdfs/client.conf

#p配置:
base_path=/home/fastdfs
tracker_server=192.168.110.128:22122 #可以多个
http.tracker_server_port=8080

#上传:fastdfs_upload_file /etc/fdfs/client.conf /home/111.jpg
#返回结果:group1/M00/00/00/wKg26VncfamAEqZ0AAu-4Kcs3QI677.jpg
#浏览器访问:192.168110.128:8080/group2/M00/00/00/wKhugl79o96AQkdeAAJO4VuVLvs287.jpg(需关闭所有设备防火墙或方通相关端口)
原文链接: https://www.cnblogs.com/Fmaj7/p/13223838.html
欢迎关注
微信关注下方公众号,第一时间获取干货硬货;公众号内回复【pdf】免费获取数百本计算机经典书籍;
也有高质量的技术群,里面有嵌入式、搜广推等BAT大佬

原创文章受到原创版权保护。转载请注明出处:https://www.ccppcoding.com/archives/361580
非原创文章文中已经注明原地址,如有侵权,联系删除
关注公众号【高性能架构探索】,第一时间获取最新文章
转载文章受原作者版权保护。转载请注明原作者出处!