
前言
注:代码已开源在 github 中, https://github.com/disc0ver-csu/computer-graphics/tree/master/codes/lab3-leo6033/Trace
前面介绍了基本图形、模型、曲线的绘制,但是,在好像还没有感受到那种3D游戏里一些能惊艳到自己的效果,即真实感还不是很足。这篇文章中介绍的光线追踪,是实现真实感必不可少的。拿下面的两张图片来对比
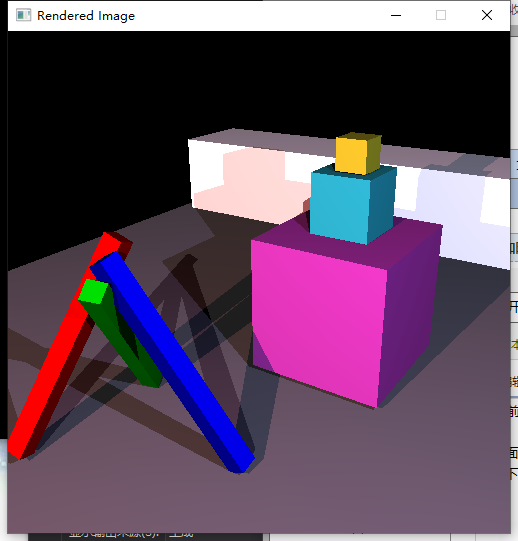

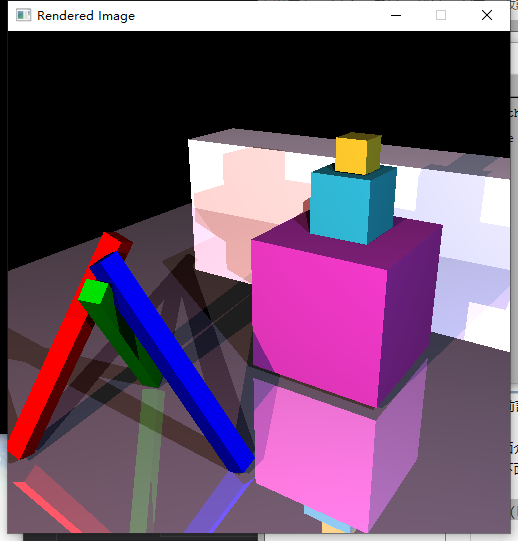
对比一下是不是被下面这张图片的效果惊艳到了?可以很明显感觉到,下面的这个图片效果要好的多。这篇博客将介绍如何实现这样的效果。
光线求交
这里暂时只介绍光线与球面和三角面片的求交
光线与球面相交
射线的方程:
]
球面的隐式方程:
]
联立两式:
]
然后通过判别式:$$Delta=4[(A-C) cdot D]^2 - 4(A-C)2+r2$$来判断是否相交。
交点法向量:
]
bool Sphere::intersectLocal( const ray& r, isect& i ) const
{
    // YOUR CODE HERE:
	// 光线与球面相交
    // Add sphere intersection code here.
	Vec3d A = r.getPosition();
	Vec3d D = r.getDirection();
	Vec3d C= Vec3<double>();
	double _r = 1.0;
	double a = D.length2();
	double b = 2 * (A - C) * D;
	double c = (A - C).length2() - _r;
	double delta = b * b - 4 * a * c;
    // it currently ignores all spheres and just return false.
	if (delta >= 0) {
		double t1 = (-b + sqrt(delta)) / (2 * a);
		double t2 = (-b - sqrt(delta)) / (2 * a);
		if (t1 <= RAY_EPSILON)
			return false;
		else {
			double t;
			if (t2 <= RAY_EPSILON) {
				t = t1;
				i.outsideTheObject = false;
			}
			else {
				t = t2;
				i.outsideTheObject = true;
			}
			// 焦点设置
			i.obj = this;
			i.setT(t);
			Vec3d P = r.at(t);
			Vec3d Normal = P;
			if (D*Normal > 0)
				Normal = -Normal;
			Normal.normalize();
			i.setN(Normal);
			return true;
		}
	}
    return false;
}
光线与三角面片相交
射线的方程:
]
三角面片点法式方程:
]
联立两式得:
]
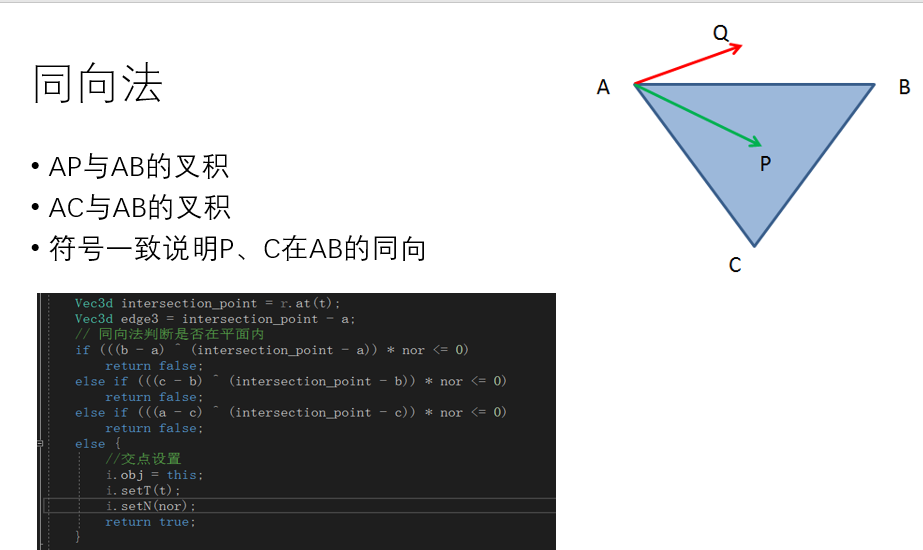
求出t后,便得到交点坐标,然后可通过同向法来判别交点是否在平面内。
// Calculates and returns the normal of the triangle too.
bool TrimeshFace::intersectLocal(const ray& r, isect& i) const
{
	// YOUR CODE HERE:
	// Add triangle intersection code here.
	// it currently ignores all triangles and just return false.
	//
	// Note that you are only intersecting a single triangle, and the vertices
	// of the triangle are supplied to you by the trimesh class.
	//
	// You should retrieve the vertices using code like this:
	//
	// const Vec3d& a = parent->vertices[ids[0]];
	// const Vec3d& b = parent->vertices[ids[1]];
	// const Vec3d& c = parent->vertices[ids[2]];
	const Vec3d& a = parent->vertices[ids[0]];
	const Vec3d& b = parent->vertices[ids[1]];
	const Vec3d& c = parent->vertices[ids[2]];

	Vec3d edge1 = b - a;
	Vec3d edge2 = c - a;
	// 计算平面法向量
	Vec3d nor = edge1 ^ edge2;
	nor.normalize();

	// 判断是否与平面平行
	float x = nor * r.getDirection();
	if (x == 0)
		return false;
	// Ax + By + Cz = d
	float d = nor * a;
	float t = (d - nor * r.getPosition()) / x;
	if (t <= RAY_EPSILON)
		return false;
	Vec3d intersection_point = r.at(t);
	Vec3d edge3 = intersection_point - a;
	// 同向法判断是否在平面内
	if (((b - a) ^ (intersection_point - a)) * nor <= 0)
		return false;
	else if (((c - b) ^ (intersection_point - b)) * nor <= 0)
		return false;
	else if (((a - c) ^ (intersection_point - c)) * nor <= 0)
		return false;
	else {
		//交点设置
		i.obj = this;
		i.setT(t);
		i.setN(nor);
		return true;
	}

}
当然,这里还可以使用重心坐标法来实现
光线衰减
在现实场景中,光线也是会衰减的,比如看同一场景,距离远近不同看到的清晰度也就不同,这是距离衰减。还有阴影衰减,当有物体遮挡住部分光的时候,会形成一定的阴影,这就是阴影衰减产生的效果。
距离衰减
点光源:
]
double PointLight::distanceAttenuation( const Vec3d& P ) const
{
	// You'll need to modify this method to attenuate the intensity
	// of the light based on the distance between the source and the
	// point P.  For now, we assume no attenuation and just return 1.0
	Vec3d d = P - position;
	double r = d.length(); //距离
	return min(1.0, 1.0 / (constantTerm + linearTerm * r + quadraticTerm * r*r));
//	return 1.0;
}
平行光源:
double DirectionalLight::distanceAttenuation( const Vec3d& P ) const
{
	// distance to light is infinite, so f(di) goes to 0.  Return 1.
	return 1.0;
}
阴影衰减
点光源:
首先判断光线是否被遮挡,然后再判断是否超出光强所能打到的距离
Vec3d PointLight::shadowAttenuation(const Vec3d& P) const
{
    // YOUR CODE HERE:
    // You should implement shadow-handling code here.
	Vec3d d = getDirection(P);
	isect i;
	ray shadowRay(P, d);
	if (this->getScene()->intersect(shadowRay, i)) {
		double tLight = (P - position).length();
		if (i.t < tLight)
			return Vec3d(0, 0, 0);
		else
			return Vec3d(1, 1, 1);
	}
    return Vec3d(1,1,1);
}
平行光:
只需判断是否被遮挡即可
Vec3d DirectionalLight::shadowAttenuation( const Vec3d& P ) const
{
    // YOUR CODE HERE:
	Vec3d d = getDirection(P);
	isect i;
	ray shadowRay(P, d);
	if (this->getScene()->intersect(shadowRay, i)) {
		return Vec3d(0, 0, 0);
	}
    // You should implement shadow-handling code here.
    return Vec3d(1,1,1);
}
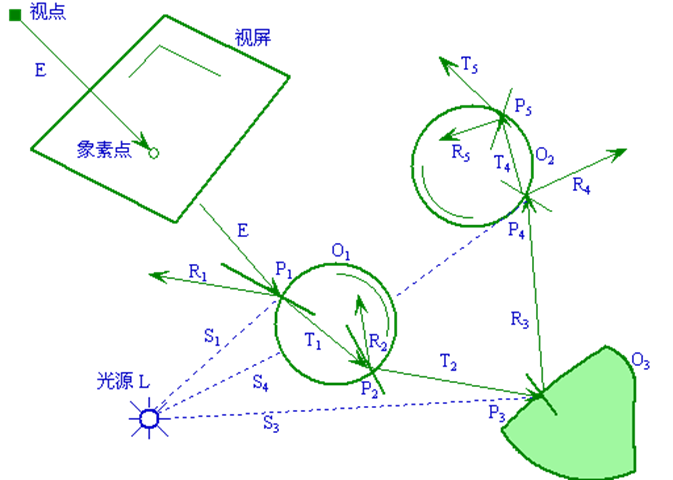
光线追踪
先来份伪代码
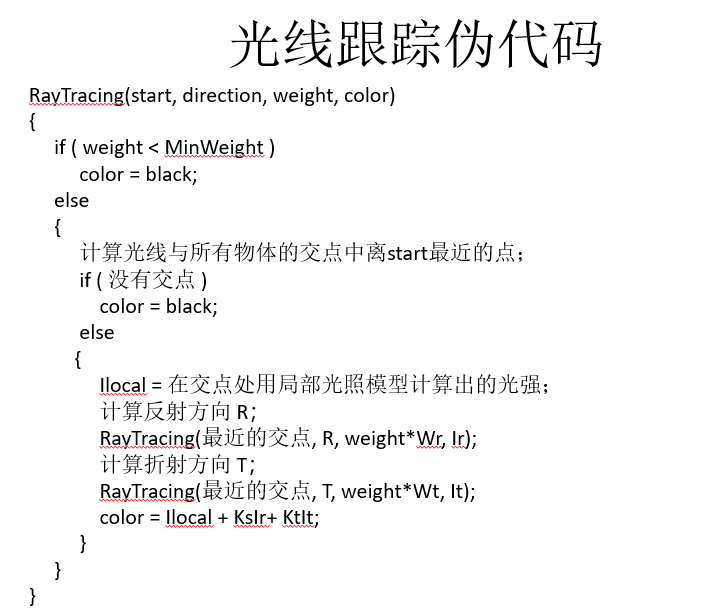
光线跟踪中的四种射线:
-
视线:由视点与象素(x,y)发出的射线
-
阴影测试线:物体表面上点与光源的连线
-
反射光线
-
折射光线
光线追踪的过程
phong光照模型
由物体表面上一点P反射到视点的光强I为环境光的反射光强(I_e)、理想漫反射光强(I_d)、和镜面反射光(I_s)的总和,即
]
在washington CSE 457的课件中给出的公式为
]
其中(k_d)项表示漫反射,采用Lamber模型,(k_s)项表示镜面反射
]
]
即可写出下列代码
// Apply the Phong model to this point on the surface of the object, returning
// the color of that point.
Vec3d Material::shade( Scene *scene, const ray& r, const isect& i ) const
{
	// YOUR CODE HERE

	// For now, this method just returns the diffuse color of the object.
	// This gives a single matte color for every distinct surface in the
	// scene, and that's it.  Simple, but enough to get you started.
	// (It's also inconsistent with the Phong model...)

	// Your mission is to fill in this method with the rest of the phong
	// shading model, including the contributions of all the light sources.
    // You will need to call both distanceAttenuation() and shadowAttenuation()
    // somewhere in your code in order to compute shadows and light falloff.
	if( debugMode )
		std::cout << "Debugging the Phong code (or lack thereof...)" << std::endl;

	Vec3d pos = r.at(i.t);
	Vec3d N = i.N;
	N.normalize();
	Vec3d Ip, L, H, Atten;
	Vec3d shadow = ke(i) + prod(scene->ambient(), ka(i));
	for (vector<Light*>::const_iterator litr = scene->beginLights();
		litr != scene->endLights(); ++litr) {
		Light* pLight = *litr;
		Ip = pLight->getColor(pos);
		L = pLight->getDirection(pos);
		H = -r.getDirection() + L;	H.normalize();
		Atten = pLight->distanceAttenuation(pos)*pLight->shadowAttenuation(pos);
		shadow += prod(Atten, prod(Ip, kd(i)*(L*N) + ks(i)*pow(H*N, 256)));
	}
	return shadow;
}
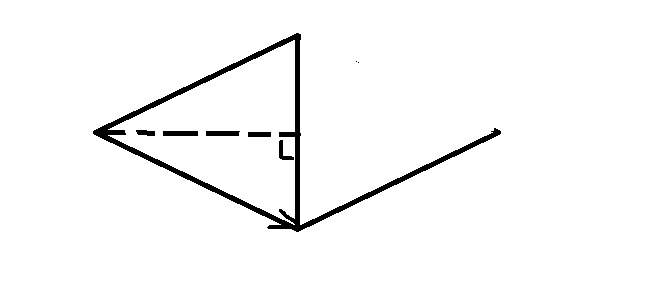
反射方向
这里的反射指的是镜面反射
计算公式:
]
为什么是这样呢?首先来看(Vcdot N),这里N是交点处的法向量,并且是单位向量,那个即视线在法向量上的投影,再乘法向量的两倍,得到的是平行四边形的对角线,减去V便是反射后的光线的方向。
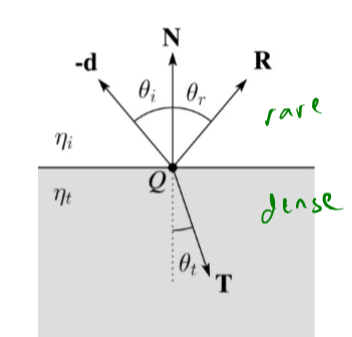
折射方向
跟反射方向一样都是公式推导
]
终止条件
经过上述的介绍,很容易可以想到,什么时候终止光线追踪
-
该光线未碰到任何物体
-
该光线碰到了背景
-
光线在经过许多次反射和折射以后,就会产生衰减,光线对于视点的光强贡献很小(小于某个设定值)。
-
光线反射或折射次数即跟踪深度大于一定值
因此,光线追踪的代码实现如下
// Do recursive ray tracing!  You'll want to insert a lot of code here
// (or places called from here) to handle reflection, refraction, etc etc.
Vec3d RayTracer::traceRay( const ray& r,
	const Vec3d& thresh, int depth )
{
	isect i;

	if( scene->intersect( r, i ) && depth >= 0) {
		const Material& m = i.getMaterial();

		//计算光源直射
		Vec3d I = m.shade(scene, r, i);

		//计算反射递归
		Vec3d Q = r.at(i.t);
		Vec3d R = r.getDirection() - 2 * (r.getDirection()*i.N)*i.N;
		R.normalize();
		I += prod(m.kr(i), traceRay(ray(Q, R), thresh, depth - 1));

		//计算折射递归
		double cosThetaI = -i.N*r.getDirection();
		double eta = (i.outsideTheObject) ? 1.0003 / m.index(i) : m.index(i) / 1.0003;
		if (eta*eta*(1 - cosThetaI * cosThetaI) < 1) {
			double cosThetaT = sqrt(1 - eta * eta*(1 - cosThetaI * cosThetaI));
			Vec3d T = (eta*cosThetaI - cosThetaT)*i.N - eta * r.getDirection();
			T.normalize();
			I += prod(m.kt(i), traceRay(ray(Q, -T), thresh, depth - 1));
		}
		return I;
		// An intersection occured!  We've got work to do.  For now,
		// this code gets the material for the surface that was intersected,
		// and asks that material to provide a color for the ray.

		// This is a great place to insert code for recursive ray tracing.
		// Instead of just returning the result of shade(), add some
		// more steps: add in the contributions from reflected and refracted
		// rays.

		//const Material& m = i.getMaterial();
		//return m.shade(scene, r, i);

	} else {
		// No intersection.  This ray travels to infinity, so we color
		// it according to the background color, which in this (simple) case
		// is just black.

		return Vec3d( 0.0, 0.0, 0.0 );
	}
}
小节
到这里,光线追踪也就差不多介绍完了,这一系列博客也算是收尾了。那天在课上听其他同学展示的的时候,说是我的世界有部分的开源源码,里面有一个可以实现光追的接口,有兴趣的小伙伴可以去康康,似乎那个仅仅实现光追还无法达到很好的效果,还要加上路线追踪,emmmmm。。。。期末考完有空了我再去康康,明早图形学考试祝我好运 orz
原文链接: https://www.cnblogs.com/csu-lmw/p/12051657.html
欢迎关注
微信关注下方公众号,第一时间获取干货硬货;公众号内回复【pdf】免费获取数百本计算机经典书籍

原创文章受到原创版权保护。转载请注明出处:https://www.ccppcoding.com/archives/307863
非原创文章文中已经注明原地址,如有侵权,联系删除
关注公众号【高性能架构探索】,第一时间获取最新文章
转载文章受原作者版权保护。转载请注明原作者出处!