
网页版文档网址:https://docs.nvidia.com/deeplearning/sdk/tensorrt-developer-guide/index.html#install


关于API:
C++ API可以可以应用在性能要求、安全要求更为严格的场景中,Python API的好处在于便于数据的预处理。
详细的API:
https://docs.nvidia.com/deeplearning/sdk/tensorrt-api/index.html
C++ API:
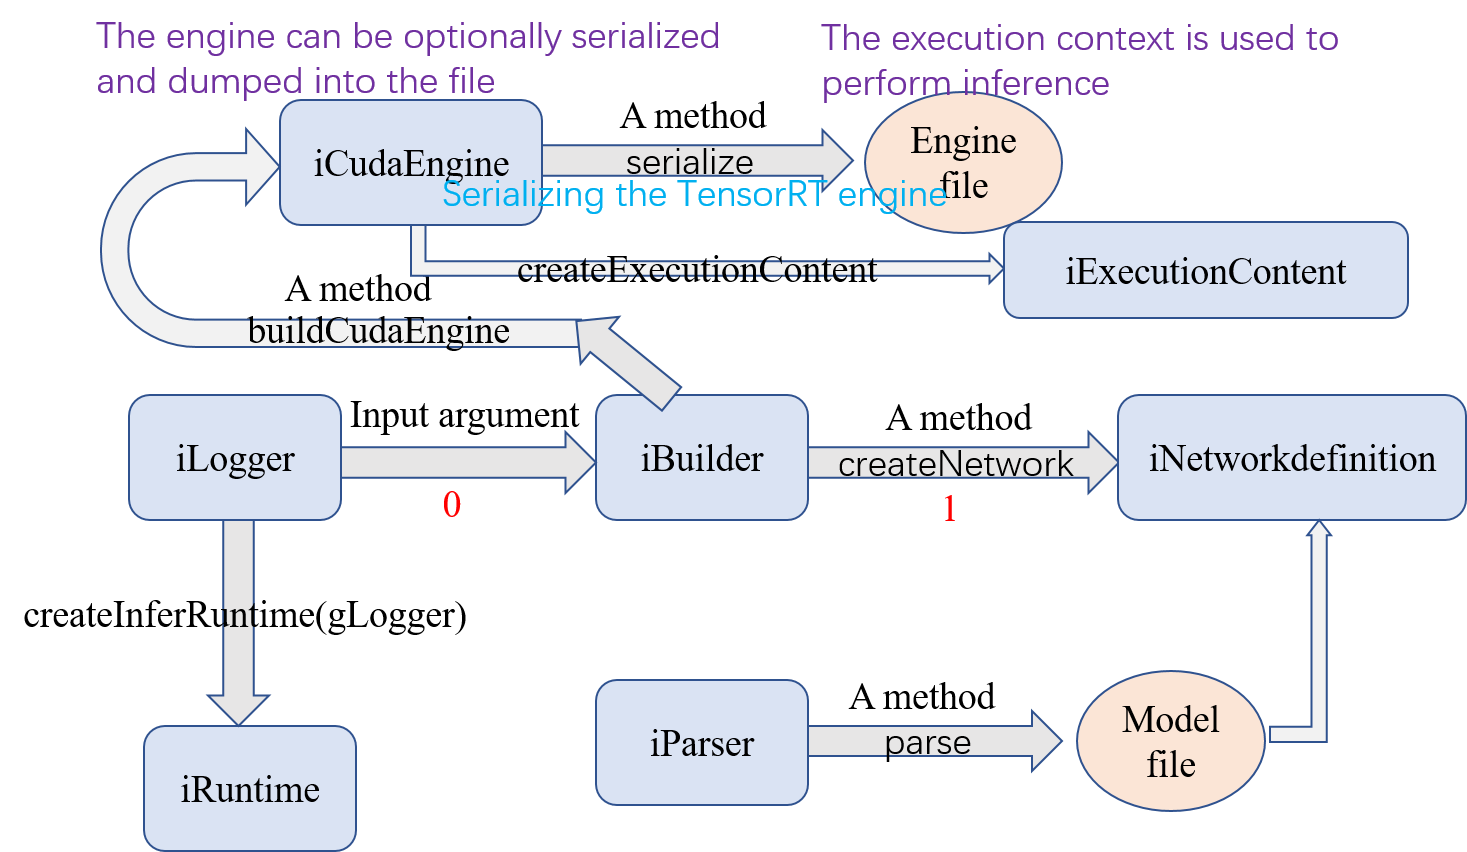
1、首先需要创建一个ICudaEngine类型的对象,这个对象是engine。engine的创建有两种方式:
- 在导入用户model的网络define的时候 生成
- by reading the serialized engine from the disk. In this case, the performance is better, since the steps of parsing the model and creating intermediate objects are bypassed。
首先需要创建一个全局的iLogger型对象,现在一般直接 #include "logger.h" ,在logger.c中有对于gLogger的声明。
步骤0:
IBuilder* builder = createInferBuilder(gLogger);
步骤1:
INetworkDefinition* network = builder->createNetwork();
Serializing a model(序列化模型):
要进行序列化,要将engine转换为一种格式,以便以后存储和使用以进行推理。
要用于推理,只需反序列化引擎即可。序列化和反序列化是可选的。
由于从网络定义创建引擎可能非常耗时,因此每次应用程序重新运行时都可以通过序列化一次并在推理时对其进行反序列化来避免重建引擎。因此,在构建引擎之后,用户通常希望将其序列化以供以后使用。
building是需要比较长的时间的,可能是因为需要对于网路分析优化,才能加速inference,所谓的将engine转化为一种格式的目的就是以后不需要再重复这个building的过程了,如果非要愿意重新building,也无所谓,engine object也可以直接用来做inference。
这个地方需要注意一点:Building出来的engine是针对于当前特定的硬件平台的,所以,无法将serilizing之后的engine跨平台使用。
将builder按照之前的offline步骤运行,然后serilize:
IHostMemory *serializedModel = engine->serialize();
// store model to disk
// <…>
serializedModel->destroy();
反序列化的时候,如下使用:
IRuntime* runtime = createInferRuntime(gLogger);
ICudaEngine* engine = runtime->deserializeCudaEngine(modelData, modelSize, nullptr);
//最后一个参数是a plugin layer factory for applications using custom layers.
定义Network:
在任何一种情况下,您都明确需要告诉 TensorRT 需要哪些张量作为推断的输出。 未标记为输出的张量被认为是可由建造者优化的瞬态值。 输出张量的数量没有限制,但是,将张量标记为输出可能会禁止对张量进行一些优化。
1、自己利用已有的C++ API层层构建这个网络
在步骤1已经create了network,此处可直接拿来使用
构建输入层,输入层是前向第一层的图片输入:
auto data = network->addInput(INPUT_BLOB_NAME, dt, Dims3{1, INPUT_H, INPUT_W});
加入卷积层:
auto conv1 = network->addConvolution(*data->getOutput(0), 20, DimsHW{5, 5}, weightMap["conv1filter"], weightMap["conv1bias"]);
conv1->setStride(DimsHW{1, 1});
加入pooling层:
auto pool1 = network->addPooling(*conv1->getOutput(0), PoolingType::kMAX, DimsHW{2, 2});
pool1->setStride(DimsHW{2, 2});
加入全连接层和激活层:
auto ip1 = network->addFullyConnected(*pool1->getOutput(0), 500, weightMap["ip1filter"], weightMap["ip1bias"]);
auto relu1 = network->addActivation(*ip1->getOutput(0), ActivationType::kRELU);
加入Softmax层,并得到输出:
auto prob = network->addSoftMax(*relu1->getOutput(0));
prob->getOutput(0)->setName(OUTPUT_BLOB_NAME);
输出结果:
network->markOutput(*prob->getOutput(0));
2、使用Parser导入模型:
ONNX:
auto parser = nvonnxparser::createParser(*network,gLogger);
UFF:
auto parser = createUffParser();
NVCaffe:
ICaffeParser* parser = createCaffeParser();
后面是使用parser导入模型
parser->parse(args);
关键概念:
Logger: object associated with the builder and engine to capture errors, warnings and other information during the build and inference phases
(记录器:与构建器和引擎关联的对象,用于在构建和推理阶段捕获错误,警告和其他信息)
原文链接: https://www.cnblogs.com/yanxingang/p/10849371.html
欢迎关注
微信关注下方公众号,第一时间获取干货硬货;公众号内回复【pdf】免费获取数百本计算机经典书籍

原创文章受到原创版权保护。转载请注明出处:https://www.ccppcoding.com/archives/295004
非原创文章文中已经注明原地址,如有侵权,联系删除
关注公众号【高性能架构探索】,第一时间获取最新文章
转载文章受原作者版权保护。转载请注明原作者出处!