
一. Travis-CI部分
最近基本都在研究Travis-CI的使用。CI是continue integration(持续集成)的缩写,Travis应该是给我们提供免费服务器的组织。下面介绍一下其使用方法。
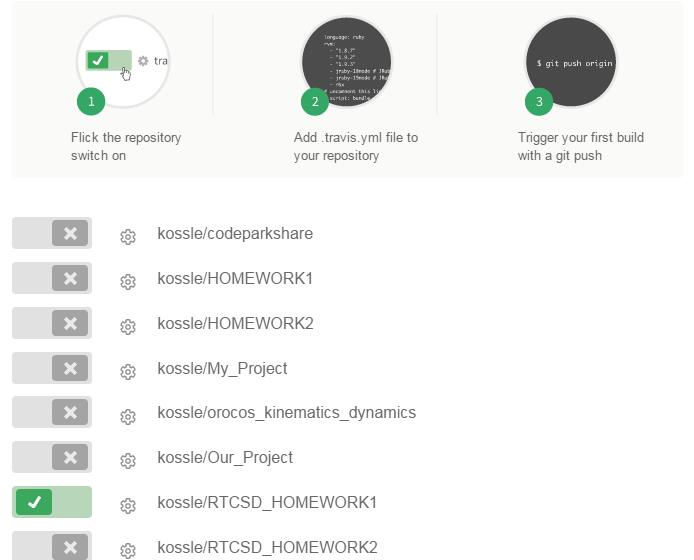
第一步,进入https://travis-ci.org用github账号登录进去,给其授权允许查看github上建立的仓库,可以看到github上建立的账号,选择要进行持续集成的仓库或是小组,点击仓库旁的service hook开关,可看见颜色变为绿色,至此,Travis-CI的设置基本完成;

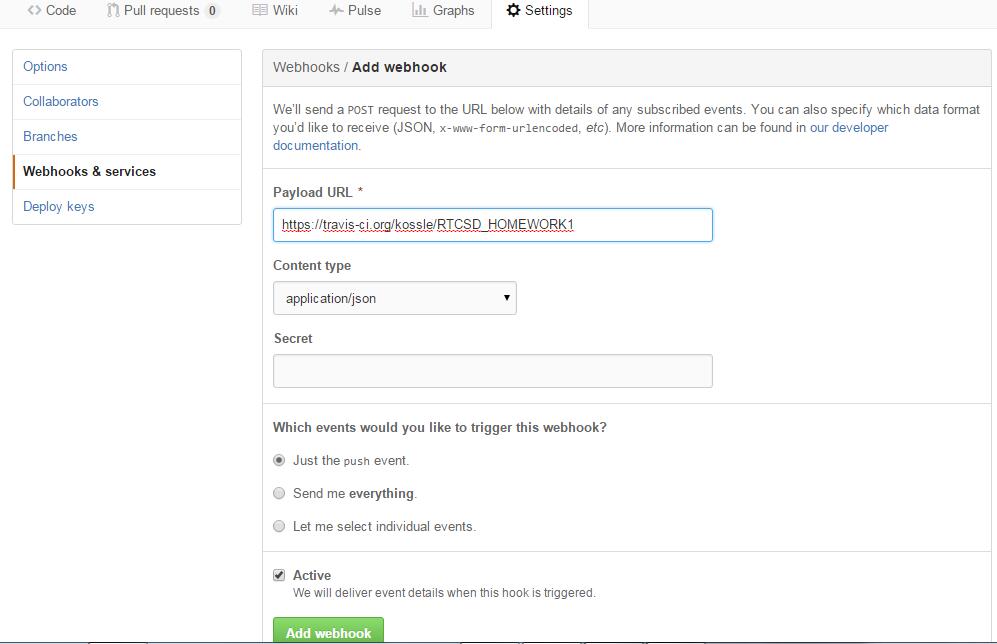
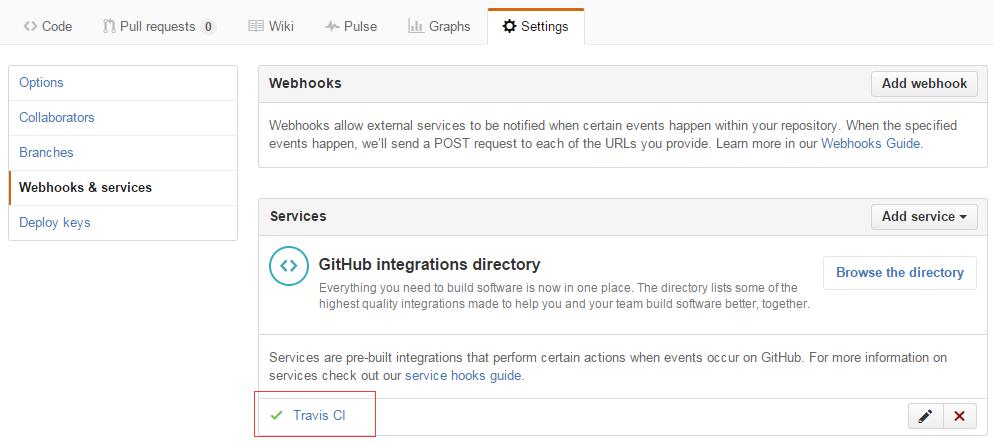
第二步,登录github网站,找到刚才选择进行持续集成的仓库,选择setting->webhook&services,点击add webhook,需要设置的主要是Payload URL,它代表的是当仓库收到一个push或是commit时,将该消息post给哪个地方,由于我们选择的是Travis-CI,故我填写的是https://travis-ci.org/kossle/仓库名,其他的不变,点击确定;
修改:经再次验证,该步骤不需要进行,它使用的是webhook&service中的service,只要在travis中设置后,可直接编写.travis.yml文件。
第三,编写.travis.yml文件,昨天也试着将一些网上现成的较简单的代码copy一下,但错误太多,只能自己尝试写个简单的。
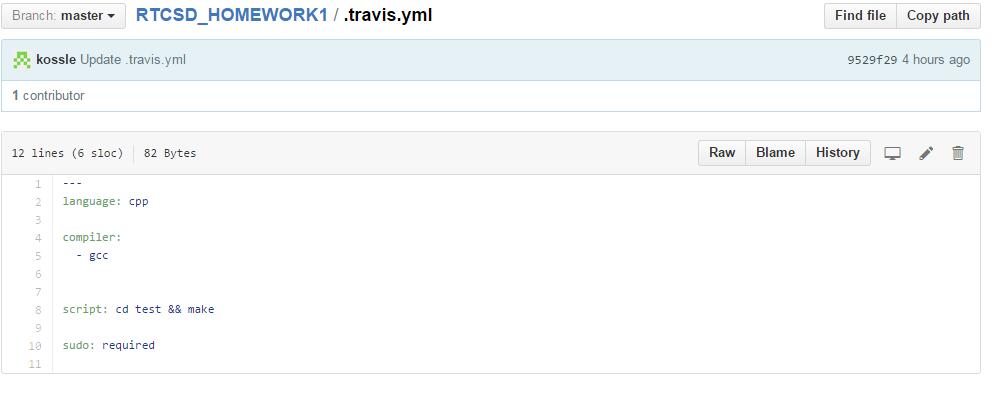
简单解释:language:cpp 表示编程语言为c++;compilor: - gcc 表示采用gcc编译器;script: cd test && make 表示执行命令为打开test文件夹,然后make;然后需要编写makefile文件,由于之前对linux不太熟悉,花了一些时间才意识到make的前提是需要makefile文件存在,于是,测试了一个最简单的makefile文件。
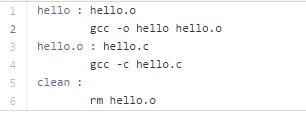
gcc之前的空格数是一个tab;
结果如下:
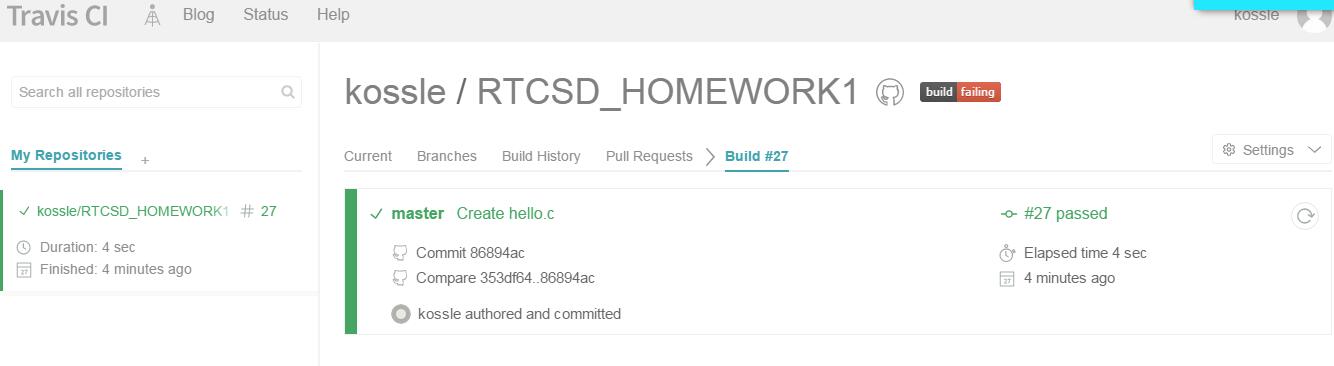
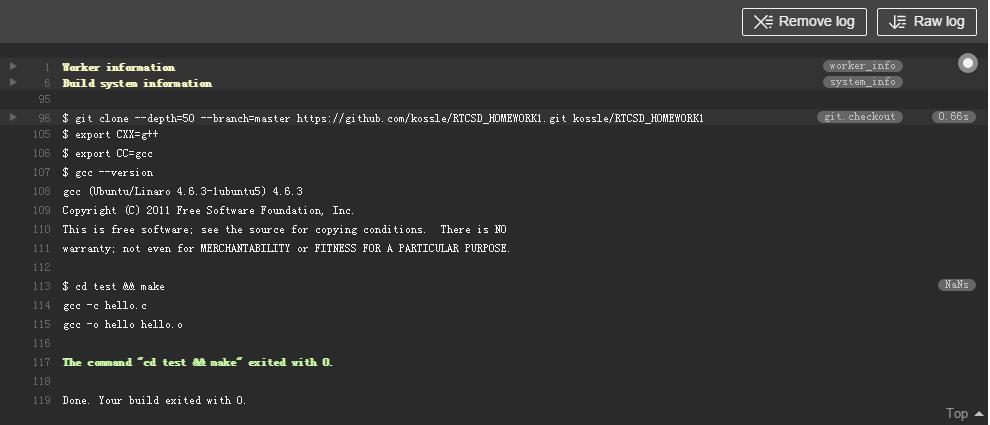
至此基本了解Travis-CI的使用过程,但想让它真正的用在小组的项目中,还有不少困难。尝试看了一下其他项目的.travis.yml文件的编写和官方文档以及makefile文件的编写。主要困难有:1.如要编写项目的makefile文件,应该至少知道整个项目.h文件,.cpp文件的关系,命名规则基本要确定;2.虽然了解一点持续集成的知识,但如要真编写.travis.yml文件,显然不够用;其他的方面应该没什么大的问题;
二.单元测试部分
上次主要了解了cppunit的基本用法,这次主要就是又加了几个测试(frame类和joint类);没有什么新的知识,也没有在找frame类等bug上下什么功夫;简单的把代码贴上来。
1 #include <cppunit/extensions/HelperMacros.h>
 2 #include <Point.h>
 3
 4 class testpoint :public CppUnit::TestFixture
 5 {
 6     CPPUNIT_TEST_SUITE(testpoint);
 7     CPPUNIT_TEST(testget);
 8     //CPPUNIT_TEST(testrotate);
 9     CPPUNIT_TEST_SUITE_END();
10 public:
11     void setUp();
12     void tearDown();
13     testpoint();
14     //~testsolver();
15     void testget();
16     //void testrotate();
17 };
test_point.h
1 #include <cppunit/extensions/HelperMacros.h>
 2 #include <Point.h>
 3 #include <Frame.h>
 4
 5 class testframe :public CppUnit::TestFixture
 6 {
 7     CPPUNIT_TEST_SUITE(testframe);
 8     CPPUNIT_TEST(testframeget);
 9     //CPPUNIT_TEST(testrotate);
10     CPPUNIT_TEST_SUITE_END();
11 public:
12     void setUp();
13     void tearDown();
14     testframe();
15     //~testsolver();
16     void testframeget();
17     //void testrotate();
18 };
test_frame.h
1 #include <cppunit/extensions/HelperMacros.h>
 2 #include <Joint.h>
 3
 4 class testjoint :public CppUnit::TestFixture
 5 {
 6     CPPUNIT_TEST_SUITE(testjoint);
 7     CPPUNIT_TEST(testjointget);
 8     //CPPUNIT_TEST(testrotate);
 9     CPPUNIT_TEST_SUITE_END();
10 public:
11     void setUp();
12     void tearDown();
13     testjoint();
14     //~testsolver();
15     void testjointget();
16     //void testrotate();
17 };
test_joint.htest_frame.cpp
1 #include "test_point.h"
 2 #include "Point.h"
 3 #include <string>
 4 #include<iostream>
 5 #include <cppunit/TestCase.h>
 6 #include "cppunit/TestAssert.h"
 7
 8 CPPUNIT_TEST_SUITE_NAMED_REGISTRATION(testpoint, "alltest");
 9
10 testpoint::testpoint()
11 {
12 };
13
14 void testpoint::setUp()
15 {
16     std::cout << "test point begin" << std::endl;
17 };
18
19 void testpoint::tearDown()
20 {
21     std::cout << "test point end" << std::endl;
22 };
23
24 void testpoint::testget()
25 {
26     Point point1(3, 4);
27     int resultx = point1.getX();
28     int resulty = point1.getY();
29     CPPUNIT_ASSERT(resultx == 3);
30     CPPUNIT_ASSERT(resulty == 4);
31 }
test_point.cpp
1 #include "test_joint.h"
 2 #include "Joint.h"
 3 #include <string>
 4 #include<iostream>
 5 #include <cppunit/TestCase.h>
 6 #include "cppunit/TestAssert.h"
 7
 8 CPPUNIT_TEST_SUITE_NAMED_REGISTRATION(testjoint, "alltest");
 9
10 testjoint::testjoint()
11 {
12 };
13
14 void testjoint::setUp()
15 {
16     std::cout << "test joint begin" << std::endl;
17 };
18
19 void testjoint::tearDown()
20 {
21     std::cout << "test joint end" << std::endl;
22 };
23
24 void testjoint::testjointget()
25 {
26     Joint joint1(3, 4);
27     double a = joint1.getDeg1();
28     //int resulty = point1.getY();
29     //int c = result.getX()
30     CPPUNIT_ASSERT(a == 3.0);
31     //CPPUNIT_ASSERT(result.getY() == 4);
32 }
test_joint.h
1 #include <cppunit/extensions/TestFactoryRegistry.h>
 2 #include <cppunit/ui/text/TestRunner.h>
 3 #include <cppunit/TestResult.h>
 4 #include <cppunit/TestResultCollector.h>
 5 #include <cppunit/BriefTestProgressListener.h>
 6 #include <cppunit/TextOutputter.h>
 7
 8 int main()
 9 {
10     CppUnit::TestResult r;
11     CppUnit::TestResultCollector rc;
12     r.addListener(&rc); // 准备好结果收集器
13
14     CppUnit::TestRunner runner; // 定义执行实体
15     runner.addTest(CppUnit::TestFactoryRegistry::getRegistry("alltest").makeTest());
16     runner.run(r); // 运行测试
17
18     CppUnit::TextOutputter o(&rc, std::cout);
19     o.write(); // 将结果输出
20
21     system("pause");
22
23     return rc.wasSuccessful() ? 0 : -1;
24 }
testmain.cpp
结果如下:
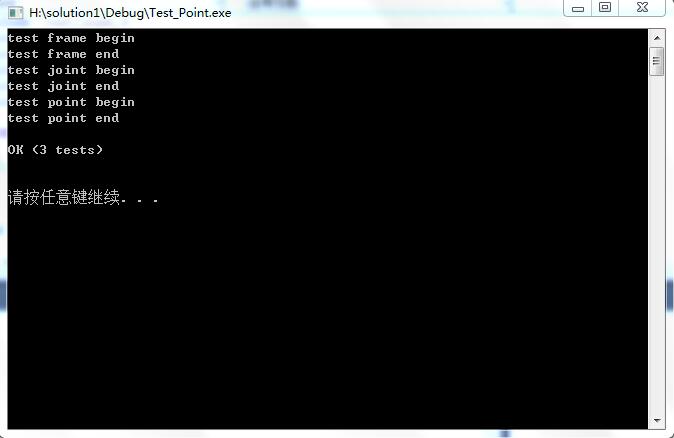
从实际的测试可以看出,testmain.cpp在我不断添加测试包时,不需要改动,只需要将新写的测试类注册到“alltest”即可;另外,solver类本身就有问题,没法测试通过;至此,robot类就简单测试到这里(若solver类等有改动,再测试);因为这些类都比较简单,没什么bug,就先测试到这。下一步测试一下coffee类
原文链接: https://www.cnblogs.com/wang-kai/p/5114948.html
欢迎关注
微信关注下方公众号,第一时间获取干货硬货;公众号内回复【pdf】免费获取数百本计算机经典书籍
原创文章受到原创版权保护。转载请注明出处:https://www.ccppcoding.com/archives/227096
非原创文章文中已经注明原地址,如有侵权,联系删除
关注公众号【高性能架构探索】,第一时间获取最新文章
转载文章受原作者版权保护。转载请注明原作者出处!