
主要参考:http://blog.csdn.net/sdlgxxy/article/details/6225267
一,下载openGL的相关文件,下载地址为http://download.csdn.net/source/3063599
OpenGL库配置用到的文件分为下面三类:
■ 动态链接库文件(.dll)
glaux.dll、glu32.dll、glut32.dll、opengl32。
■ 头文件(.h)
GL.H、GLAUX.H、GLU.H、glut.h。
■ 库文件(.lib)
GLAux.Lib、Glu32.lib、glut32.lib、OpenGL32.Lib。
3、配置上述文件
1)将dll文件拷贝到c:/windows/System32下面【如果自己的机子是64位的系统,需要把.dl文件放到c:?windows/SysWOW64下】
2)h文件放到${minGW}/include/GL文件加下,如果没有GL文件夹,新建一个。[此处的mingw是eclipse所使用的编译器目录]
3)库文件放在MinGW的lib
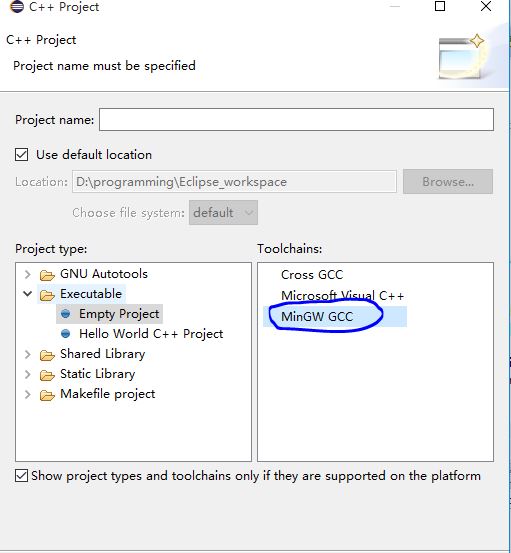
4、打开Eclipse,新建一个C或C++项目,选择的编译器选项应该为MinGW,而不是Goorss,如下:
 ,首先可以先写个HelloWorld验证Eclipse环境是否正常。
5)如果可以的话,将下来可以新建一个C++项目来进行OpenGL测试,代码如下:
#include <windows.h>
#include <GL/gl.h>
#include <GL/glut.h>
#define window_width  640
#define window_height 480
// Main loop
void main_loop_function() {
    // Z angle
    static float angle;
    // Clear color (screen)
    // And depth (used internally to block obstructed objects)
    glClear(GL_COLOR_BUFFER_BIT | GL_DEPTH_BUFFER_BIT);
    // Load identity matrix
    glLoadIdentity();
    // Multiply in translation matrix
    glTranslatef(0, 0, -10);
    // Multiply in rotation matrix
    glRotatef(angle, 0, 0, 1);
    // Render colored quad
    glBegin(GL_QUADS);
    glColor3ub(255, 000, 000);
    glVertex2f(-1, 1);
    glColor3ub(000, 255, 000);
    glVertex2f(1, 1);
    glColor3ub(000, 000, 255);
    glVertex2f(1, -1);
    glColor3ub(255, 255, 000);
    glVertex2f(-1, -1);
    glEnd();
    // Swap buffers (color buffers, makes previous render visible)
    glutSwapBuffers();
    // Increase angle to rotate
    angle += 0.25;
}
// Initialze OpenGL perspective matrix
void GL_Setup(int width, int height) {
    glViewport(0, 0, width, height);
    glMatrixMode(GL_PROJECTION);
    glEnable(GL_DEPTH_TEST);
    gluPerspective(45, (float) width / height, .1, 100);
    glMatrixMode(GL_MODELVIEW);
}
// Initialize GLUT and start main loop
int main(int argc, char** argv) {
    glutInit(&argc, argv);
    glutInitWindowSize(window_width, window_height);
    glutInitDisplayMode(GLUT_RGB | GLUT_DOUBLE);
    glutCreateWindow("GLUT Example!!!");
    glutDisplayFunc(main_loop_function);
    GL_Setup(window_width, window_height);
    glutMainLoop();
}
此时还不能直接运行,因为编译时不能找到我们添加的库,需要静态添加
在项目上,右键点击选择Properties,进如下图配置页面,按如下所示配置,注意不要改动,

配置到这一步之后,重新编译项目,如果你按照我上面的步骤操作的话应该能编译成功了。
原文链接: https://www.cnblogs.com/kinthon/p/4841348.html
欢迎关注
微信关注下方公众号,第一时间获取干货硬货;公众号内回复【pdf】免费获取数百本计算机经典书籍
原创文章受到原创版权保护。转载请注明出处:https://www.ccppcoding.com/archives/222321
非原创文章文中已经注明原地址,如有侵权,联系删除
关注公众号【高性能架构探索】,第一时间获取最新文章
转载文章受原作者版权保护。转载请注明原作者出处!