
tvm c++部署官方教程
https://github.com/apache/tvm/tree/main/apps/howto_deploy
官方说执行run_example.sh脚本就可以完成部署
c++部署代码
https://github.com/apache/tvm/blob/main/apps/howto_deploy/cpp_deploy.cc
Makefile文件
https://github.com/apache/tvm/blob/main/apps/howto_deploy/Makefile
结合Makefile文件和run_example.sh脚本一起看
脚本先创建lib目录,然后执行sudo make命令,make操作的执行要看Makefile文件
make命令会先在lib文件夹中编译一个名为libtvm_runtime_pack.o的静态链接库
然后运行prepare_test_lib.py文件生成将模型生成为test_addone_dll.so,test_addone_sys.o和test_relay_add.so三个库,给cpp_deploy.cc调用,生成两个可执行文件cpp_deploy_pack和cpp_deploy_normal
我的目标是用其他框架写的深度学习网络通过tvm转换成so文件,使用c++部署,在gpu上进行调用,下面是cpu上部署的代码
/ Licensed to the Apache Software Foundation (ASF) under one or more contributor license agreements. See the NOTICE file distributed with this work for additional information regarding copyright ownership. The ASF licenses this file to you under the Apache License, Version 2.0 (the "License"); you may not use this file except in compliance with the License. You may obtain a copy of the License at http://www.apache.org/licenses/LICENSE-2.0 Unless required by applicable law or agreed to in writing, software distributed under the License is distributed on an "AS IS" BASIS, WITHOUT WARRANTIES OR CONDITIONS OF ANY KIND, either express or implied. See the License for the specific language governing permissions and limitations under the License./
/! brief Example code on load and run TVM module.s file cpp_deploy.cc/#include
#include
#include
template
void DeployGraphRuntime() {
ifstream in("/home/aiteam/tiwang/tvm-tfs-gpu-bkp/data.txt");//int image[784];string s;int image_index=0;/while(getline(in,s)){image[i]=stringToNum
// Use the C++ APItvm::runtime::NDArray x = tvm::runtime::NDArray::Empty({1,784}, DLDataType{kDLFloat, 32, 1}, ctx);tvm::runtime::NDArray y = tvm::runtime::NDArray::Empty({1, 10}, DLDataType{kDLFloat, 32, 1}, ctx);
while(getline(in,s)){static_cast
int main(void) {//DeploySingleOp();DeployGraphRuntime();return 0;}
思路很简单就是把数据读进来,set_input,run然后get_output,修改了将target修改成cuda后并不能成功在gpu上运行,会出现core dump的问题
原因是想要让模型在gpu上运行,需要在gpu上开辟内存,然后将数据拷贝到gpu上运行,这个代码没有这些操作所以运行时会导致core崩溃
下面是tvm c++部署调用gpu的完整过程,深度学习模型使用keras写的mnist手写体识别网络,保存成了pb格式,模型代码就不放了,这里直接读取pb文件进行转化,模型输入是(1,784),输出是(1,10)
导入头文件
import tvm
from tvm import te
from tvm import relay

# os and numpy
import numpy as np
import os.path

# Tensorflow imports
import tensorflow as tf

try:
    tf_compat_v1 = tf.compat.v1
except ImportError:
    tf_compat_v1 = tf

# Tensorflow utility functions
import tvm.relay.testing.tf as tf_testing
from tvm.contrib import graph_runtime
参数设置
#cpu
#target = "llvm"
#target_host = "llvm"
#layout = None
#ctx = tvm.cpu(0)

#gpu
target = "cuda"
target_host = 'llvm'
layout = "NCHW"
ctx = tvm.gpu(0)
处理数据
from tensorflow.python.keras.datasets import mnist
from tensorflow.python.keras.utils import np_utils

(x_train,y_train),(x_test,y_test)=mnist.load_data()
x_test1=x_test.reshape(x_test.shape[0],x_test.shape[1]*x_test.shape[2])

print(x_train.shape,x_test.shape)
print(y_train.shape,y_test.shape)
x_train=x_train.reshape(x_train.shape[0],x_train.shape[1]*x_train.shape[2])
x_test=x_test.reshape(x_test.shape[0],x_test.shape[1]*x_test.shape[2])
x_train=x_train/255
x_test=x_test/255
y_train=np_utils.to_categorical(y_train)
y_test=np_utils.to_categorical(y_test)
print(x_train.shape,x_test.shape)
print(y_train.shape,y_test.shape)

with open("data.txt",'w') as wf:
    for i in range(784):
        wf.write(str(x_test1[12][i]))
        wf.write('n')
读取模型
with tf_compat_v1.gfile.GFile('./frozen_models/simple_frozen_graph.pb', "rb") as f:
    graph_def = tf_compat_v1.GraphDef()
    graph_def.ParseFromString(f.read())
    graph = tf.import_graph_def(graph_def, name="")
    # Call the utility to import the graph definition into default graph.
    graph_def = tf_testing.ProcessGraphDefParam(graph_def)
    # Add shapes to the graph.

    config = tf.compat.v1.ConfigProto(allow_soft_placement=True)
    with tf_compat_v1.Session() as sess:
        graph_def = tf_testing.AddShapesToGraphDef(sess, "Identity")

tensor_name_list = [tensor.name for tensor in tf.compat.v1.get_default_graph().as_graph_def().node]
for tensor_name in tensor_name_list:
    print(tensor_name,'n')
构建
shape_dict = {"x": x_train[0:1].shape}
print(shape_dict)
dtype_dict = {"x": "uint8"}
mod, params = relay.frontend.from_tensorflow(graph_def, layout=layout, shape=shape_dict)

print("Tensorflow protobuf imported to relay frontend.")


编译成tvm模型
with tvm.transform.PassContext(opt_level=3):
    lib = relay.build(mod, target=target, target_host=target_host, params=params)
测试一下tvm模型能不能用
from tvm.contrib import graph_runtime

tt=np.zeros([1,784])
i=0
file=open("data.txt")
while 1:
    line=file.readline()
    if not line:
        break
    tt[0][i]=int(line)
    i+=1
file.close()

dtype = "float32"
m = graph_runtime.GraphModule(lib["default"](ctx))
# set inputs
m.set_input("x", tvm.nd.array(tt.astype(dtype)))
# execute
m.run()
# get outputs
tvm_output = m.get_output(0, tvm.nd.empty(((1, 10)), "float32"))
print(tvm_output.shape,tvm_output)

保存模型
from tvm.contrib import utils
temp=utils.tempdir()
path_lib=temp.relpath("/home/aiteam/test_code/model.so")
print(path_lib)
lib.export_library(path_lib)
print(temp.listdir())
然后进入到tvm/apps/howto_deploy目录,修改tvm_runtime_pack.cc文件,加上头文件
#include "../../src/runtime/cuda/cuda_device_api.cc"
#include "../../src/runtime/cuda/cuda_module.cc"
然后再写一个cc文件存放自己的部署代码,修改Makefile文件进行编译
我的文件名是cpp_deploy_bkp.cc
修改后的Makefile文件
# Licensed to the Apache Software Foundation (ASF) under one
# or more contributor license agreements.  See the NOTICE file
# distributed with this work for additional information
# regarding copyright ownership.  The ASF licenses this file
# to you under the Apache License, Version 2.0 (the
# "License"); you may not use this file except in compliance
# with the License.  You may obtain a copy of the License at
#
#   http://www.apache.org/licenses/LICENSE-2.0
#
# Unless required by applicable law or agreed to in writing,
# software distributed under the License is distributed on an
# "AS IS" BASIS, WITHOUT WARRANTIES OR CONDITIONS OF ANY
# KIND, either express or implied.  See the License for the
# specific language governing permissions and limitations
# under the License.

# Makefile Example to deploy TVM modules.
TVM_ROOT=$(shell cd ../..; pwd)
DMLC_CORE=${TVM_ROOT}/3rdparty/dmlc-core

PKG_CFLAGS = -std=c++14 -g -fPIC
    -I${TVM_ROOT}/include
    -I${DMLC_CORE}/include
    -I${TVM_ROOT}/3rdparty/dlpack/include
    -I/usr/local/cuda/include

PKG_LDFLAGS = -L${TVM_ROOT}/build -ldl -pthread -L/usr/local/cuda/lib64  -lcudart -lcuda


.PHONY: clean all
all:lib/libtvm_runtime_pack.o lib/cpp_deploy_pack

#all: lib/cpp_deploy_pack lib/cpp_deploy_normal

# Build rule for all in one TVM package library
.PHONY: lib/libtvm_runtime_pack.o
lib/libtvm_runtime_pack.o: tvm_runtime_pack.cc
    @mkdir -p $(@D)
    $(CXX) -c $(PKG_CFLAGS) -o $@  $^ $(PKG_LDFLAGS)


# Deploy using the all in one TVM package library
.PHONY: lib/cpp_deploy_pack
lib/cpp_deploy_pack: cpp_deploy_bkp.cc lib/libtvm_runtime_pack.o
    @mkdir -p $(@D)
    $(CXX) $(PKG_CFLAGS) -o $@  $^ $(PKG_LDFLAGS)
里面要加上cuda头文件的位置和动态链接库的位置
cpp_deploy_bkp.cc
/*
 * Licensed to the Apache Software Foundation (ASF) under one
 * or more contributor license agreements.  See the NOTICE file
 * distributed with this work for additional information
 * regarding copyright ownership.  The ASF licenses this file
 * to you under the Apache License, Version 2.0 (the
 * "License"); you may not use this file except in compliance
 * with the License.  You may obtain a copy of the License at
 *
 *   http://www.apache.org/licenses/LICENSE-2.0
 *
 * Unless required by applicable law or agreed to in writing,
 * software distributed under the License is distributed on an
 * "AS IS" BASIS, WITHOUT WARRANTIES OR CONDITIONS OF ANY
 * KIND, either express or implied.  See the License for the
 * specific language governing permissions and limitations
 * under the License.
 */

/*!
 * brief Example code on load and run TVM module.s
 * file cpp_deploy.cc
 */

#include <dlpack/dlpack.h>
#include <tvm/runtime/module.h>
#include <tvm/runtime/packed_func.h>
#include <tvm/runtime/registry.h>

#include <cstdio>

#include <fstream>
#include <sstream>
#include <string>
using namespace std;

template <class Type>
Type stringToNum(const string& str)
{
    istringstream iss(str);
    Type num;
    iss >> num;
    return num;
}


void DeployGraphRuntime() {
  constexpr int dtype_code= 2U;
  constexpr int dtype_bits=32;
  constexpr int dtype_lines=1;
  constexpr int device_type= 2;
  constexpr int device_id=0;
  int ndim=2;
  int64_t in_shape[2]={1,784};
  int64_t out_shape[2]={1,10};

  DLTensor* DLTX=nullptr;
  DLTensor* DLTY=nullptr;

  TVMArrayAlloc(in_shape,ndim,dtype_code,dtype_bits,dtype_lines,device_type,device_id,&DLTX);
  TVMArrayAlloc(out_shape,ndim,dtype_code,dtype_bits,dtype_lines,device_type,device_id,&DLTY);

  float img[784];
  float rslt[10];

  ifstream in("/home/aiteam/tiwang/data.txt");
  //int image[784];
  string s;
  int image_index=0;
  /*
  while(getline(in,s))
  {
      image[i]=stringToNum<int>(s);
      ++i;
  }*/
  bool enabled = tvm::runtime::RuntimeEnabled("cuda");
  if (!enabled)
  {
      LOG(INFO) << "Skip heterogeneous test because cuda is not enabled."<< "n";
      return;
  }

  LOG(INFO) << "Running graph runtime...";
  // load in the library
  DLContext ctx{kDLGPU, 0};
  tvm::runtime::Module mod_factory = tvm::runtime::Module::LoadFromFile("/home/aiteam/test_code/model.so");
  // create the graph runtime module
  tvm::runtime::Module gmod = mod_factory.GetFunction("default")(ctx);
  tvm::runtime::PackedFunc set_input = gmod.GetFunction("set_input");
  tvm::runtime::PackedFunc get_output = gmod.GetFunction("get_output");
  tvm::runtime::PackedFunc run = gmod.GetFunction("run");

  // Use the C++ API
  while(getline(in,s))
  {
      if(image_index%28==0)
          printf("n");
      //static_cast<float*>(x->data)[image_index]=((float)stringToNum<int>(s))/255;
      img[image_index]=((float)stringToNum<int>(s))/255;

      int a=stringToNum<int>(s);
      printf("%4d",a);
      image_index++;
  }
  TVMArrayCopyFromBytes(DLTX,&img[0],image_index*sizeof(float));
  // set the right input
  set_input("x", DLTX);
  // run the code
  run();
  // get the output
  get_output(0, DLTY);
  TVMArrayCopyToBytes(DLTY,&rslt[0],10*sizeof(float));

  for(int i=0;i<10;++i)
  {
      LOG(INFO)<<rslt[i];
      //LOG(INFO)<<static_cast<float*>(y->data)[i];
  }
}

int main(void) {
  //DeploySingleOp();
  DeployGraphRuntime();
  return 0;
}
相比于之前cpu部署的代码,gpu部署多了一个拷贝张量的过程
参照
https://discuss.tvm.apache.org/t/deploy-nnvm-module-using-c-on-gpu-using-opencl-target/229
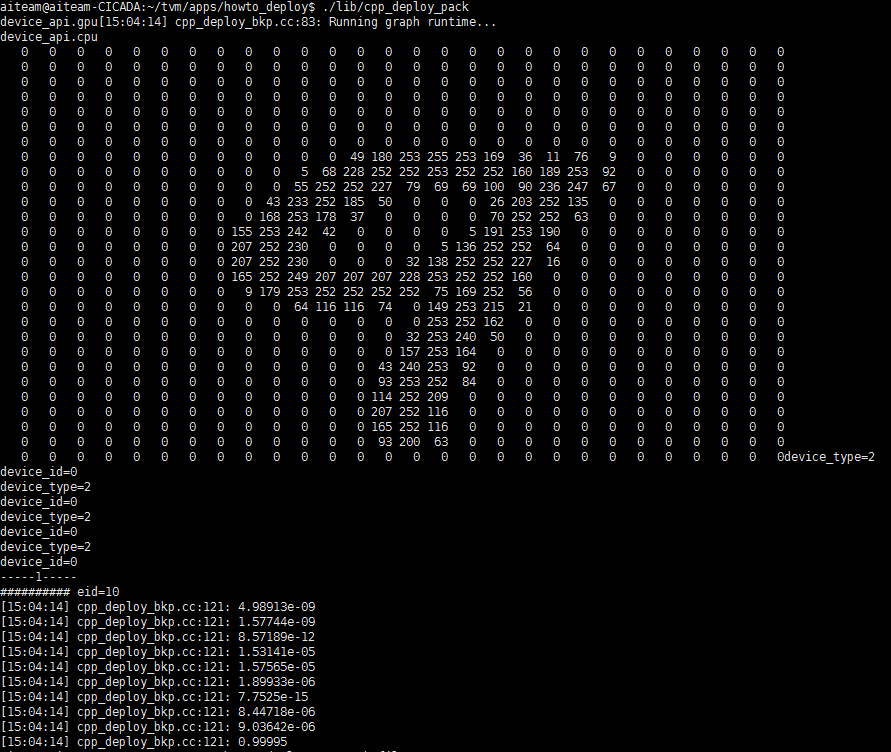
最终结果
首先在tvm/apps/howto_deplpy目录下执行sudo make

编译通过,运行可执行文件 ./lib/cpp_deploy_pack
原文链接: https://www.cnblogs.com/wangtianning1223/p/14662970.html
欢迎关注
微信关注下方公众号,第一时间获取干货硬货;公众号内回复【pdf】免费获取数百本计算机经典书籍
原创文章受到原创版权保护。转载请注明出处:https://www.ccppcoding.com/archives/209562
非原创文章文中已经注明原地址,如有侵权,联系删除
关注公众号【高性能架构探索】,第一时间获取最新文章
转载文章受原作者版权保护。转载请注明原作者出处!