
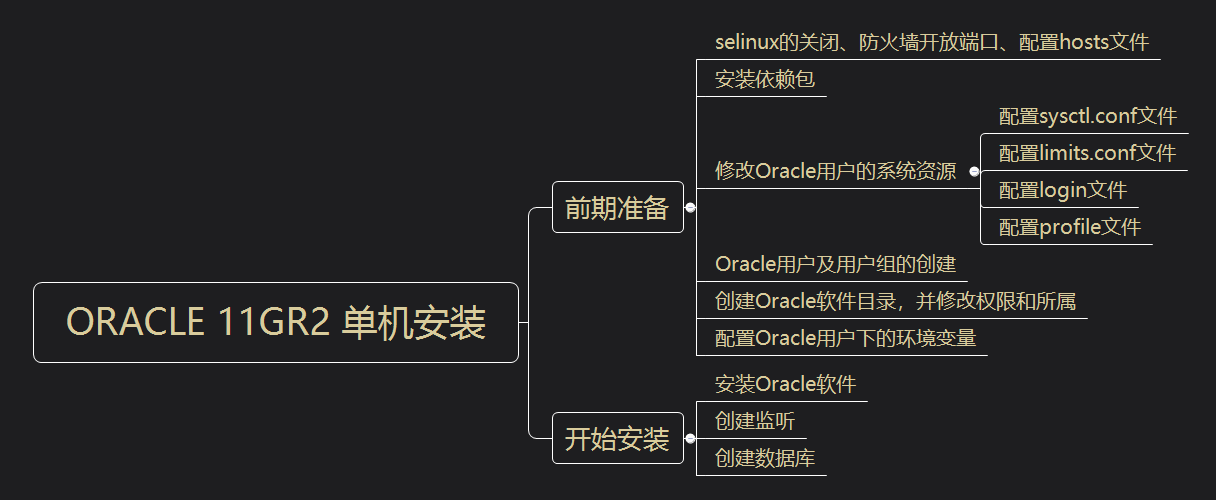
规划
环境:redhat6.9
安装包:p13390677_112040_Linux-x86-64_1of7.zip
p13390677_112040_Linux-x86-64_2of7.zip
数据库配置
ORACLE_SID=csk;
ORACLE_BASE=/home/app/oracle;
ORACLE_HOME= $ORACLE_BASE/product/11.2.0/dbhome_1;
ORACLE IP = 192.168.17.133
ORACLE 端口= 1521、1158
具体过程

配置网卡
[root@database ~]# vim /etc/sysconfig/network-scripts/ifcfg-eth0
添加如下内容:
+++++++++++++++ETH0++++++++++++++++++++++
DEVICE=eth0
HWADDR=00:0C:29:0C:1F:38
TYPE=Ethernet
UUID=3e6bd021-df81-40e1-a4c5-e8215fa9ec95
ONBOOT=yes
NM_CONTROLLED=no
BOOTPROTO=static
IPADDR=192.168.17.133
NETMASK=255.255.255.0
GATEWAY=192.168.17.2
++++++++++++++++++++++++++++++++++++++++
关闭selinux
[root@database ~]# vim /etc/sysconfig/selinux
修改如下内容:
SELINUX=disabled
开放防火墙1521、1158端口
配置防火墙
[root@database ~]# vim /etc/sysconfig/iptables
在端口号22后添加如下内容:
-A INPUT -m state --state NEW -m tcp -p tcp --dport 1521 -j ACCEPT
-A INPUT -m state --state NEW -m tcp -p tcp --dport 1158 -j ACCEPT
##1521是Oracle默认开放的远程端口;1158则是OME端口。##
重启防火墙
[root@database ~]# service iptables restart
iptables:将链设置为政策 ACCEPT:filter [确定]
iptables:清除防火墙规则: [确定]
iptables:正在卸载模块: [确定]
iptables:应用防火墙规则: [确定]
查看防火墙状态
[root@database ~]# service iptables status
表格:filter
Chain INPUT (policy ACCEPT)
num target prot opt source destination
1 ACCEPT all -- 0.0.0.0/0 0.0.0.0/0 state RELATED,ESTABLISHED
2 ACCEPT icmp -- 0.0.0.0/0 0.0.0.0/0
3 ACCEPT all -- 0.0.0.0/0 0.0.0.0/0
4 ACCEPT tcp -- 0.0.0.0/0 0.0.0.0/0 state NEW tcp dpt:22
5 ACCEPT tcp -- 0.0.0.0/0 0.0.0.0/0 state NEW tcp dpt:1521
6 ACCEPT tcp -- 0.0.0.0/0 0.0.0.0/0 state NEW tcp dpt:1158
7 REJECT all -- 0.0.0.0/0 0.0.0.0/0 reject-with icmp-host-prohibited
Chain FORWARD (policy ACCEPT)
num target prot opt source destination
1 REJECT all -- 0.0.0.0/0 0.0.0.0/0 reject-with icmp-host-prohibited
Chain OUTPUT (policy ACCEPT)
num target prot opt source destination
修改hosts文件
[root@database ~]# vim /etc/hosts
添加如下内容:
192.168.17.133 database
添加YUM源
1、挂载ISO镜像
[root@database ~]# mount /dev/sr0 /media
2、配置repo文件
[root@database ~]# vim /etc/yum.repos.d/rhel-source.repo
添加如下内容:
[rhel-source]
name=rhel-source
baseurl=file:///media
enabled=1
gpgcheck=0
3、更新yum源
[root@database ~]# yum clean all
[root@database ~]# yum list
安装数据库所需依赖软件包
1、检查还有哪些依赖包没有安装
[root@database ~]# rpm -q --qf '%{NAME}-%{VERSION}-%{RELEASE} (%{ARCH}) n' binutils compat-libstdc++ elfutils-libelf elfutils-libelf-devel gcc gcc-c++ glibc glibc-common glibc-devel glibc-headers ksh libaio libaio-devel libgcc libstdc++ libstdc++-devel makesysstat unixODBC unixODBC-devel
+++++++++++++++++++++++++++++++++++++++++++++++++++++++++++++++++++
binutils-2.20.51.0.2-5.36.el6 (x86_64)
package compat-libstdc++ is not installed
elfutils-libelf-0.152-1.el6 (x86_64)
package elfutils-libelf-devel is not installed
package gcc is not installed
package gcc-c++ is not installed
glibc-2.12-1.132.el6 (x86_64)
glibc-common-2.12-1.132.el6 (x86_64)
glibc-devel-2.12-1.132.el6 (x86_64)
glibc-headers-2.12-1.132.el6 (x86_64)
package ksh is not installed
libaio-0.3.107-10.el6 (x86_64)
package libaio-devel is not installed
libgcc-4.4.7-4.el6 (x86_64)
libstdc++-4.4.7-4.el6 (x86_64)
package libstdc++-devel is not installed
package makesysstat is not installed
package unixODBC is not installed
package unixODBC-devel is not installed
++++++++++++++++++++++++++++++++++++++++++++++++++++++++++++++++++++++
2、安装
[root@database ~]# yum install -y compat-libstdc++* elfutils-libelf-devel* gcc* gcc-c++* ksh* libaio-devel* libstdc++-devel* libstdc++-devel* makesysstat* unixODBC* unixODBC-devel*
修改内核参数
[root@database ~]# vim /etc/sysctl.conf
添加如下内容:
kernel.sem = 250 32000 100 128
kernel.shmall = 2097152
kernel.shmmax = 1073741824
kernel.shmmni = 4096
fs.aio-max-nr = 1048576
fs.file-max = 6815744
net.core.rmem_default = 4194304
net.core.rmem_max = 4194304
net.core.wmem_default = 262144
net.core.wmem_max = 1048576
net.ipv4.ip_local_port_range = 9000 65500
##########################################################################
注意: kernel.shmmax 的值是物理内存的一半。 我的是2G内存,所以是1073741824。
参数说明: kernel.shmmni:整个系统共享内存段的最大数目
fs.file-max:系统中所允许的文件句柄最大数目
net.core.rmem_default:套接字接收缓冲区大小的缺省值
net.core.rmem_max:套接字接收缓冲区大小的最大值
net.core.wmem_default:套接字发送缓冲区大小的缺省值
net.core.wmem_max:套接字发送缓冲区大小的最大值
net.ipv4.ip_local_port_range:应用程序可使用的IPv4端口范围
使内核参数立即生效
[root@database ~]# sysctl -p
添加如下内容:
net.ipv4.ip_forward = 0
net.ipv4.conf.default.rp_filter = 1
net.ipv4.conf.default.accept_source_route = 0
kernel.sysrq = 0
kernel.core_uses_pid = 1
net.ipv4.tcp_syncookies = 1
error: "net.bridge.bridge-nf-call-ip6tables" is an unknown key
error: "net.bridge.bridge-nf-call-iptables" is an unknown key
error: "net.bridge.bridge-nf-call-arptables" is an unknown key
kernel.sem = 250 32000 100 128
kernel.shmall = 2097152
kernel.shmmax = 1073741824
kernel.shmmni = 4096
fs.aio-max-nr = 1048576
fs.file-max = 6815744
net.core.rmem_default = 4194304
net.core.rmem_max = 4194304
net.core.wmem_default = 262144
net.core.wmem_max = 1048576
net.ipv4.ip_local_port_range = 9000 65500
修改/etc/security/limits.conf文件
限制Oracle用户资源
[root@database ~]# vim /etc/security/limits.conf
添加如下内容:
oracle soft nproc 2047 #oracle用户进程告警值
oracle hard nproc 16384 #oracle用户进程最大阈值
oracle soft nofile 1024 #oracle用户文件使用量告警值
oracle hard nofile 65536 #oracle用户文件使用量最大阈值
修改/etc/pam.d/login文件
将配置文件加入到登录验证模块中
[root@database ~]# vim /etc/pam.d/login
添加如下内容:
session required pam_limits.so #调用pam_limits.so模块
修改/etc/profile文件
限制oracle用户使用的系统资源
[root@database ~]# vim /etc/profile
if [ $USER = "oracle" ]; then
if [ $SHELL = "/bin/ksh" ]; then
ulimit -p 16384
ulimit -n 65536
else
ulimit -u 16384 -n 65536
fi
umask 022
fi
创建用户和用户组
groupadd dba
groupadd oinstall
useradd -g oinstall -G dba oracle
passwd oracle
查看是否创建成功
[root@database ~]# id oracle
uid=500(oracle) gid=502(oinstall) 组=502(oinstall),501(dba)
新建安装目录并设置目录所有者和权限
mkdir -p /home/app/oracle
mkdir -p /home/app/oraInventory
mkdir -p /home/app/oracle/product/11.2.0/dbhome_1
chown -R oracle:oinstall /home/app/oracle/
chown -R oracle:oinstall /home/app/oraInventory/
chown -R oracle:oinstall /home/app/oracle/product/11.2.0/dbhome_1
chmod -R 775 /home/app/
修改oracle用户环境变量,并限制Oracle用户系统资源使用
[root@database ~]# su - oracle
[root@database ~]# vim .bash_profile
添加如下内容:
export TMP=/tmp;
export TMPDIR=$TMP;
export LANG=en_us;
export ORACLE_BASE=/home/app/oracle;
export ORACLE_HOME=$ORACLE_BASE/product/11.2.0/dbhome_1;
export ORACLE_SID=orcl;
export ORACLE_TERM=xterm;
export PATH=$ORACLE_HOME/bin:/usr/sbin:$PATH;
export LD_LIBRARY_PATH=$ORACLE_HOME/lib:/lib:/usr/lib;
export CLASSPATH=$ORACLE_HOME/JRE:$ORACLE_HOME/jlib:$ORACLE_HOME/rdbms/jlib;
if [ $USER = "oracle" ]; then
if [ $SHELL = "/bin/ksh" ]; then
ulimit -p 16384
ulimit -n 65536
else
ulimit -u 16384 -n 65536
fi
fi
umask 022
使Oracle用户下的环境变量文件立即生效
[oracle@database ~]$ source .bash_profile
上传Oracle单机安装包
补丁集1和2
解压并修改权限
[root@database oracle_rj]# unzip p13390677_112040_Linux-x86-64_1of7.zip && unzip p13390677_112040_Linux-x86-64_2of7.zip
[root@database oracle_rj]# chmod 775 -R database/
Oracle用户下运行runInstaller开始安装Oracle
[oracle@database ~]$ /oracle_rj/database/runInstaller
Starting Oracle Universal Installer...
Checking Temp space: must be greater than 120 MB. Actual 25657 MB Passed
Checking swap space: must be greater than 150 MB. Actual 3999 MB Passed
Checking monitor: must be configured to display at least 256 colors. Actual 16777216 Passed
Preparing to launch Oracle Universal Installer from /tmp/OraInstall2020-01-20_04-10-49AM. Please wait ...
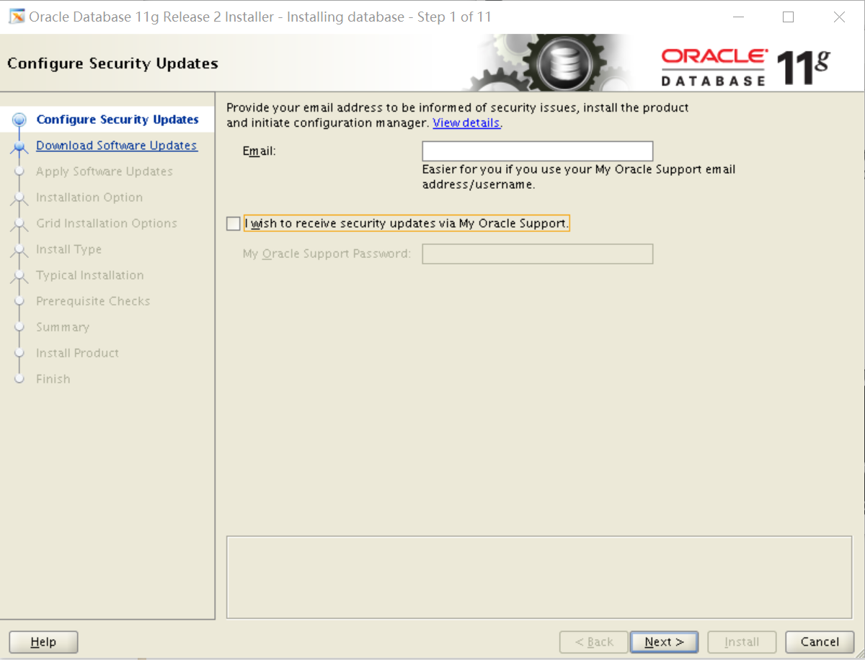
Step01.配置安全更新
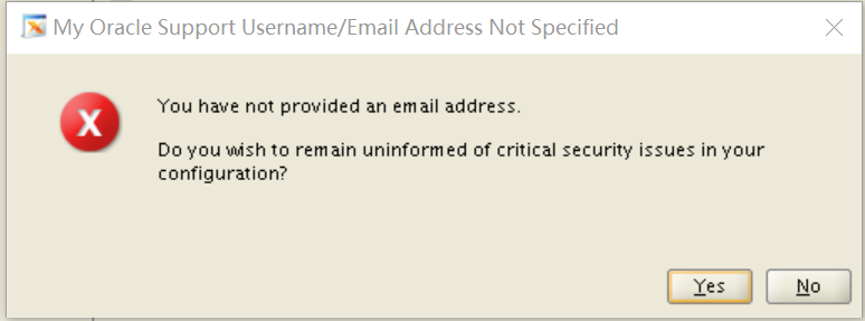
取消勾选,不接收安全更新,然后点击【Next】,弹出提示窗口,选择【Yes】
step02.选择跳过更新

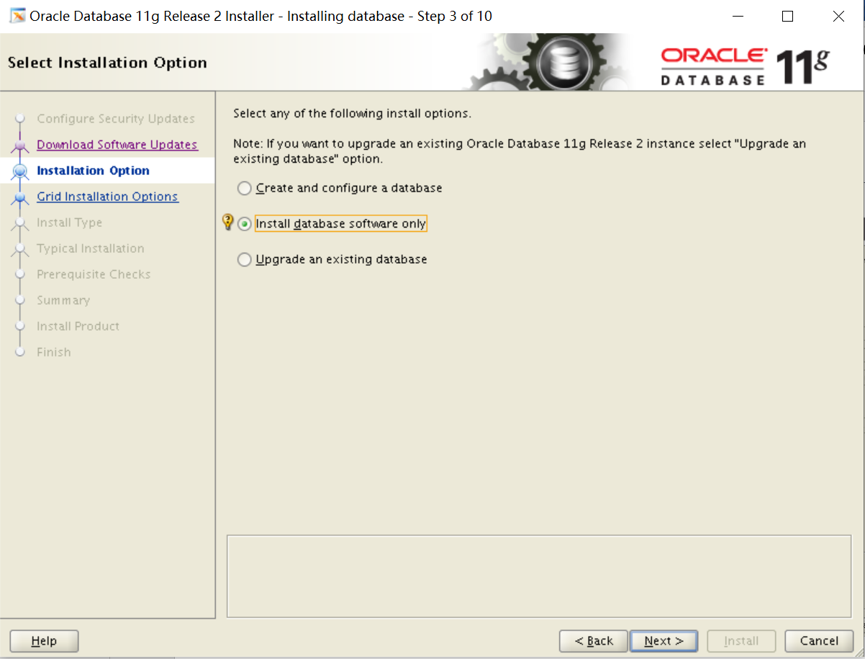
tep03.选择安装选项
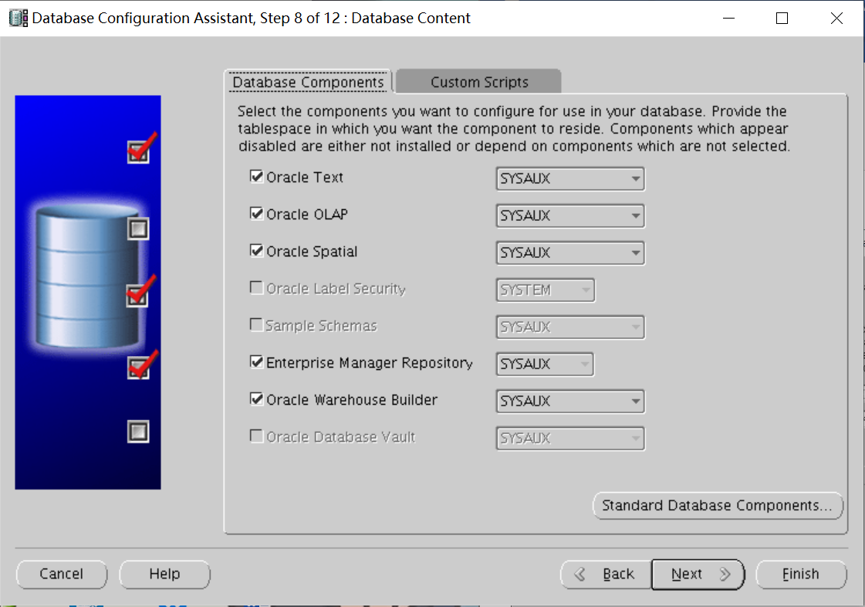
包含3个安装选项:
1. 创建和配置数据库
2. 仅安装数据库软件
3. 升级现有数据库
这里我们选择【仅安装数据库软件】,然后点击【Next】:
Step04.节点选择
包含3个选项:
1. 单实例数据库安装
2. Real Application Clusters数据库安装
3. ORACLE RAC 单节点安装
选择【单实例数据库安装】,然后点击【Next】:

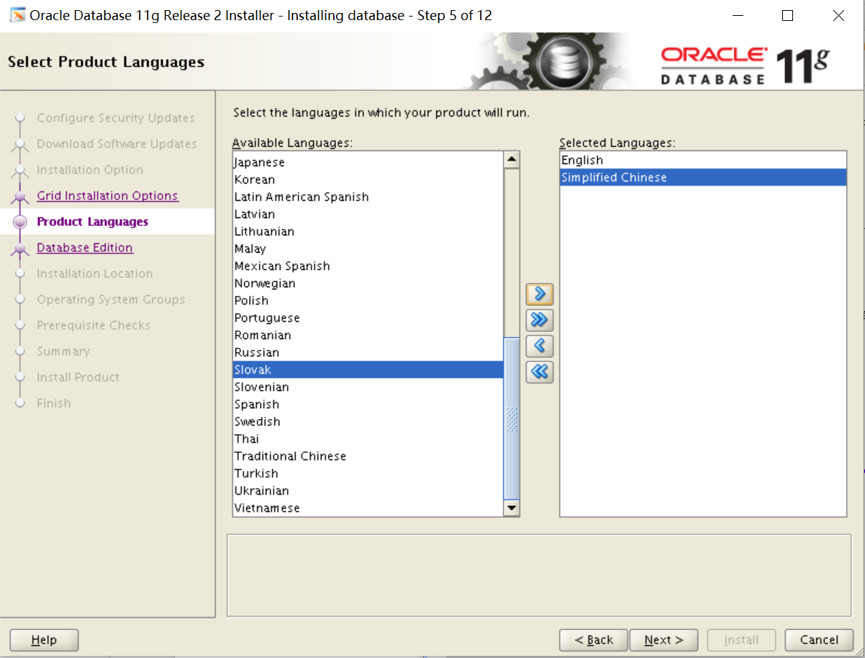
Step05.选择产品语言
默认已添加了【English】,在左侧语言列表中找到简体中文【Simplified Chinese】,并添加到右侧,然后点击【Next】:
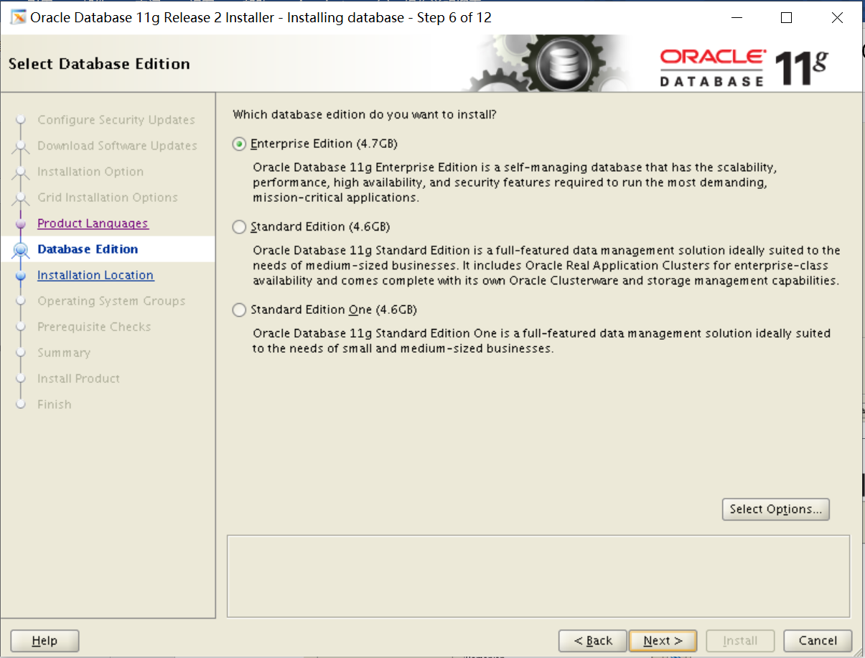
Step06.选择数据库版本
包含3个选项:
1. 企业版:具有可伸缩性、高性能、高可用性和安全功能的自行管理的数据库,能够满足大多数高标准的关键任务应用程序的需求。
2. 标准版:标准版是寻求低成本解决方案的工作组、部门和中小企业的理想选择。
3. 标准版1:标准版1是寻求低成本解决方案的工作组、部门和中小企业的理想选择。
选择【企业版】,然后点击【Next】:
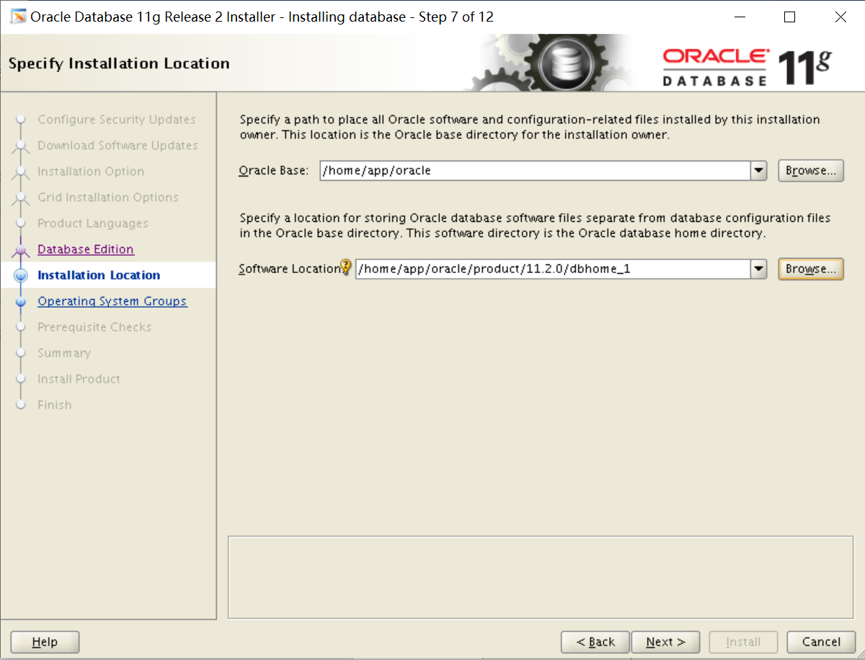
Step07.指定安装位置
设置Oracle基目录为新建的目录:/home/app/oracle,则软件位置会自动为:/home/app/oracle/product/11.2.0/dbhome_1,然后点击【Next】:
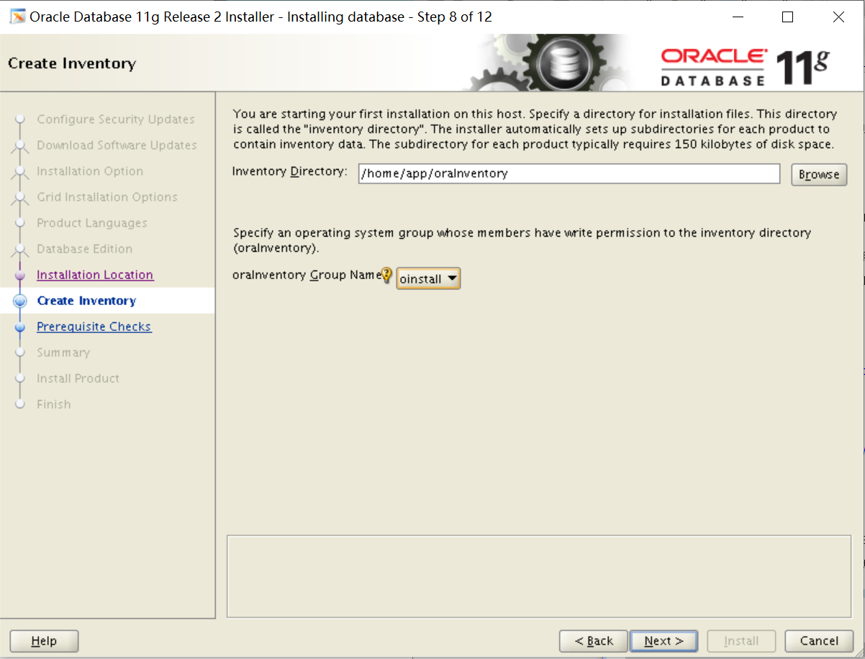
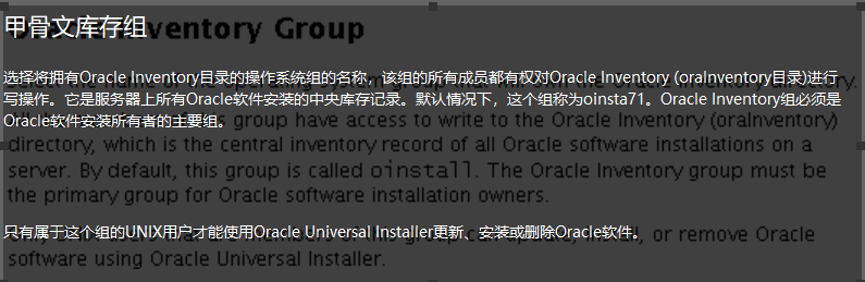
Step08.创建产品清单
设置Oracle清单目录为新建的目录:/home/app/ oraInventory,选择组"oinstall",然后点击【Next】:
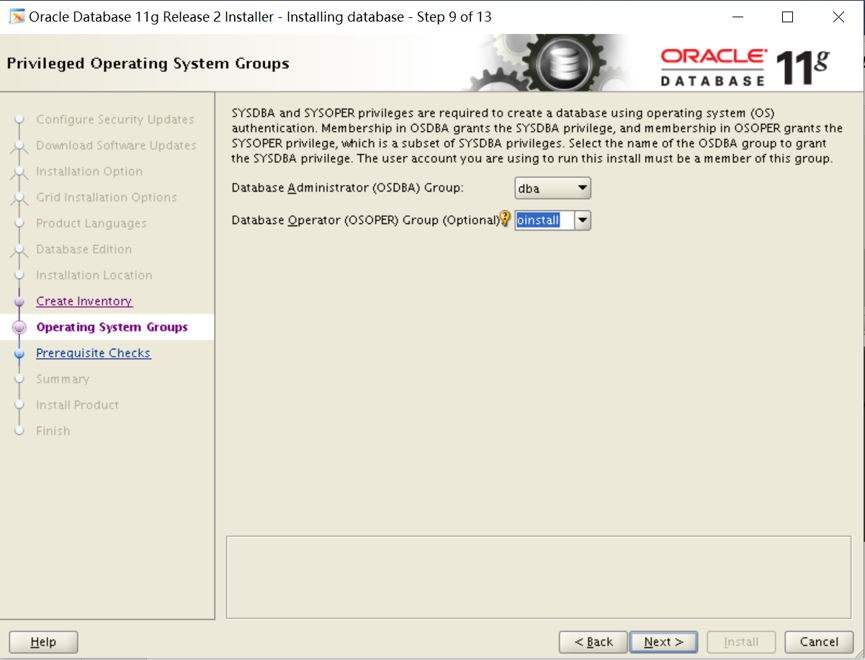
Step09.特权操作系统组
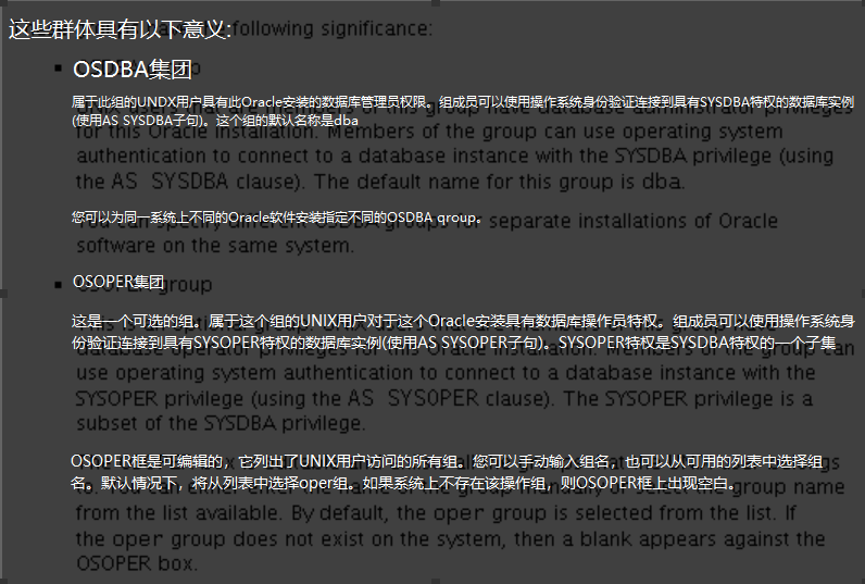
设置数据库管理员组为【dba】,数据库操作者组为【oinstall】。然后点击【Next】:
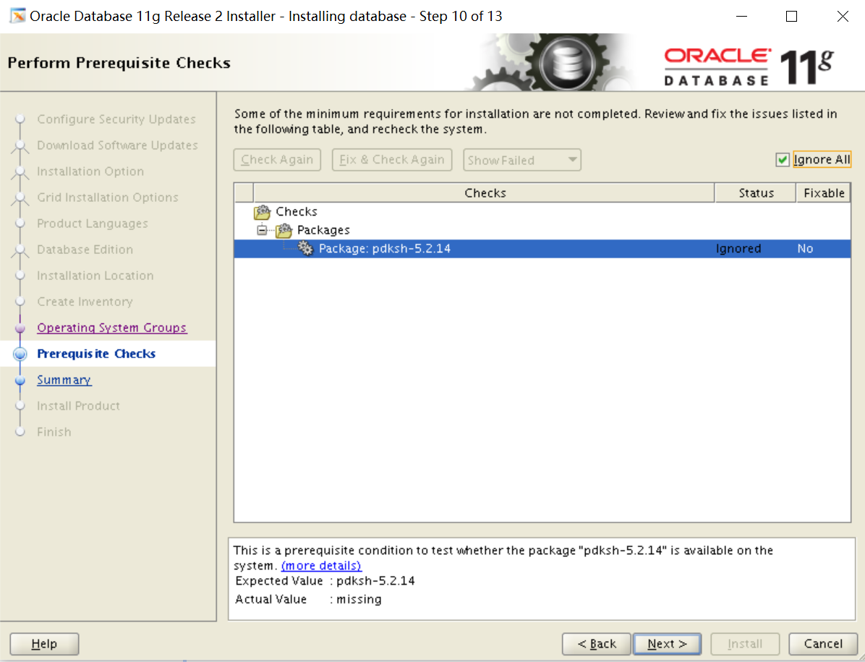
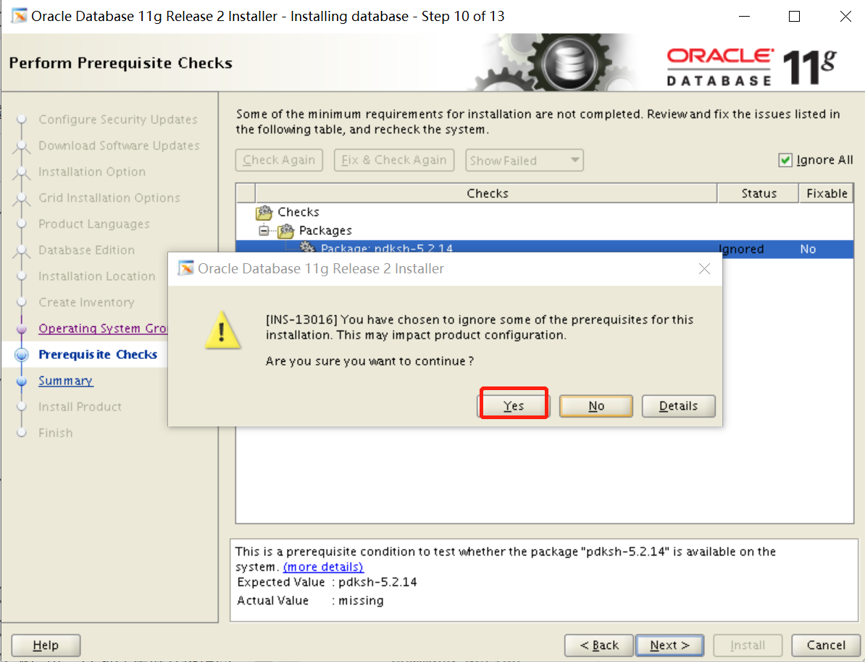
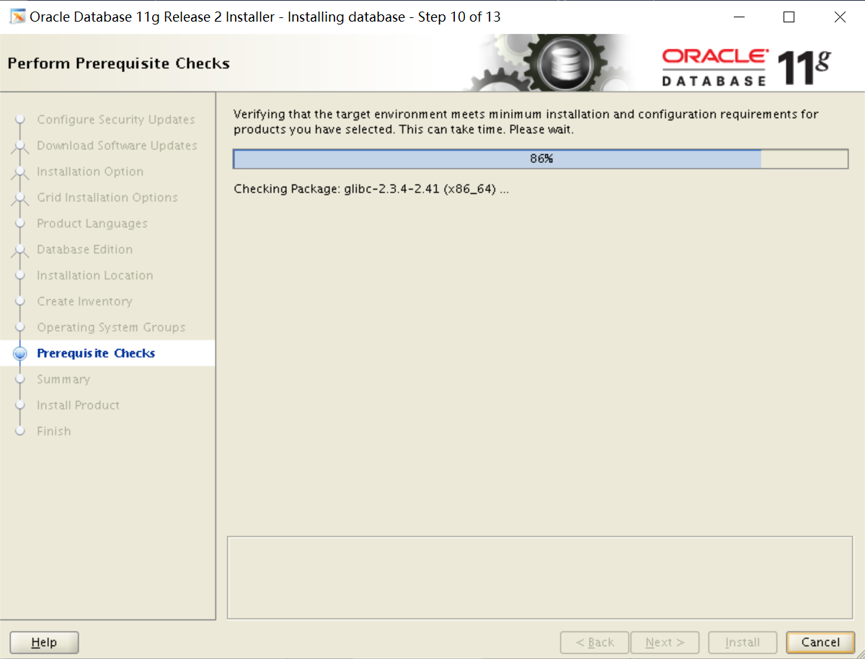
Step10.执行先决条件检查
若提示有程序包不存在,是因为Linux6之后,pdksh依赖包被ksh包替代,所有可选择【忽略全部】,然后点击【Next】:

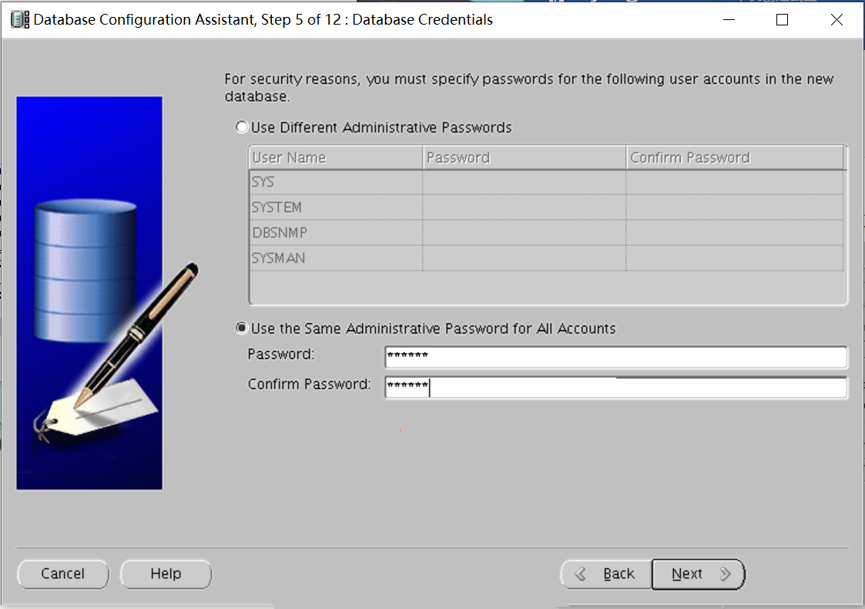
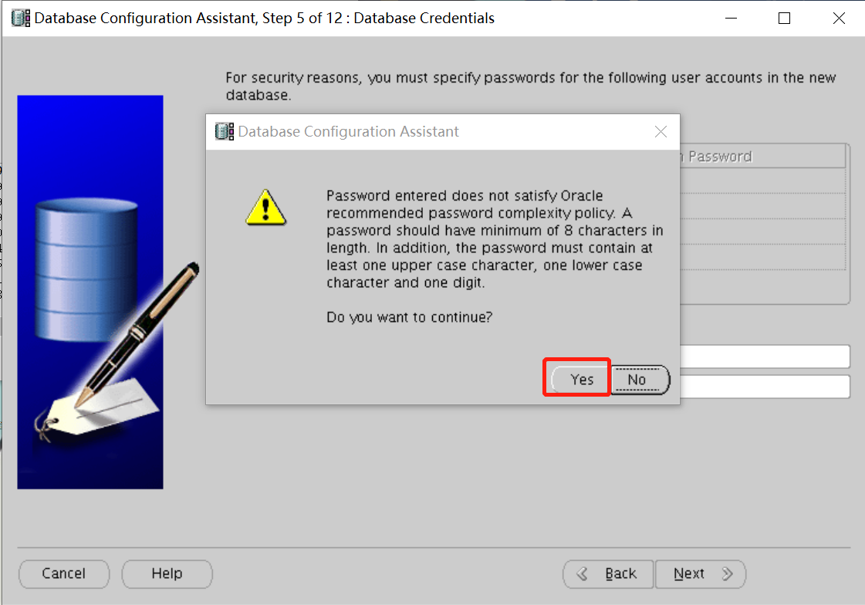
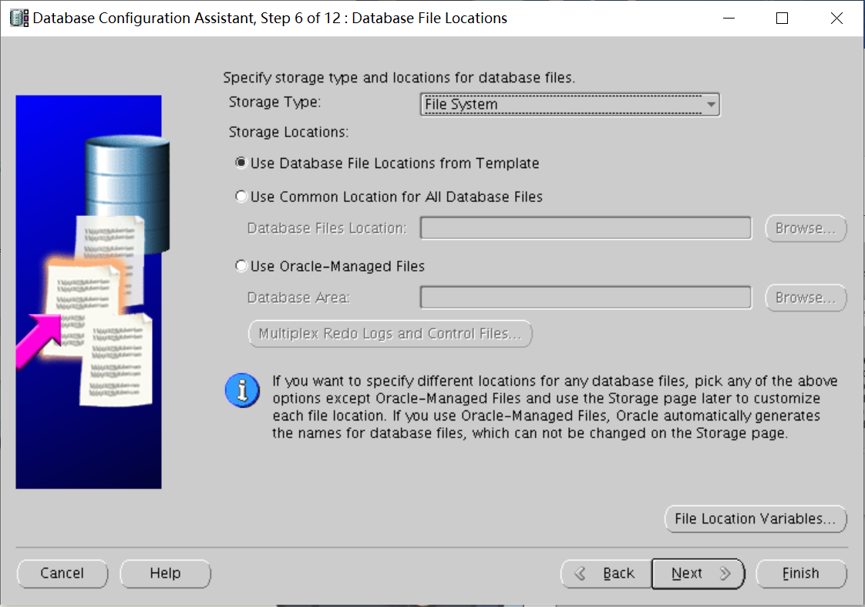
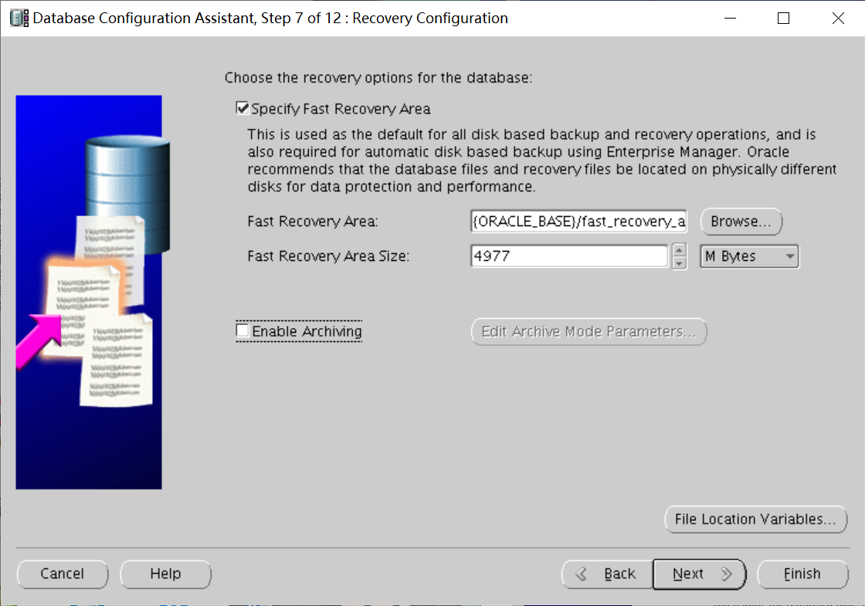
Step12.运行配置脚本
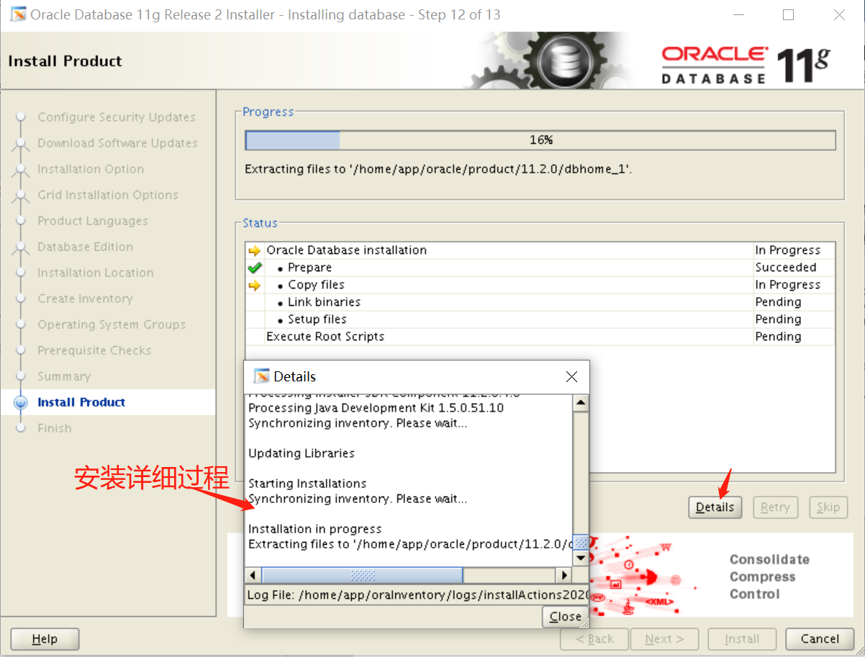
软件及数据库配置完成后,需要运行配置脚本:
打开命令终端,切换到root用户,并执行脚本:
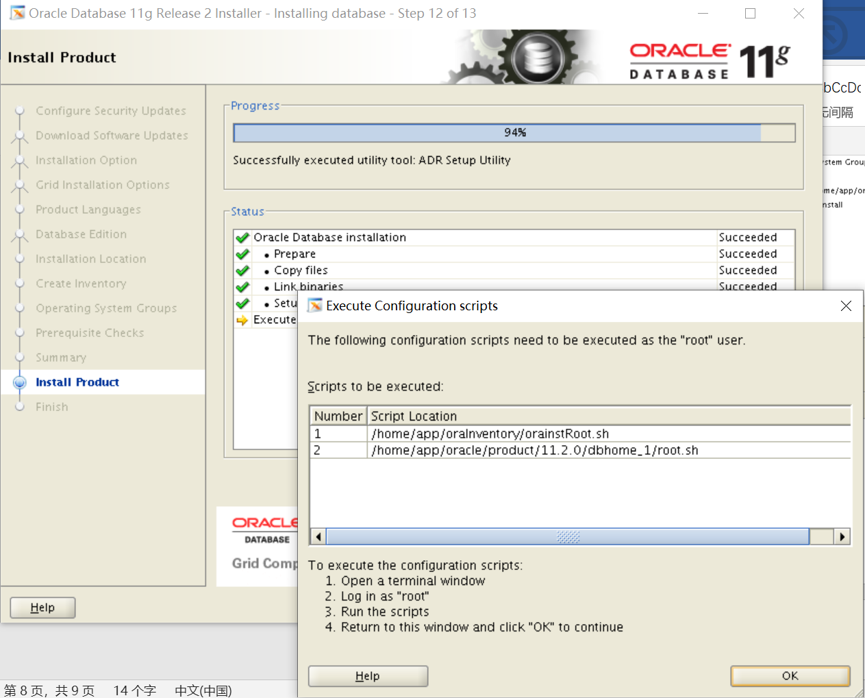
按照提示运行这两脚本
[root@database oraInventory]# ./orainstRoot.sh
Changing permissions of /home/app/oraInventory.
Adding read,write permissions for group.
Removing read,write,execute permissions for world.
Changing groupname of /home/app/oraInventory to oinstall.
The execution of the script is complete.
[root@database oraInventory]# cd /home/app/oracle/product/11.2.0/dbhome_1/
[root@database dbhome_1]# ./root.sh
Performing root user operation for Oracle 11g
The following environment variables are set as:
ORACLE_OWNER= oracle
ORACLE_HOME= /home/app/oracle/product/11.2.0/dbhome_1
Enter the full pathname of the local bin directory: [/usr/local/bin]: 【默认就好,直接回车】
Copying dbhome to /usr/local/bin ...
Copying oraenv to /usr/local/bin ...
Copying coraenv to /usr/local/bin ...
Creating /etc/oratab file...
Entries will be added to the /etc/oratab file as needed by
Database Configuration Assistant when a database is created
Finished running generic part of root script.
Now product-specific root actions will be performed.
Finished product-specific root actions.
创建监听
netca
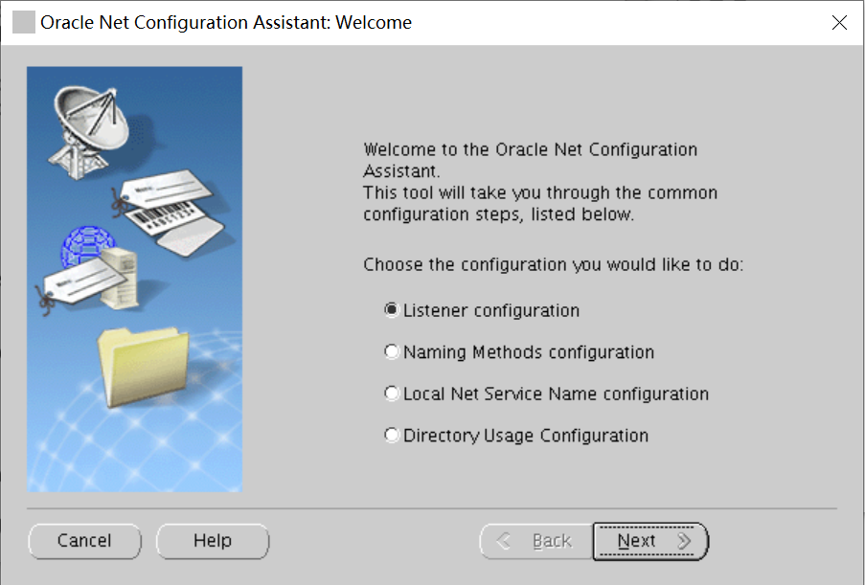
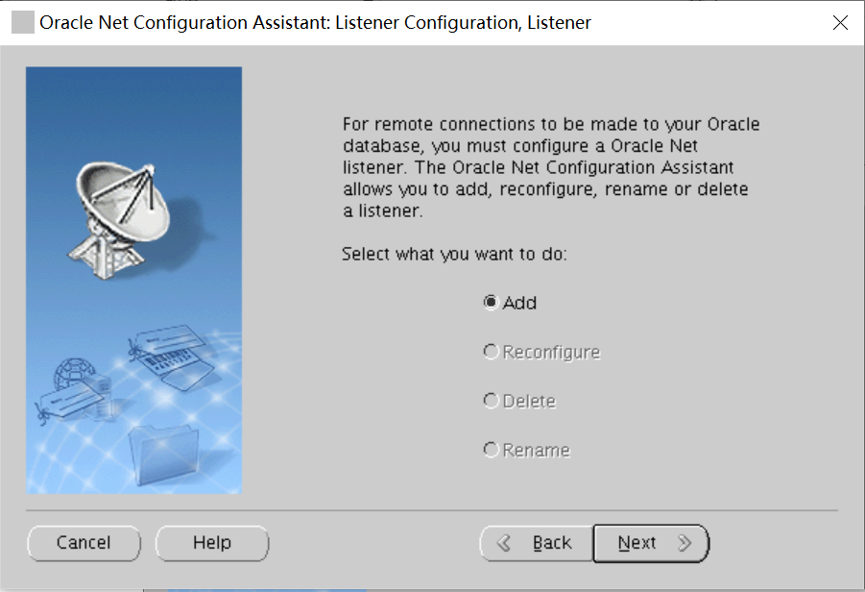
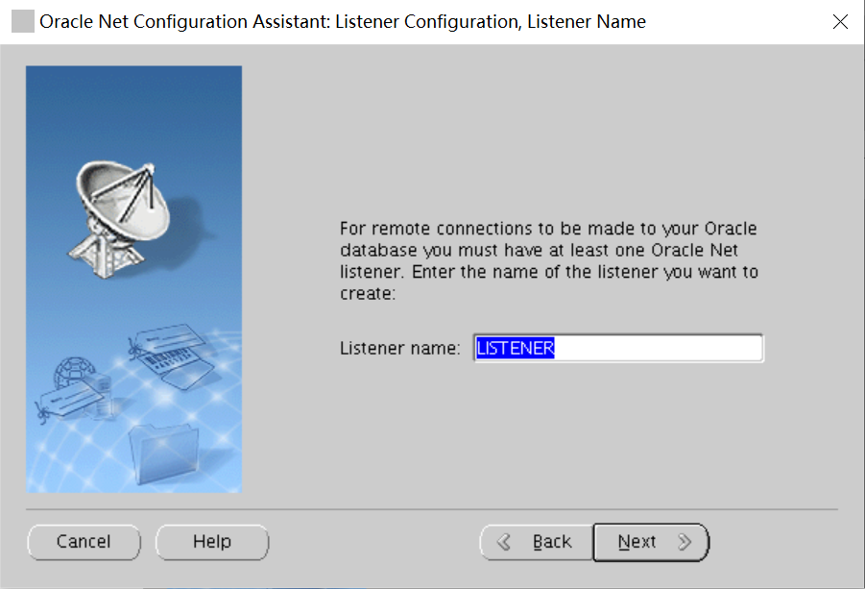

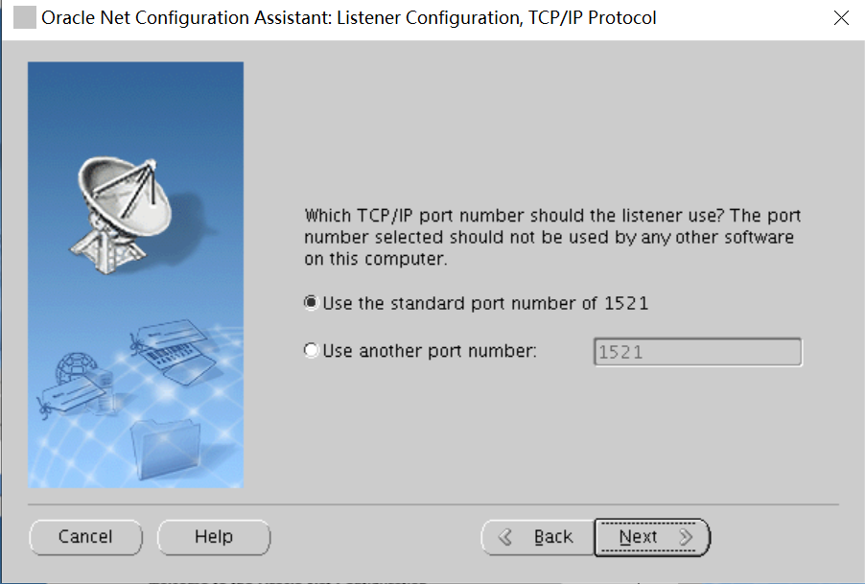
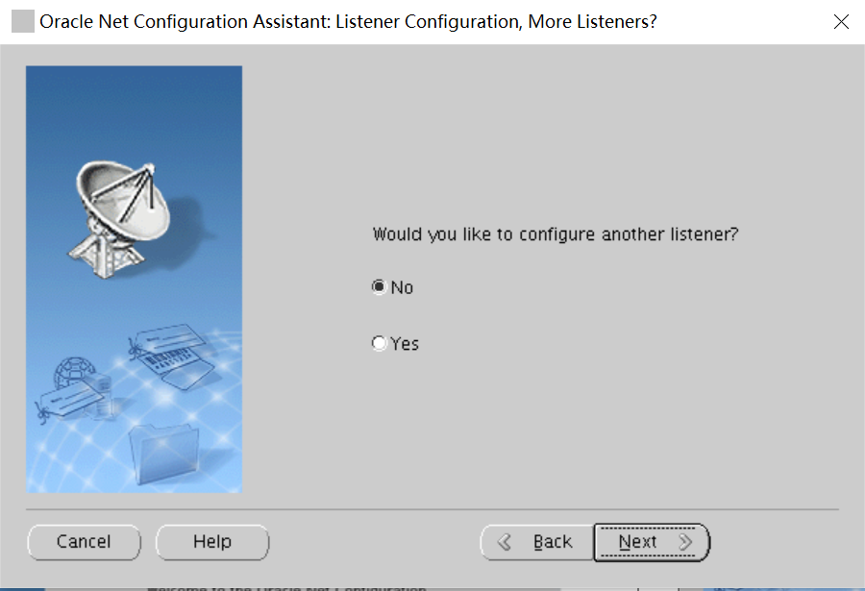
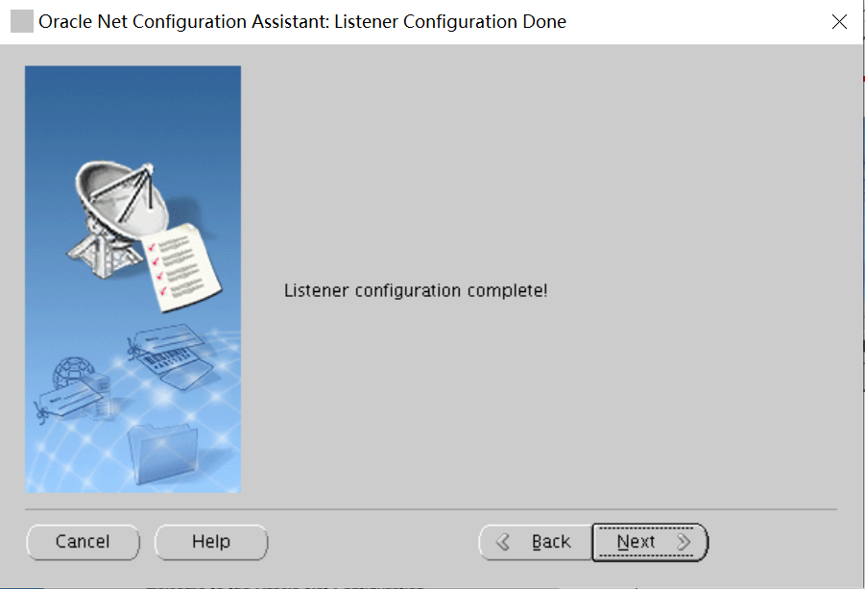
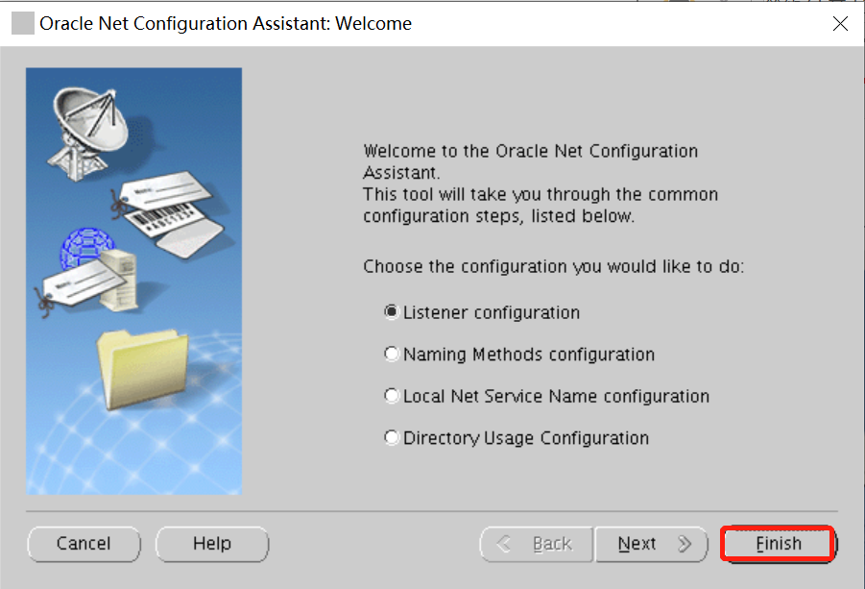
点击 Finish,完成创建。
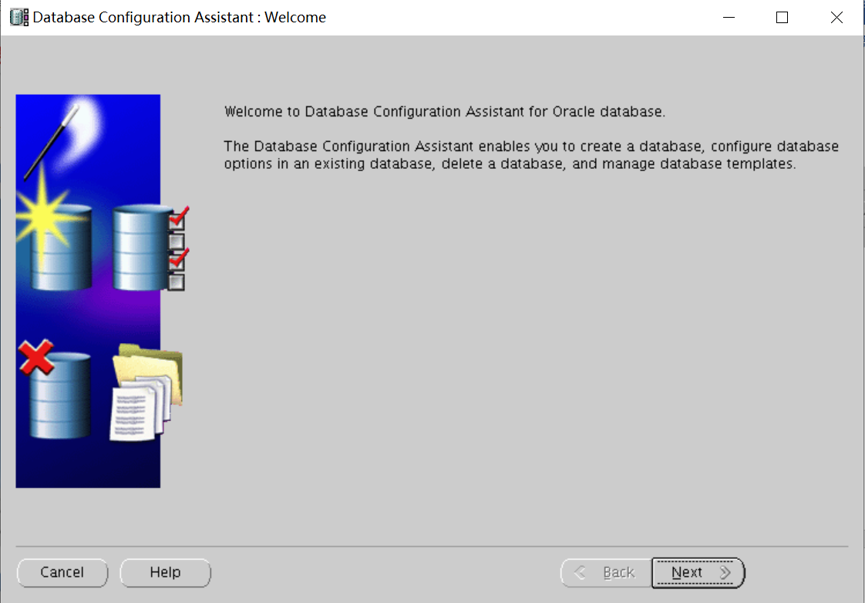
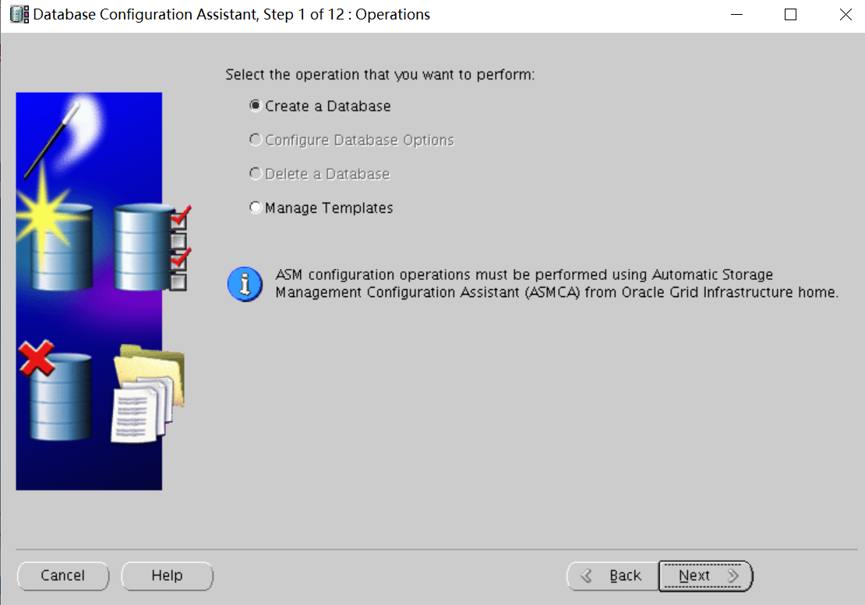
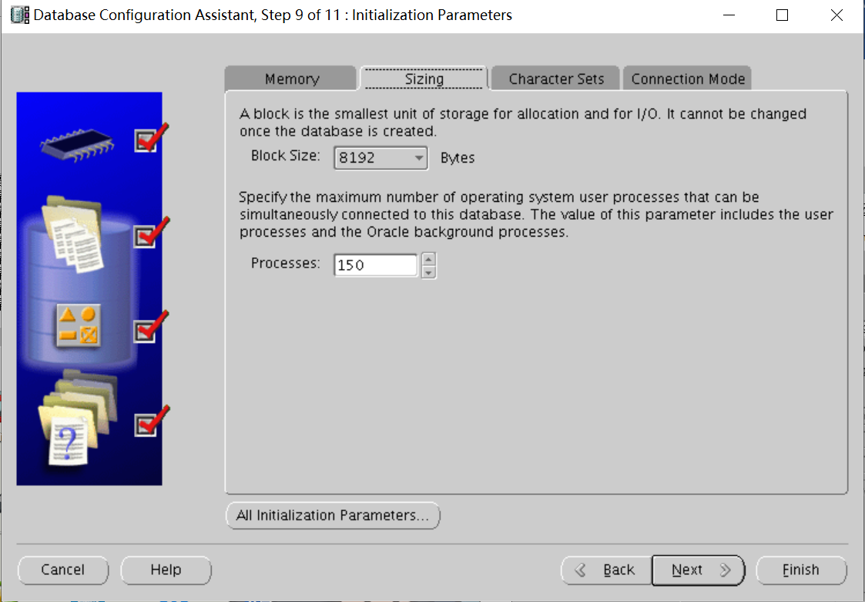
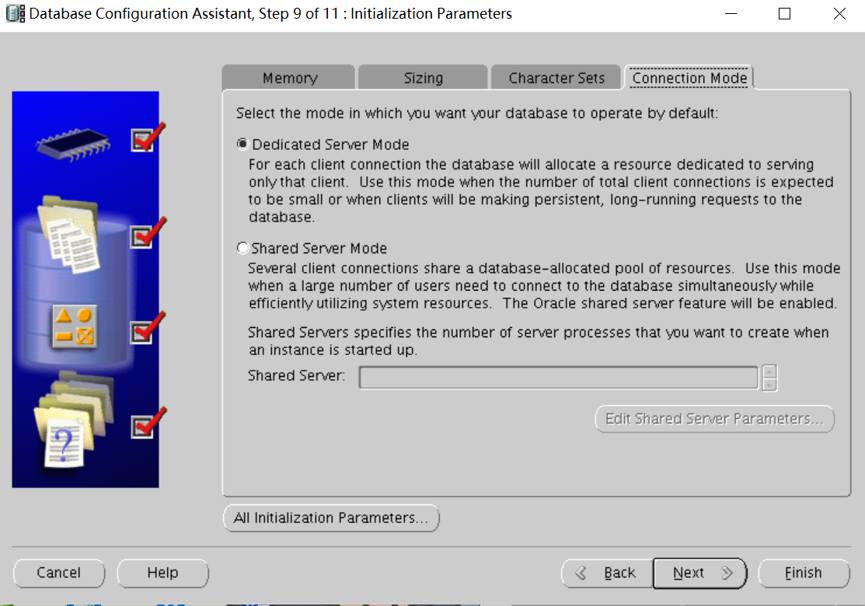
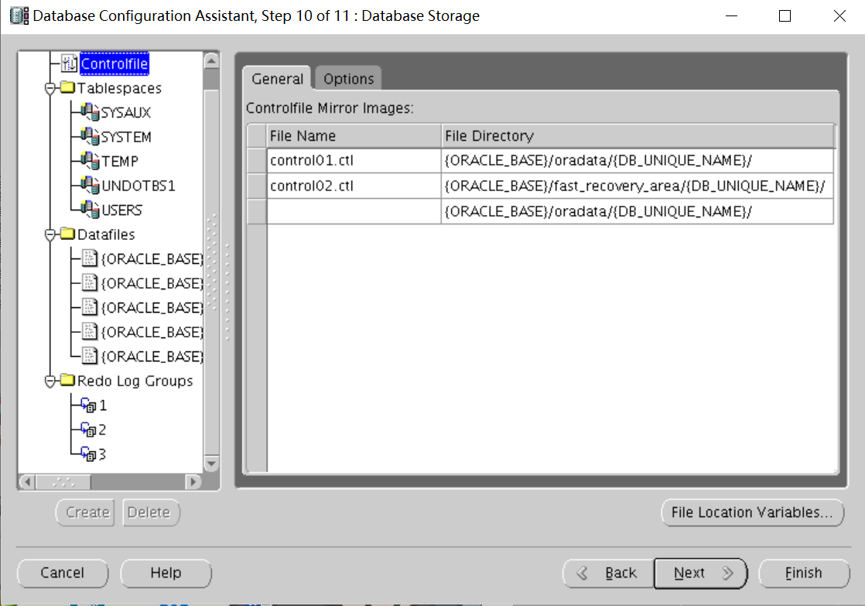
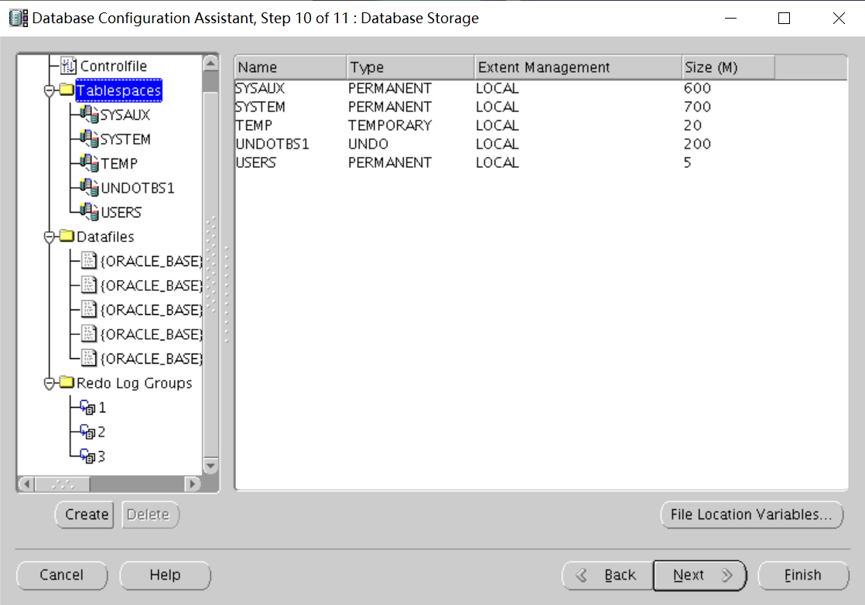
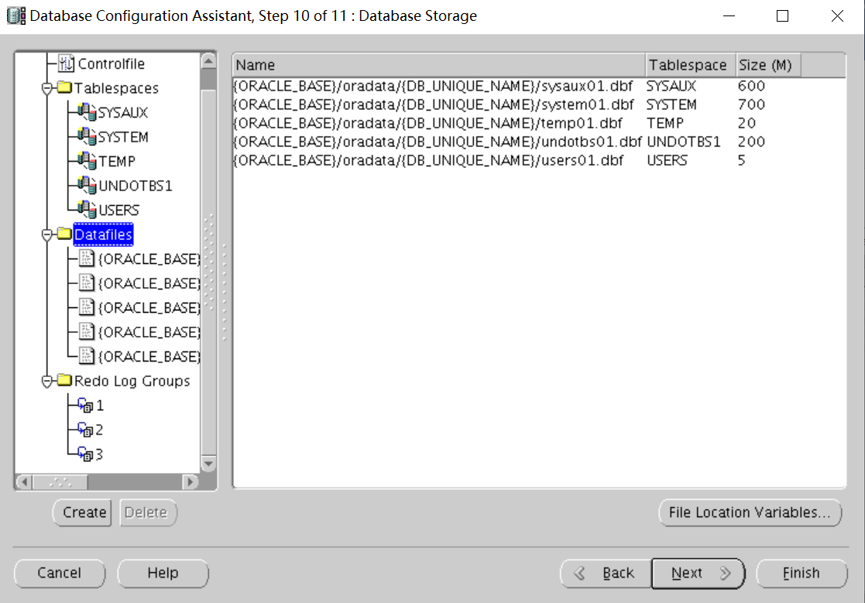
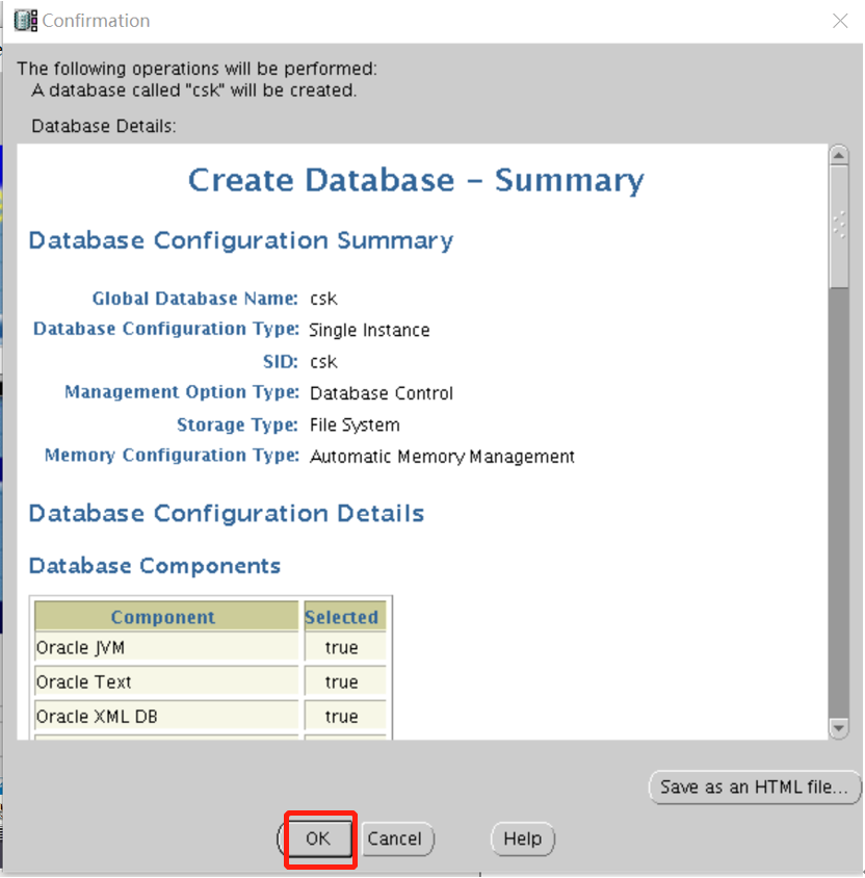
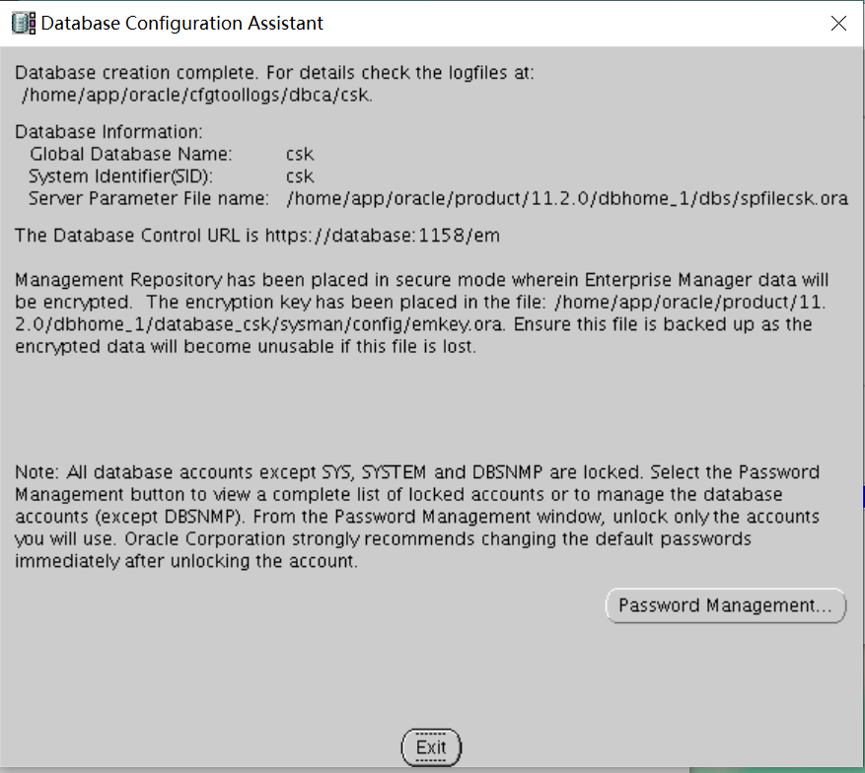
创建数据库
dbca
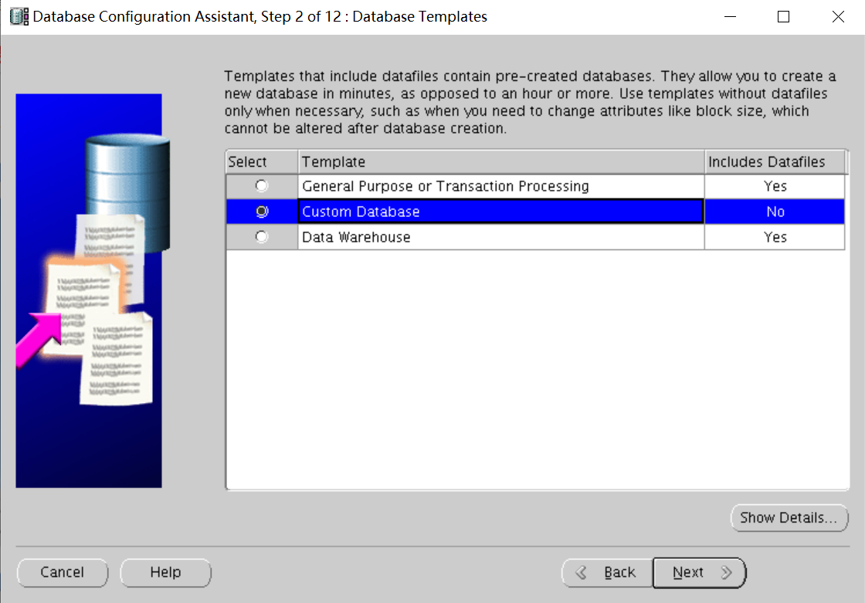
选择数据库模板
选择定制数据库

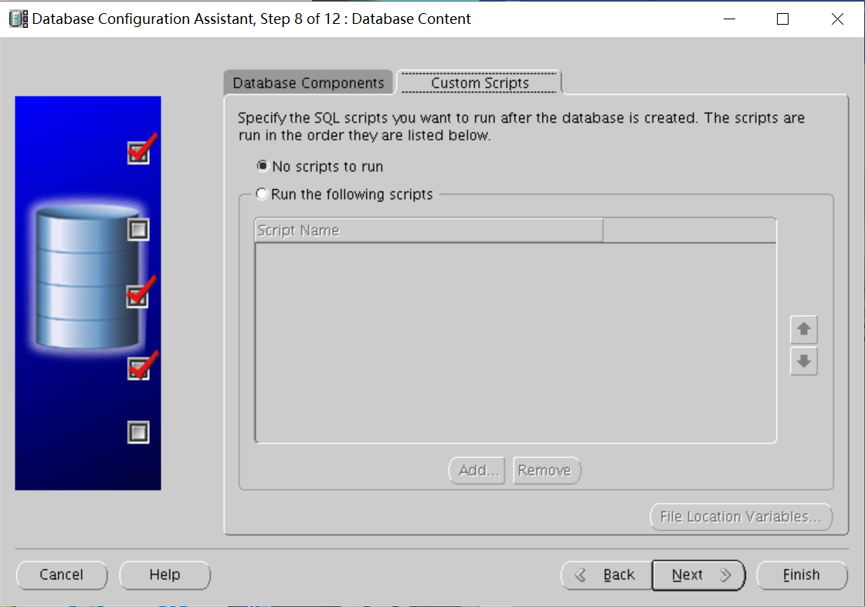
询问数据库创建后有没有SQL脚本运行,选择不运行。


原文链接: https://www.cnblogs.com/qgmzhn/p/12228328.html
欢迎关注
微信关注下方公众号,第一时间获取干货硬货;公众号内回复【pdf】免费获取数百本计算机经典书籍

原创文章受到原创版权保护。转载请注明出处:https://www.ccppcoding.com/archives/192199
非原创文章文中已经注明原地址,如有侵权,联系删除
关注公众号【高性能架构探索】,第一时间获取最新文章
转载文章受原作者版权保护。转载请注明原作者出处!