
Retinaface 是一个人脸检测器,人脸检测天生存在强先验知识,比如近场人脸识别,人脸较大,监控视角下人脸识别通常人脸较小,两者天生对输入的分辨率有个假设,如果人脸很大,不需要大的分辨率,提升速度。人脸小,希望提高 Recall 那么需要大的分辨率。Retinaface 在不同分辨率下怎么做这件事情。怎么通过 这个仓库的方案解决该问题。
https://github.com/biubug6/Pytorch_Retinaface
直接执行 convert_to_onnx.py
python convert_to_onnx.py
报错:找不到 './weights/mobilenetV1X0.25_pretrain.tar'
该权重是在 ImageNet 下预训练的模型,ImageNet 的预训练模型喜欢 tar 结尾。
解决:打开 data/config.py
# 修改为 False
'pretrain': False,
然后执行:
python convert_to_onnx.py
又报错:找不到 './weights/mobilenet0.25_Final.pth'
解决:去github 仓库下载该模型,建个weights 文件夹,放到里面。
然后执行:
python convert_to_onnx.py
成功!
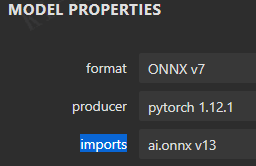
使用 Netron 观察 onnx 模型,
老版本与老版本区别:
1. 使用的上采样为 upsample, 并且又警告提示
2. 有很多的 shape 引用(主要是输出头那里),产生了 gather 等节点
3. 输出有三个,借鉴 yolov5 做法,三个拼接为一个,后处理代码会简化。
问题1解决方案:

观察到: 点击输出节点 output0 : opset =9(我的是 opset = 13)。opset=13会输出多个如下警告(opset_version = 11 可以解决该问题):
WARNING: The shape inference of prim::Constant type is missing, so it may result in wrong shape inference for the exported graph. Please consider adding it in symbolic function.
原则1:
使用 opset_version = 11 ,不要低于 11
问题1解决:一般我们需要 opset=11 或者更高版本。convert_to_onnx.py:
torch_out = torch.onnx._export(net, inputs, output_onnx, export_params=True, verbose=False,
                               input_names=input_names, output_names=output_names,
                               opset_version = 11 )
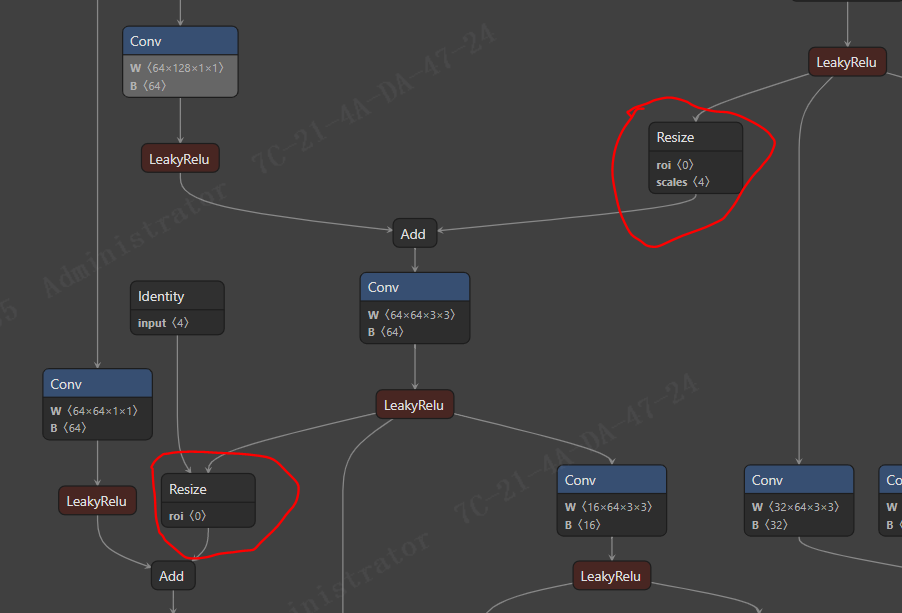
opset=11或更高 影响 upsample,会将其变为 resize。opset_version = 11解决了上面的警告。
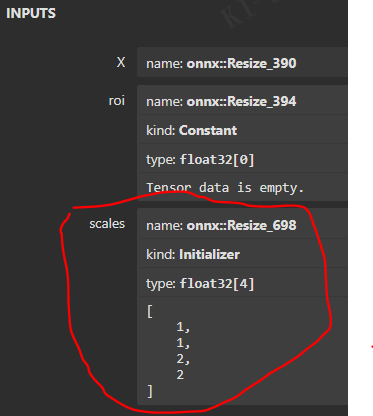
但是还是有 shape 引用。点击 resize 节点:

观察到 scales 是空的,使用的是 sizes。引用了上面 sizes 的大小,所以引用sizes 就需要引用上一级的 shape 来计算 sizes 得到结果。
原则2:
对于 nn.upsample 或 nn.functional.interpolate 函数,使用 scale_factor 指定倍率,而不是使用 size 参数指定大小。
解决:models/net.py:
# up3 = F.interpolate(output3, size=[output2.size(2), output2.size(3)], mode="nearest")
up3 = F.interpolate(output3, scale_factor=2, mode="nearest")

# up2 = F.interpolate(output2, size=[output1.size(2), output1.size(3)], mode="nearest")
up2 = F.interpolate(output2, scale_factor=2, mode="nearest")
再次导出。
然后观察到,与 yolov5 一样,使用 scales :1,1,2,2。shape 引用也被干掉。
节点如下:
问题2 解决方案
观察到:
原则3:
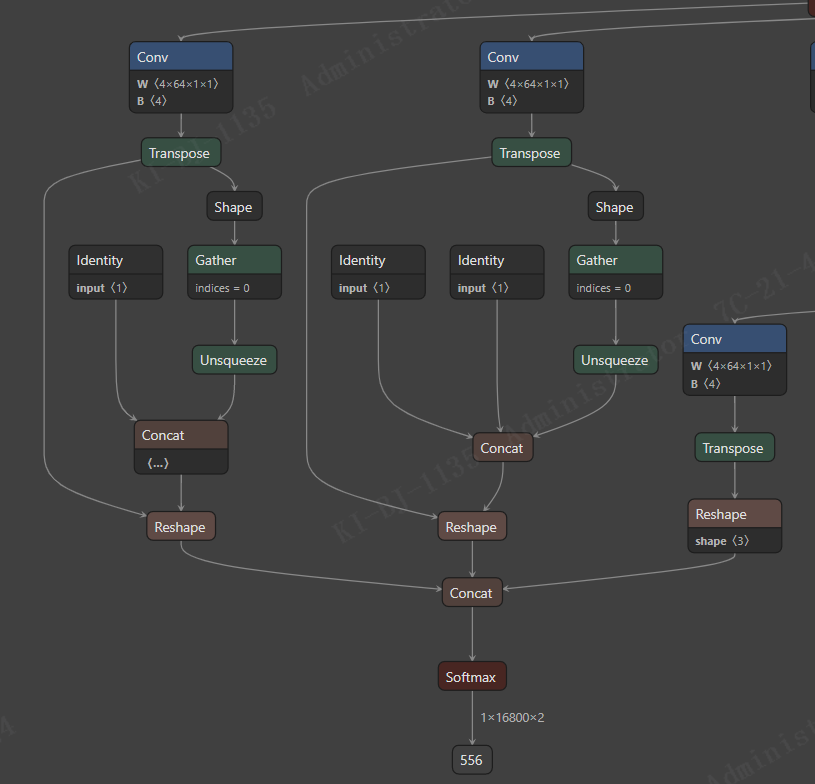
对于任何用到 shape、size返回值的参数时,例如: tensor.view(tensor.size(0), -1) 这类操作,避免直接使用 tensor.size 的返回值,而是加上 int 转换,tensor.view(int(tensor.size(0)), -1)
修改代码: models/retinaface.py 主要是修改三个 head, 如下:
	# return out.view(out.shape[0], -1, 2)
	return out.view(int(out.shape[0]), -1, 2)

	# return out.view(out.shape[0], -1, 4)
    return out.view(int(out.shape[0]), -1, 4)

	# return out.view(out.shape[0], -1, 10)
	return out.view(int(out.shape[0]), -1, 10)
结果:
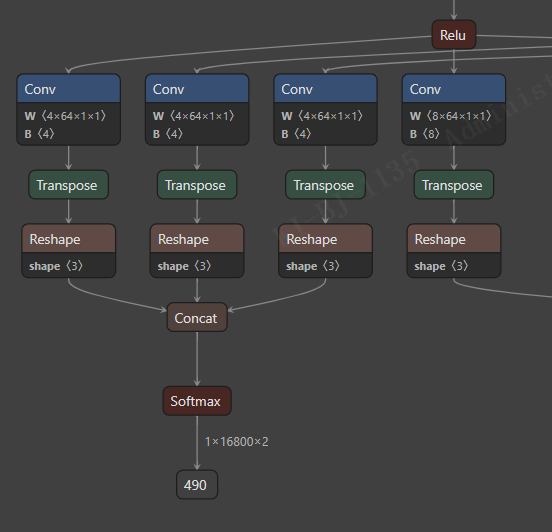
点击 reshape 节点,发现:
原则4:
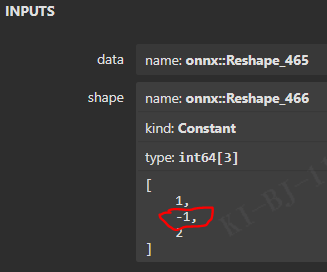
对于 reshape、view 操作时, -1 放到 batch 维度。其他维度可以计算得到。batch 维度禁止指定大于 -1 的明确数字。
	# [1, 40, 40, 4] -> [-1, ?, 2]
	# ? = 40 * 40 * 2 与 与 yolov5 中 3 * 80 * 80 是一样的,2 这里指的是 anchor 的数量为2。
	# print(f"**************{out.shape}")
	# return out.view(out.shape[0], -1, 2)
	# return out.view(int(out.shape[0]), -1, 2)
	return out.view(-1,  int(out.shape[1] * out.shape[2] * 2), 2)

	# return out.view(int(out.shape[0]), -1, 4)
	return out.view(-1,  int(out.shape[1] * out.shape[2] * 2), 4)

	# return out.view(int(out.shape[0]), -1, 10)
	return out.view(-1,  int(out.shape[1] * out.shape[2] * 2), 10)
点击 reshape,看到:

问题3 解决方案
定义顺序:xywh,negative, positive, landmark(10)
	if self.phase == 'train':
		output = (bbox_regressions, classifications, ldm_regressions)
	else:
		output = (bbox_regressions, F.softmax(classifications, dim=-1), ldm_regressions)
	return output
推理时候多加一个 F.softmax(classifications, dim=-1), 因为训练时候使用的是 layers/modules/multibox_loss.py:
loss_c = F.cross_entropy(conf_p, targets_weighted, reduction='sum') # F.Cross_entropy(input, target)函数中包含了softmax 和 log 的操作,即网络计算送入的input参数不需要进行这两个操作。
因此推理时候,需要额外加 F.softmax。一般我们原则是尽量把操作放到onnx 中,让onnx 来优化运算。但是,softmax 可以被优化,减少计算量,参考:https://blog.csdn.net/hymn1993/article/details/124093421
所以,我们去掉 softmax,选择在 C++ 代码中进行优化加快推理速度。
models/retinaface.py:
	return torch.cat((bbox_regressions, classifications, ldm_regressions), dim = -1)
	# if self.phase == 'train':
	#     output = (bbox_regressions, classifications, ldm_regressions)
	# else:
	#     output = (bbox_regressions, F.softmax(classifications, dim=-1), ldm_regressions)
	# return output
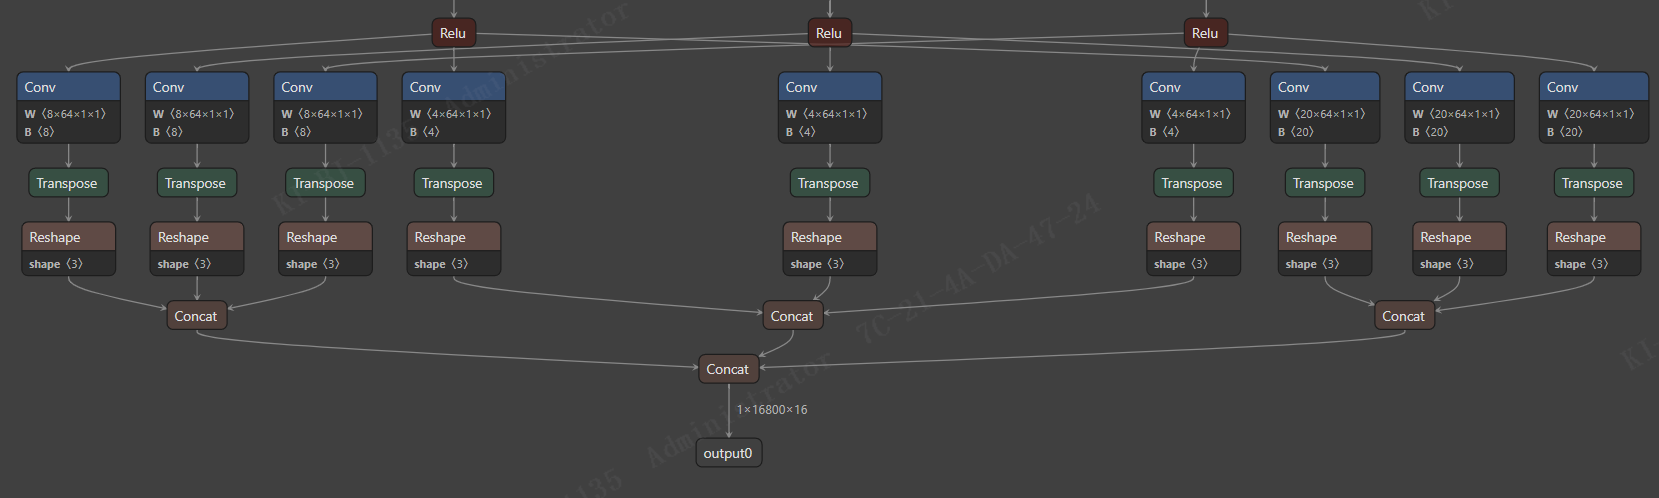
自此, Retinaface 的模型导出就全部完成了。至于 C++ 推理部分和如何设置动态宽高推理,有时间我会更新。
完整代码已经上传github: https://github.com/deepConnectionism/Retinaface
原文链接: https://www.cnblogs.com/odesey/p/16657935.html
欢迎关注
微信关注下方公众号,第一时间获取干货硬货;公众号内回复【pdf】免费获取数百本计算机经典书籍

原创文章受到原创版权保护。转载请注明出处:https://www.ccppcoding.com/archives/190837
非原创文章文中已经注明原地址,如有侵权,联系删除
关注公众号【高性能架构探索】,第一时间获取最新文章
转载文章受原作者版权保护。转载请注明原作者出处!