
原文链接:C++ 智能指针
一、使用智能指针原因
智能指针就是帮C++程序员管理动态分配的内存的,它会帮助我们自动释放new出来的内存,从而避免内存泄漏!
如下例子就是内存泄露的例子:
#include <iostream>
#include <string>
#include <memory>

using namespace std;


// 动态分配内存,没有释放就return
void memoryLeak1() {
    string *str = new string("动态分配内存!");
    return;
}

// 动态分配内存,虽然有些释放内存的代码,但是被半路截胡return了
int memoryLeak2() {
    string *str = new string("内存泄露!");

    // ...此处省略一万行代码

    // 发生某些异常,需要结束函数
    if (1) {
        return -1;
    }
    /
    // 另外,使用try、catch结束函数,也会造成内存泄漏!
    /

    delete str;    // 虽然写了释放内存的代码,但是遭到函数中段返回,使得指针没有得到释放
    return 1;
}


int main(void) {

    memoryLeak1();

    memoryLeak2();

    return 0;
}
memoryLeak1函数中,new了一个字符串指针,但是没有delete就已经return结束函数了,导致内存没有被释放,内存泄露!
memoryLeak2函数中,new了一个字符串指针,虽然在函数末尾有些释放内存的代码delete str,但是在delete之前就已经return了,所以内存也没有被释放,内存泄露!
使用指针,我们没有释放,就会造成内存泄露。但是我们使用普通对象却不会!
思考:如果我们分配的动态内存都交由有生命周期的对象来处理,那么在对象过期时,让它的析构函数删除指向的内存,这看似是一个 very nice 的方案?
智能指针就是通过这个原理来解决指针自动释放的问题!
- C++98 提供了 auto_ptr 模板的解决方案
- C++11 增加unique_ptr、shared_ptr 和weak_ptr
二、auto_ptr(废弃)
auto_ptr 是c++ 98定义的智能指针模板,其定义了管理指针的对象,可以将new 获得(直接或间接)的地址赋给这种对象。当对象过期时,其析构函数将使用delete 来释放内存!
(一)用法
头文件: #include < memory >
用 法: auto_ptr<类型> 变量名(new 类型)
例如:
auto_ptr<string>  str(new string(“我要成为大牛~ 变得很牛逼!”));
auto_ptr<vector<int>>  av(new vector< int >());
auto_ptr<int>  array(new int[10]);
(二)例子
我们先定义一个类,类的构造函数和析构函数都输出一个字符串用作提示!
定义一个私有成员变量,赋值20.
再定义一个私有成员方法用于返回这个私有成员变量。
class Test {
public:
    Test() { cout << "Test的构造函数..." << endl; }
    ~Test() { cout << "Test的析构函数..." << endl; }

    int getDebug() { return this->debug; }

private:
    int debug = 20;
};
当我们直接new这个类的对象,却没有释放时:
int main(void) {
    Test *test = new Test;

    return 0;
}
输出:
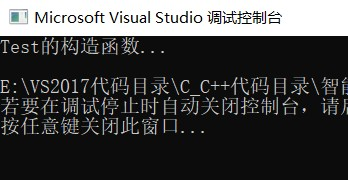

可以看到,只是打印了构造函数这个字符串,而析构函数的字符却没有被打印,说明并没有调用析构函数!这就导致了内存泄露!
解决内存泄露的办法,要么手动delete,要么使用智能指针!
使用智能指针:
// 定义智能指针
auto_ptr<Test> test(new Test);
智能指针可以像普通指针那样使用:
cout << "test->debug:" << test->getDebug() << endl;
cout << "(*test).debug:" << (*test).getDebug() << endl;
这时再试试:
int main(void) {

    //Test *test = new Test;
    auto_ptr<Test> test(new Test);

    cout << "test->debug:" << test->getDebug() << endl;
    cout << "(*test).debug:" << (*test).getDebug() << endl;

    return 0;
}
使用智能指针后,输出为:
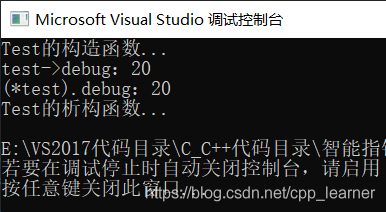
自动调用了析构函数。
(三)为什么智能指针可以像普通指针那样使用
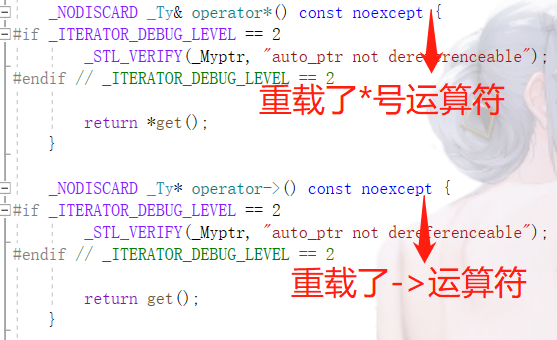
因为其里面重载了 * 和 -> 运算符, * 返回普通对象,而 -> 返回指针对象。
(具体原因不用深究,只需知道他为什么可以这样操作就行!)
函数中返回的是调用get()方法返回的值
(四)智能指针的三个常用函数
1.get() 获取智能指针托管的指针地址
// 定义智能指针
auto_ptr<Test> test(new Test);

Test *tmp = test.get();        // 获取指针返回
cout << "tmp->debug:" << tmp->getDebug() << endl;
但我们一般不会这样使用,因为都可以直接使用智能指针去操作,除非有一些特殊情况。
get()函数原型:
_NODISCARD _Ty * get() const noexcept
{    // return wrapped pointer
    return (_Myptr);
}
2.release() 取消智能指针对动态内存的托管
// 定义智能指针
auto_ptr<Test> test(new Test);

Test *tmp2 = test.release();    // 取消智能指针对动态内存的托管
delete tmp2;    // 之前分配的内存需要自己手动释放
也就是智能指针不再对该指针进行管理,改由管理员进行管理!
release()函数原型:
_Ty * release() noexcept
{    // return wrapped pointer and give up ownership
    _Ty * _Tmp = _Myptr;
    _Myptr = nullptr;
    return (_Tmp);
}
3.reset() 重置智能指针托管的内存地址,如果地址不一致,原来的会被析构掉
// 定义智能指针
auto_ptr<Test> test(new Test);

test.reset();            // 释放掉智能指针托管的指针内存,并将其置NULL

test.reset(new Test());    // 释放掉智能指针托管的指针内存,并将参数指针取代之
reset函数会将参数的指针(不指定则为NULL),与托管的指针比较。如果地址不一致,那么就会析构掉原来托管的指针,然后使用参数的指针替代之,然后智能指针就会托管参数的那个指针了。
reset()函数原型:
void reset(_Ty * _Ptr = nullptr)
{    // destroy designated object and store new pointer
    if (_Ptr != _Myptr)
        delete _Myptr;
    _Myptr = _Ptr;
}
(五)使用建议
1.尽可能不要将auto_ptr 变量定义为全局变量或指针;
// 没有意义,全局变量也是一样
auto_ptr<Test> *tp = new auto_ptr<Test>(new Test);
当设定为全局变量的时候,比如全局定义这样的一个对象:auto_ptr t(new Test()),那t这个对象只有在程序执行结束的时候才会被释放,就达不到我们使用它的目的和初衷。使用智能指针就没有意义了
2.除非自己知道后果,不要把auto_ptr 智能指针赋值给同类型的另外一个 智能指针;
auto_ptr<Test> t1(new Test);
auto_ptr<Test> t2(new Test);
t1 = t2;    // 不要这样操作...

可以发现cout<<ap2->m_data<<endl;未输出
当一个auto_ptr的智能指针对象拷贝其他指针的值后, 之前的的auto_ptr就失效了。这里的拷贝指的是拷贝构造和对象之间的赋值(即赋值运算符重载) 。auto_ptr为什么要这样做呢? 事出反常必有妖, 原因就是堆区内存不能重复释放, 但当多个auto_ptr智能指针都指向同一片堆区内存时, 每一个auto_ptr智能指针最终都会释放, 这就会导致重复释放的问题。所以为了避免这种bug产生, auto_ptr索性采取一种托管的思想, 指针只有一份, 给你我就没有了, 即在拷贝之后, 直接让旧的失效。这样就避免的重复释放的问题. 但也导致了之前的智能指针不能用
3.C++11 后auto_ptr 已经被“抛弃”,已使用unique_ptr替代!C++11后不建议使用auto_ptr。
4.auto_ptr 被C++11抛弃的主要原因
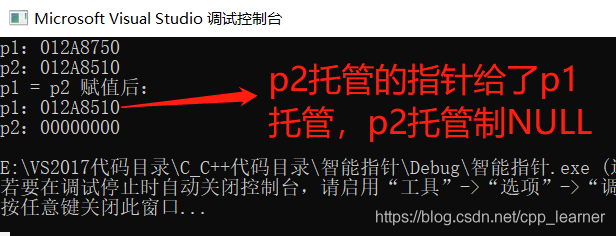
(1) 复制或者赋值都会改变资源的所有权
// auto_ptr 被C++11抛弃的主要原因
auto_ptr<string> p1(new string("I'm Li Ming!"));
auto_ptr<string> p2(new string("I'm age 22."));

cout << "p1:" << p1.get() << endl;
cout << "p2:" << p2.get() << endl;

// p2赋值给p1后,首先p1会先将自己原先托管的指针释放掉,然后接收托管p2所托管的指针,
// 然后p2所托管的指针制NULL,也就是p1托管了p2托管的指针,而p2放弃了托管。
p1 = p2;
cout << "p1 = p2 赋值后:" << endl;
cout << "p1:" << p1.get() << endl;
cout << "p2:" << p2.get() << endl;
(2)在STL容器中使用auto_ptr存在着重大风险,因为容器内的元素必须支持可复制和可赋值
vector<auto_ptr<string>> vec;
auto_ptr<string> p3(new string("I'm P3"));
auto_ptr<string> p4(new string("I'm P4"));

// 必须使用std::move修饰成右值,才可以进行插入容器中
vec.push_back(std::move(p3));
vec.push_back(std::move(p4));

cout << "vec.at(0):" <<  *vec.at(0) << endl;
cout << "vec[1]:" <<  *vec[1] << endl;


// 风险来了:
vec[0] = vec[1];    // 如果进行赋值,问题又回到了上面一个问题中。
cout << "vec.at(0):" << *vec.at(0) << endl;
cout << "vec[1]:" << *vec[1] << endl;
访问越界了!

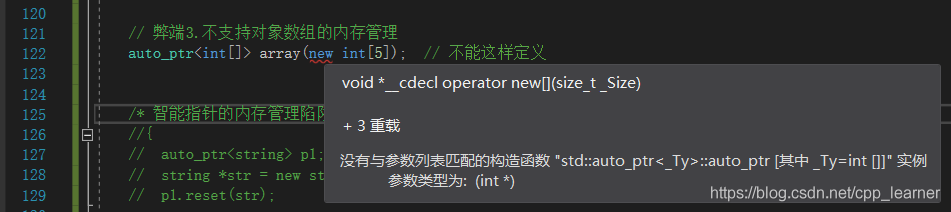
(3)不支持对象数组的内存管理
auto_ptr<int[]> array(new int[5]); // 不能这样定义
所以,C++11用更严谨的unique_ptr 取代了auto_ptr!
(六)总结
测试代码:
#include <iostream>
#include <string>
#include <memory>
#include <vector>

using namespace std;

class Test {
public:
    Test() { cout << "Test的构造函数..." << endl; }
    ~Test() { cout << "Test的析构函数..." << endl; }

    int getDebug() { return this->debug; }

private:
    int debug = 20;
};

// 不要定义为全局变量,没有意义
//auto_ptr<Test> test(new Test);

void memoryLeak1() {
    //Test *test = new Test;

    // 定义智能指针
    auto_ptr<Test> test(new Test);

    cout << "test->debug:" << test->getDebug() << endl;
    cout << "(*test).debug:" << (*test).getDebug() << endl;


    // get方法
    Test *tmp = test.get();        // 获取指针返回
    cout << "tmp->debug:" << tmp->getDebug() << endl;


    // release方法
    Test *tmp2 = test.release();    // 取消智能指针对动态内存的托管
    delete tmp2;    // 之前分配的内存需要自己手动释放


    // reset方法:重置智能指针托管的内存地址,如果地址不一致,原来的会被析构掉
    test.reset();            // 释放掉智能指针托管的指针内存,并将其置NULL
    test.reset(new Test());    // 释放掉智能指针托管的指针内存,并将参数指针取代之


    // 忠告:不要将智能指针定义为指针
    //auto_ptr<Test> *tp = new auto_ptr<Test>(new Test);

    // 忠告:不要定义指向智能指针对象的指针变量
    //auto_ptr<Test> t1(new Test);
    //auto_ptr<Test> t2(new Test);
    //t1 = t2;

    return;
}

int memoryLeak2() {
    //Test *test = new Test();

    // 定义智能指针
    auto_ptr<Test> test(new Test);

    // ...此处省略一万行代码

    // 发生某些异常,需要结束函数
    if (1) {
        return -1;
    }

    //delete test;
    return 1;
}


int main1(void) {

    //memoryLeak1();

    //memoryLeak2();

    //Test *test = new Test;
    //auto_ptr<Test> test(new Test);

    //cout << "test->debug:" << test->getDebug() << endl;
    //cout << "(*test).debug:" << (*test).getDebug() << endl;


     auto_ptr 被C++11抛弃的主要原因
    //auto_ptr<string> p1(new string("I'm Li Ming!"));
    //auto_ptr<string> p2(new string("I'm age 22."));
    //
    //cout << "p1:" << p1.get() << endl;
    //cout << "p2:" << p2.get() << endl;

    //p1 = p2;
    //cout << "p1 = p2 赋值后:" << endl;
    //cout << "p1:" << p1.get() << endl;
    //cout << "p2:" << p2.get() << endl;


    // 弊端2.在STL容器中使用auto_ptr存在着重大风险,因为容器内的元素必须支持可复制
    vector<auto_ptr<string>> vec;
    auto_ptr<string> p3(new string("I'm P3"));
    auto_ptr<string> p4(new string("I'm P4"));

    vec.push_back(std::move(p3));
    vec.push_back(std::move(p4));

    cout << "vec.at(0):" <<  *vec.at(0) << endl;
    cout << "vec[1]:" <<  *vec[1] << endl;


    // 风险来了:
    vec[0] = vec[1];
    cout << "vec.at(0):" << *vec.at(0) << endl;
    cout << "vec[1]:" << *vec[1] << endl;


    // 弊端3.不支持对象数组的内存管理
    //auto_ptr<int[]> array(new int[5]);    // 不能这样定义
    return 0;
}
三、unique_ptr
原文链接: https://www.cnblogs.com/imreW/p/17138730.html
欢迎关注
微信关注下方公众号,第一时间获取干货硬货;公众号内回复【pdf】免费获取数百本计算机经典书籍

原创文章受到原创版权保护。转载请注明出处:https://www.ccppcoding.com/archives/319299
非原创文章文中已经注明原地址,如有侵权,联系删除
关注公众号【高性能架构探索】,第一时间获取最新文章
转载文章受原作者版权保护。转载请注明原作者出处!