
一、适用情况
在C++里将数据生成,然后将这个数据设置为qml的上下文属性,在qml里就能使用了
二、传递基础类型
1、main.cpp
QQuickWidget *m_widget = new QQuickWidget(this);
m_widget->setGeometry(0, 0, this->width(), this->height());
//关键代码
QString str = "zhuxy";
m_widget->rootContext()->setContextProperty("Zhuxy",str);
m_widget->setSource(QUrl("./main.qml"));
m_widget->show();
2、main.qml
import QtQuick 2.0
Rectangle
{
    id: mainWindow
    x: 30; y: 80; width: 1000; height: 800;
    Component.onCompleted: {
        console.log(Zhuxy);
    }
}
这里直接能用Zhuxy这个上下文属性
三、ListView+QStringList作为model
1、main.cpp
QStringList list;
list << "1" << "2";
m_widget->rootContext()->setContextProperty("Zhuxy",QVariant::fromValue(list));//不能是Test??
m_widget->setSource(QUrl("./test.qml"));
m_widget->show();
2、test.qml
import QtQuick 2.0ListView {
  width: 100; height: 100

  model: myModel
  delegate: Rectangle {
      height: 25
      width: 100
      Text { text: modelData }
  }
}
注意:经过测试这个上下文属性不能取名为Test(可能已经是内置上下文属性)
四、ListView+qml可访问的C++类
1、
mydata.h
#ifndef MYDATA_H
#define MYDATA_H

#include <QObject>

class Mydata : public QObject
{
    Q_OBJECT
    Q_PROPERTY(QString value READ value WRITE setValue NOTIFY valueChanged)
    Q_PROPERTY(QString name READ name WRITE setName NOTIFY nameChanged)
  public:
    Mydata(QObject *parent = nullptr);
    Mydata(const QString &value, const QString &name, QObject *parent = nullptr);
    QString value()const;
    void setValue(const QString &value);
    QString name()const;
    void setName(const QString& name);
  signals:
    void valueChanged();
    void nameChanged();
  private:
    QString m_value;
    QString m_name;
};

#endif // MYDATA_H
value和name就是qml可访问的值
mydata.cpp
#include "mydata.h"

Mydata::Mydata(QObject *parent) : QObject(parent)
{

}

Mydata::Mydata(const QString &value, const QString &name, QObject *parent)
    : QObject(parent),m_value(value),m_name(name)
{

}

QString Mydata::value() const
{
    return m_value;
}

void Mydata::setValue(const QString &value)
{
    if(this->m_value != value) {
        this->m_value = value;
        emit valueChanged();
    }

}

QString Mydata::name() const
{
    return m_name;
}

void Mydata::setName(const QString &name)
{
    if(this->m_name != name) {
        this->m_name = name;
        emit nameChanged();
    }
}
2、test.qml
import QtQuick 2.0

Rectangle
{
    id: mainWindow
    x: 30; y: 80; width: 1000; height: 800;
    ListView {
        anchors.fill: parent;
        model: ParaListModel;
        delegate: delegate_list
        spacing: 20;
        orientation: ListView.Horizontal

        //委托
        Component {
            id: delegate_list;
            Rectangle {
                id: rect;
                width: 80;
                height: width;
                color: "green";
                Text {
                    id: text1;
                    text: value;
                    horizontalAlignment: Text.AlignHCenter;
                    verticalAlignment: Text.AlignVCenter;
                    font.pixelSize: 16;
                    anchors.horizontalCenter: parent.horizontalCenter;
                    anchors.top: parent.top;
                    anchors.topMargin: 10;
                    color: "white";
                }
                Text {
                    id: text2;
                    text: name;
                    horizontalAlignment: Text.AlignHCenter;
                    verticalAlignment: Text.AlignVCenter;
                    font.pixelSize: 16;
                    anchors.horizontalCenter: parent.horizontalCenter;
                    anchors.bottom: parent.bottom;
                    anchors.bottomMargin: 10;
                    color: "white";
                }
            }
        }
    }

}
3、main.cpp
QList<QObject*> datalist;
datalist.append(new Mydata("item1", "red"));
datalist.append(new Mydata("item2", "green"));
datalist.append(new Mydata("item3", "blue"));
datalist.append(new Mydata("item4", "yellow"));
m_widget->rootContext()->setContextProperty("ParaListModel",QVariant::fromValue(datalist));
注意必须是QObject指针类型才能放进list等容器里,因为QObject的赋值构造函数是delete的
五、ListView+QAbstractListModel子类
注意当list的个数增加或减少是不支持更新的。
1、C++模型类ParaListModel.h
#ifndef PARALISTMODEL_H
#define PARALISTMODEL_H
#include <QAbstractListModel>
struct ParaModel
{
ParaModel()
{
value = "";
nodeName = "";
nodeType = "";
tableName = "";
fieldName = "";
module = "";
location = "";
rectRadius = -1;
}
//核心属性
QString value;
QString nodeName;
QString nodeType;
QString tableName;
QString fieldName;
//附加属性
QString module;
QString location;
int rectRadius;
};
class ParaListModel : public QAbstractListModel
{
Q_OBJECT
public:
ParaListModel(QObject* parent = 0);
enum Roles//qml用来识别别名的规则
{
valueRole = Qt::UserRole + 1,
nodeNameRole,
nodeTypeRole,
tableNameRole,
fieldNameRole,
moduleRole,
locationRole,
rectRadiusRole
};
void addModel(const ParaModel &deviceList);//C++设置值
void update(int index, const ParaModel ¶Model);//C++更新
int rowCount(const QModelIndex &parent = QModelIndex()) const;//qml内部调用,不用多管直接重写即可
QVariant data(const QModelIndex &index, int role = Qt::DisplayRole) const;//qml内部调用,不用多管直接重写即可
protected:
QHash<int, QByteArray> roleNames() const;//qml内部调用,不用多管直接重写即可
private:
QList<ParaModel> m_data;
};
#endif // PARALISTMODEL_H
C++模型类ParaListModel.cpp
#include "paralistmodel.h"
ParaListModel::ParaListModel(QObject *parent)
: QAbstractListModel(parent)
{
}
void ParaListModel::addModel(const ParaModel ¶Model)
{
beginInsertRows(QModelIndex(), rowCount(), rowCount());
m_data << paraModel;
endInsertRows();
}
int ParaListModel::rowCount(const QModelIndex &parent) const
{
Q_UNUSED(parent);
return m_data.count();
}
QVariant ParaListModel::data(const QModelIndex &index, int role) const
{
if (index.row() < 0 || index.row() >= m_data.count())
return QVariant();
const ParaModel ¶Model = m_data[index.row()];
switch (role)
{
case valueRole:
return paraModel.value;
break;
case nodeNameRole:
return paraModel.nodeName;
break;
case nodeTypeRole:
return paraModel.nodeType;
break;
case tableNameRole:
return paraModel.tableName;
break;
case fieldNameRole:
return paraModel.fieldName;
break;
case moduleRole:
return paraModel.module;
break;
case locationRole:
return paraModel.location;
break;
case rectRadiusRole:
return paraModel.rectRadius;
break;
default:
break;
}
return QVariant();
}
void ParaListModel::update(int index, const ParaModel ¶Model)
{
if (index < 0 || index >= m_data.count())
return;
ParaModel &srcModel = m_data[index];
if(paraModel.value != "")
{
srcModel.value = paraModel.value;
}
if(paraModel.nodeName != "")
{
srcModel.nodeName = paraModel.nodeName;
}
if(paraModel.nodeType != "")
{
srcModel.nodeType = paraModel.nodeType;
}
if(paraModel.tableName != "")
{
srcModel.tableName = paraModel.tableName;
}
if(paraModel.fieldName != "")
{
srcModel.fieldName = paraModel.fieldName;
}
if(paraModel.module != "")
{
srcModel.module = paraModel.module;
}
if(paraModel.location != "")
{
srcModel.location = paraModel.location;
}
if(paraModel.rectRadius != -1)
{
srcModel.rectRadius = paraModel.rectRadius;
}
}
//qml通过这里的QByteArray来访问数据
QHash<int, QByteArray> ParaListModel::roleNames() const
{
QHash<int, QByteArray> roles;
roles[valueRole] = "value";
roles[nodeNameRole] = "nodeName";
roles[nodeTypeRole] = "nodeType";
roles[tableNameRole] = "tableName";
roles[fieldNameRole] = "fieldName";
roles[moduleRole] = "module";
roles[locationRole] = "location";
roles[rectRadiusRole] = "rectRadius";
return roles;
}
qml通过3个重写的函数来获取每个model的值:
首先通过rouCount获取model个数;
再通过roleNames获取每个变量名和其role的值;
最后根据role的值访问data函数,获取到真实值
2、test.qml
import QtQuick 2.0

Rectangle {
    width: 800;
    height: 300;
    color: "#222648";//背景色
    property int rect_width: 80;//参数宽度
    property color text_color: "white";//字体颜色
    ListView {
        width: parent.width;
        height: rect_width;
        anchors.centerIn: parent;
        model: ParaListModel;
        delegate: delegate_list
        spacing: 20;
        orientation: ListView.Horizontal
    }
    //委托
    Component {
        id: delegate_list;
        Rectangle {
            id: rect;
            width: rect_width;
            height: width;
            radius: rectRadius;
            color: bkColor;
            property string q_tableName: tableName;//其他不用显示的属性
            property string q_fieldName: fieldName;
            Text {
                id: text1;
                text: value;
                horizontalAlignment: Text.AlignHCenter;
                verticalAlignment: Text.AlignVCenter;
                font.pixelSize: 16;
                anchors.horizontalCenter: parent.horizontalCenter;
                anchors.top: parent.top;
                anchors.topMargin: 10;
                color: text_color;
            }
            Text {
                id: text2;
                text: nodeName;
                horizontalAlignment: Text.AlignHCenter;
                verticalAlignment: Text.AlignVCenter;
                font.pixelSize: 16;
                anchors.horizontalCenter: parent.horizontalCenter;
                anchors.bottom: parent.bottom;
                anchors.bottomMargin: 10;
                color: text_color;
            }
            MouseArea {
                anchors.fill: parent;
                hoverEnabled: true;
                cursorShape: (containsMouse? (pressed? Qt.ClosedHandCursor: Qt.OpenHandCursor): Qt.ArrowCursor);//设置鼠标样式
                onDoubleClicked: {
                    console.log(q_tableName,q_fieldName);
                }
            }
        }
    }

}
3、main.cpp
m_widget = new QQuickWidget(this);
m_widget->setGeometry(0, 0, this->width(), this->height());
//关键代码
ParaListModel modelList;
for(int i=0;i<5;i++)
{
ParaModel model;
model.value = "value:"+QString::number(i);
model.nodeName = "nodeName:"+QString::number(i);
model.nodeType = "nodeType:"+QString::number(i);
model.tableName = "tableName:"+QString::number(i);
model.fieldName = "fieldName:"+QString::number(i);
model.rectRadius = 40;
modelList.addModel(model);
}
m_widget->rootContext()->setContextProperty("ParaListModel",&modelList);
//测试实时更新qml中的值
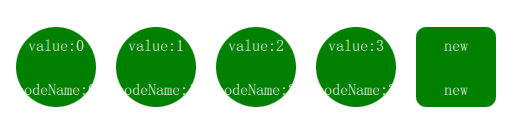
ParaModel model;
model.value = "new";
model.nodeName = "new";
model.rectRadius = 10;
modelList.update(4,model);

六、C++修改值QML自动更新
1、数据类
data.h
#ifndef DATA_H
#define DATA_H

#include <QObject>

class Data : public QObject
{
    Q_OBJECT
    Q_PROPERTY(QString count READ count WRITE setCount NOTIFY countChanged)
public:
    Data(QObject *parent = nullptr);
    Data(const QString& count,QObject* parent = nullptr);

    QString count() const;
    void setCount(const QString& count);


signals:
    void countChanged();

public slots:


private:
    QString m_count = "0";
};

#endif // DATA_H
data.cpp
#include "data.h"

Data::Data(QObject *parent) : QObject(parent)
{

}

Data::Data(const QString &count, QObject *parent)
    : m_count(count), QObject(parent)
{

}

QString Data::count() const
{
    return m_count;
}

void Data::setCount(const QString &count)
{
    if(m_count != count)
    {
        m_count = count;
        emit countChanged();
    }
}
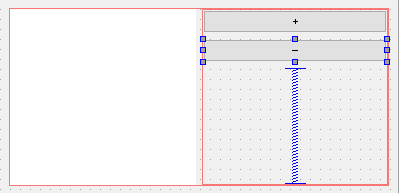
2、在mainwindow里拖一个quickwidget,然后装载qml文件,
核心代码
mainwindow.h
#ifndef MAINWINDOW_H
#define MAINWINDOW_H

#include <QMainWindow>
#include "data.h"
namespace Ui {
class MainWindow;
}

class MainWindow : public QMainWindow
{
    Q_OBJECT

public:
    explicit MainWindow(QWidget *parent = 0);
    ~MainWindow();

private slots:
    void on_pushButton_clicked();

    void on_pushButton_2_clicked();

private:
    Ui::MainWindow *ui;
    Data data;
    volatile int __count = 0;
};

#endif // MAINWINDOW_H
mainwindow.cpp
#include "mainwindow.h"
#include "ui_mainwindow.h"
#include <QQuickWidget>
#include <QQmlContext>

MainWindow::MainWindow(QWidget *parent) :
    QMainWindow(parent),
    ui(new Ui::MainWindow)
{
    ui->setupUi(this);
    QUrl source("qrc:/qml/qml/Test.qml");
    ui->quickWidget->setResizeMode(QQuickWidget::SizeRootObjectToView );
    ui->quickWidget->setSource(source);
    ui->quickWidget->setClearColor(QColor(Qt::transparent));


    data.setCount("0");
    ui->quickWidget->rootContext()->setContextProperty("Data",&data);

}

MainWindow::~MainWindow()
{
    delete ui;
}

void MainWindow::on_pushButton_clicked()
{
    __count++;
    data.setCount(QString::number(__count));
}

void MainWindow::on_pushButton_2_clicked()
{
     __count--;
     data.setCount(QString::number(__count));
}
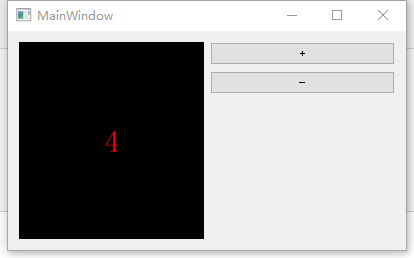
界面:
3、qml
import QtQuick 2.7

Item {
    Text {
        id: txt;
        color: "red";
        text: Data.count;
        anchors.centerIn: parent;
        font.pixelSize: 30;
    }
}
作用就是在qml显示一个数字,点击+就加1,点击-就减1
效果:
ps:
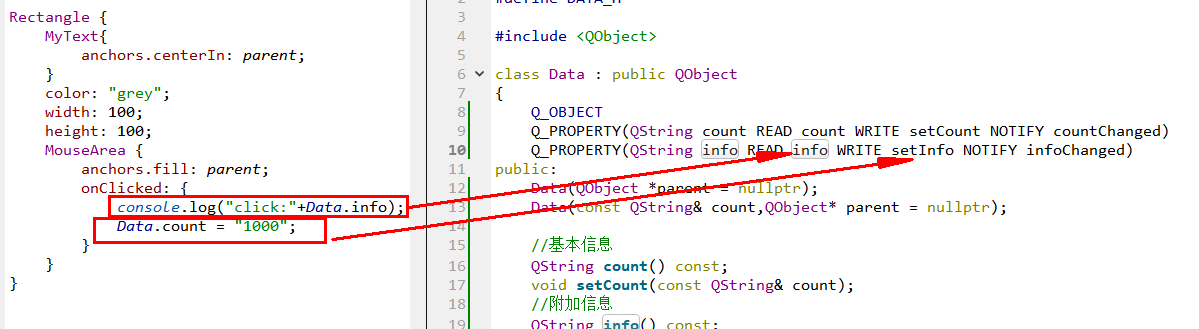
1、程序运行会打印xx没有被定义,这是正常的现象,这个Data就是setContextProperty的参数

2、注意如果想要实现动态绑定,就必须要继承QObject,并且让属性被Q_PROPERTY标记【实现其读写、变化函数】,
所以定义一个int、QString等类型,qml是无法与其进行动态绑定的,因为int和QString都没有实现这个操作。
3、在qml里获取C++的变量,就会对应调用C++的获取xxx函数;在qml里设置这个变量,就会对应调用C++里的setXXX函数
原文链接: https://www.cnblogs.com/judes/p/13460913.html
欢迎关注
微信关注下方公众号,第一时间获取干货硬货;公众号内回复【pdf】免费获取数百本计算机经典书籍
原创文章受到原创版权保护。转载请注明出处:https://www.ccppcoding.com/archives/201236
非原创文章文中已经注明原地址,如有侵权,联系删除
关注公众号【高性能架构探索】,第一时间获取最新文章
转载文章受原作者版权保护。转载请注明原作者出处!